Tip #272: Trim Faster with Dynamic Trim
… for Adobe Premiere Pro CC
Tip #272: Trim Faster with Dynamic Trim
Larry Jordan – LarryJordan.com
Quickly trim using the mouse or keyboad.
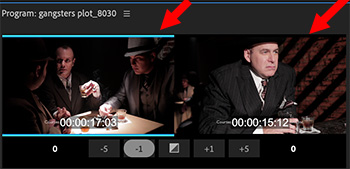

Hidden within the Premiere timeline is a powerful trimming tool: Dynamic Trim. This feature shows the last frame of the outgoing clip and the first frame of the incoming clip, allowing you to easily trim between them.
Here’s how it works.
- Double-click an edit point to display the Dynamic Trim window.
- Click the left image in the Trim window to ripple trim the outgoing clip. (The blue bars highlight the left side.)
- Click the right image in the Trim window to ripple trim the incoming image. (The blue bars highlight the right side.)
- Click the boundary between the two images in the Trim window to select both sides of the selected edit point. (The blue bars highlight both sides.)
- Once you select which side, or sides, of the edit point you want to trim, either click the timecode numbers at the bottom or drag the image left and right.
Here’s the really cool part. Type J to move backward or L to move forward. Whenever you type K, the edit point is trimmed in real time to the position of the playhead. Press the spacebar to preview the edit point in real-time.
Close this window by clicking anywhere in the Timeline.
EXTRA CREDIT
Click the square in the center between the two sets of timecode numbers to apply the default video transition.
Leave a Reply
Want to join the discussion?Feel free to contribute!