Tip #280: Adjustment Layers are Magic
… for Adobe Premiere Pro CC
Tip #280: Adjustment Layers are Magic
Larry Jordan – LarryJordan.com
Adjustment Layers are a fast way to change multiple clips all at once.


An Adjustment Layer is a special kind of video clip that is placed above one or more clips in the Premiere timeline to which, when you apply an effect, those effects apply to every video clip under the adjustment layer.
If you’ve worked with adjustment layers in Photoshop, these work the same way, except they apply to layers of video, rather than layers in a still image.
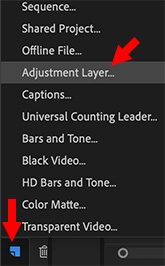
To create an adjustment layer, click the New Item icon in the lower right corner of the Projects panel (blue in this screen shot) and select Adjustment Layer from the menu.
The next menu allows you to specify the size and timebase for the clip. For most situations, accept the defaults.
Then, watch what happens as you add different effects to this new clip. Remember, an adjustment layer ONLY affects clips that are stacked below it in the timeline.
NOTE: A good place to start using adjustment layers is to use one to create a consistent color look for all your clips.


Oy. I love adjustment layers, but I hate editors that use them for color correction.
Why? Because I do a lot of copying and pasting clips from segment timelines into a show timeline, for teases and bumps. Placing the Lumetri or other color effect into an adjustment layer means I have DOUBLE the clicks to get the proper shot into my tease. Ain’t NOBODY got time for that!
Mike:
This is a good point. As with all things, what works well for some situations, doesn’t for others. Thanks for raising this point.
Larry