Tip #299: Set Custom Audio Roles During Import
… for Apple Final Cut Pro X
Tip #299: Set Custom Audio Roles During Import
Larry Jordan – LarryJordan.com
Roles can speed timeline organization and audio mixing.

Here’s a tip from Apple Support.
By default, when you import media clips (video, audio, or still images), Final Cut Pro analyzes existing clip metadata to assign one of five default roles to the video and audio components of each clip: Video, Titles, Dialogue, Music, or Effects. (Specifically, Final Cut Pro assigns a subrole of one of the default roles to each video or audio component.)
You can adjust the assignment of audio roles on import in two ways: by setting the role assignment manually or by having Final Cut Pro create custom roles automatically while importing media files with iXML metadata.
NOTE: iXML metadata is applied to clips by some high-end audio recording gear. For example, during production, a sound recordist might enter “Boom mic” and “Jessie lav mic” on the recording device to identify the audio channels of a recording. During import, Final Cut Pro can use the iXML names to create subroles named “Boom mic” and “Jessie lav mic” and assign them to the corresponding audio components in the imported clips.
For any given import session, you can override the automatic role assignment process so that every imported audio component is assigned a role of your choosing. You can specify one of the three default audio roles or a custom role that you create. When you import with this setting enabled, Final Cut Pro assigns a unique subrole (from the role you specify) to every component in each clip.
For example, imagine that you’ve recorded several hundred natural sound files for use as Foley sound effects in your video project. By default, Final Cut Pro assigns the Dialogue role to natural sound recordings (with no additional metadata). Instead, you could assign the more appropriate Effects role to every clip in the import session.
- To open the Import pane of Final Cut Pro preferences, choose Final Cut Pro > Preferences (or press Command-Comma), then click Import.
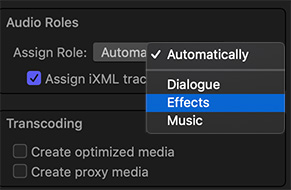
- In the Audio Roles section, click the Assign Role pop-up menu and choose a role.
NOTE: The Assign Role pop-up menu also appears in the Audio Roles section on the right side of the Media Import window. All default and custom audio roles appear in this pop-up menu.
- Import the files.
The role you chose is assigned to the imported clips. (More precisely, components in the imported clips are assigned subroles of the role you chose.)
You can change this and any other import preferences using the settings in the Media Import window or the Import pane of Final Cut Pro > Preferences. To revert to the default setting, so that roles are assigned automatically when you import clips, click the Assign Role pop-up menu and choose Automatically.
I have been trying to learn and apply Roles. All my videos have extensive Narration.
It seems that narration gets lumped in with Dialogue which is the audio attached to the
imported video clip. I would really like to have the Narration as a separate role with its own color.
Am I missing something?
Tony:
Correct, you are missing something.
You need to create a custom Role for your narration. I do this each week so that I have separate control over sync sound vs. narration.
Here’s an example:
https://larryjordan.com/articles/final-cut-pro-x-how-i-use-audio-roles/
Larry