Tip #319: Automatically Adjust Audio Levels
… for Apple Final Cut Pro X
Tip #319: Automatically Adjust Audio Levels
Larry Jordan – LarryJordan.com
Use the Modify menu to adjust an entire range at once.

There’s a very cool feature that allows you to quickly adjust audio volume across a selected range of clips. But, it isn’t where you expect. Here’s what you need to know.
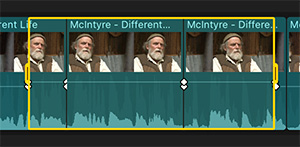
- Using the Range Selection tool (R), select a range within the timeline. This could be a single clip or multiple clips.
- Then, go to Modify > Audio Volume and use either Up, Down or Relative to adjust every clip in the selected range by the same amount. (Relative, which is my personal preference, allows you to enter the number of dB by which you want to adjust the audio.)
NOTE: This menu option does this by adding and adjusting keyframes at the edges of the range and ends of clips.
What doesn’t work:
- Drag the volume line. This only adjusts a single clip.
- Use the Volume setting in the Audio Inspector. This adjusts all clips that contain the range, but ignores the range itself.
EXTRA CREDIT
Here’s an Apple KnowledgeBase article that covers this, but the article does not match the behavior of FCP X.
Larry: “…the article does not match the behavior of FCP X”. Don’t you just love that? That has been a great time-waster in the past!
Thanks for these tips, Larry: today’s is a great time saver.
Kit:
Yeah. I let the people who need to know know.
Larry