Tip #367: How to Render a Portion of the Timeline
… for Apple Final Cut Pro X
Tip #367: How to Render a Portion of the Timeline
Larry Jordan – LarryJordan.com
Rendering creates temporary files that smooth playback.

This article first appeared as an Apple KnowledgeBase article. This is an excerpt.
Rendering is the process of creating temporary video and audio files for segments of your project that Final Cut Pro cannot play in real time. When you add effects, transitions, generators, titles, and other items, they require rendering before you can play them back at high quality.
By default, background rendering begins 5 seconds after you stop moving the pointer in Final Cut Pro, and it even continues while you work in a different app. Rendering only affects the clips that need it.
To render your project in Final Cut Pro, do one of the following:
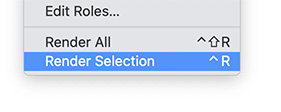
- Render a portion of your project: In the timeline, select the clip or clips that you want to render, then choose Modify > Render Selection (or press Control-R).
Note: The selection must be a clip selection, not a range selection. - Render all portions of your project that need rendering: Choose Modify > Render All (or press Control-Shift-R).
Leave a Reply
Want to join the discussion?Feel free to contribute!