Tip #377: The Record Button Easily Adds Keyframes
… for Apple Motion
Tip #377: The Record Button Easily Adds Keyframes
Larry Jordan – LarryJordan.com
The Record Button simplifies adding keyframes to projects.

This first appeared in an Apple KnowledgeBase article. There are two ways to apply keyframes in Motion: Automatically and manually. Here’s the automatic method – using the Record button.
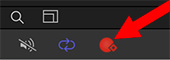
Turn on the Record button (Shortcut: A), located at the bottom left of the Viewer, to create a new keyframe whenever you adjust any parameter. This method is useful when you want to create keyframes for multiple parameters in your project.
Here are the steps:
1. In Motion, do one of one following:
- Click the Record button on the left side of the timing toolbar.
- Press A.
- Choose Mark > Record Animation.
The Record button is highlighted.
2. Select an object in the canvas, Layers list, or Timeline.
3. Drag the playhead to a new position in time.
4. Modify one or more parameters by doing any of the following:
- Use the onscreen controls to move, scale, or manipulate objects.
- Use the controls in the Inspector or HUD to move, scale or manipulate objects
NOTE:
Keyframes are added at the current playhead position for any parameters you modified.
5. Repeat steps 3 and 4 to add additional keyframes.
NOTE: As long as the Record button is enabled, any parameter modifications your make in your project are recorded as new keyframes. In the Inspector, all modifiable parameters are highlighted red to remind you that parameter changes are being recorded as keyframes.
Leave a Reply
Want to join the discussion?Feel free to contribute!