Tip #404: 6 Tips to Crop Images More Effectively
… for Adobe Premiere Pro CC
Tip #404: 6 Tips to Crop Images More Effectively


This article, written by Logan Baker, first appeared in PremiumBeat.com. This is an excerpt.
The Crop tool is an important tool in the video editor’s toolkit. Here are six tips to help you get more out of it.
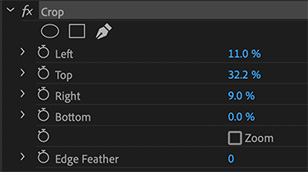
- Add a Crop. The Crop tool is located in Effects > Video Effects > Transform > Crop – or just search for “crop”. Then, drag it from the Effects panel onto your clip. You can crop using the Left, Right, Top, and Bottom parameters. These parameters are also animatable using keyframes.
NOTE: You can also crop using Adjustment Layers.
- Wide screen. Add classic wide screen bars to the top and bottom of your image. (An adjustment layer will do this to your entire sequence.)
- Text. Animate a crop to imaginatively reveal your text.
- Create a split screen. Stack the clips you want to see, then apply the crop to the top clip.
- Create a spicy transition. First, make sure the upcoming clip is atop the tail end of your current clip. Then, add the crop effect to both clips. For the bottom clip, enable the zoom (in the crop effect), then raise the bottom by about fifteen percent, with your keyframes set toward the end of the clip. This’ll stretch out the video downwards. Then, for the top clip, animate the bottom from one-hundred percent to zero percent. This’ll bring the clip down, following the first clip.
- Reveal effects. Apply effects to your clip, then nest them. Duplicate the nest and stack it above the clips with the effects. Remove the effects from the clips in the top nest. Then, wipe between the two nests.


Leave a Reply
Want to join the discussion?Feel free to contribute!