Tip #427: Create a LUT in Photoshop
… for Codecs & Media
Tip #427: Create a LUT in Photoshop
Larry Jordan – LarryJordan.com
Photoshop can create LUTs that work in Premiere, Resolve or Final Cut Pro X.

LUTs are a great way to take log or RAW images and convert them into something pleasing to look at. You can even use this technique for Rec. 709 media, which we use every day in HD projects.
Here’s a technique that creates LUTs that work in Premiere, Final Cut or Resolve.
- In Photoshop, import a still frame from your video that you want to create a LUT for.
- Select the layer containing the image and choose Layer > New > Background from Layer. (This setting is important.)
- Add at least one Adjustment layers, then adjust Levels and other settings to the adjustment layer to create the look you want.
NOTE: This image needs to retain some detail in the highlights. TIFF or PNG are the best export formats to use.
NOTE: Do not adjust the image, only modify the adjustment layer.
Here’s the magic part – as long as you convert the image into a background and use adjustment layers, you can take your look and convert it into a LUT which can be opened in Premiere, Resolve, or Final Cut.
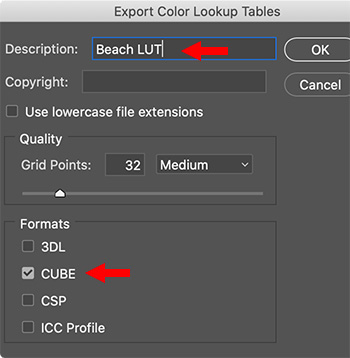
- In Photoshop, choose File > Export > Color Lookup Tables.
- Give the file a description that makes sense to you. Then, and this is a KEY step, select the CUBE format. This format is required by all our NLEs.
- Click OK,give it a name and location, then save it.
- Switch over to your NLE and import your new custom LUT and apply it to your footage.
Done. This LUT can be used across multiple projects and multiple NLEs.
EXTRA CREDIT
Here’s an article that walks you through all the steps in more detail.
Going to try this tomorrow making my own lut’s super. thanks for the tip