Tip #439: Tips on Using the Position Tool
… for Apple Final Cut Pro X
Tip #439: Tips on Using the Position Tool
Larry Jordan – LarryJordan.com
The Position tool allows you to move any clip anywhere – even to leave gaps.

When Final Cut Pro X was first released, editors were aghast that the Magnetic Timeline prevented them from leaving gaps in the timeline. Leaving aside the issue of why you might, or might not, want to leave gaps, the answer is that since the beginning, FCP X has had the ability to create gaps in the timeline. It just isn’t obvious. Here’s how.
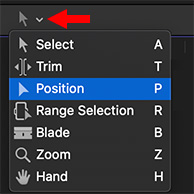
To access the Position tool, click the small arrow to the right of the Arrow tool at the top center of the Timeline. You can also use the keyboard shortcut of P.
With the Position tool:
- When you drag a clip, the clip doesn’t spring back. Instead a media block of black video, called a gap, is inserted between the end of the previous clip and the one you are moving.
- When you trim clips, it leaves a gap.
- When you drag one clip on top of another, the edge of the new clip overwrites the old clip.
- When you move a clip, any opened space is filled with a gap. This means that using the Position tool does not change the overall duration of a project.
Over the years, as I work in both Final Cut and Premiere, I’ve learned that the Position tool emulates older editing interfaces where dragging creates gaps and one clip overwrites another.
Final Cut gives us the ability to choose how our clips behave when we move them.
Leave a Reply
Want to join the discussion?Feel free to contribute!