Tip #444: Automatic Audio Ducking
… for Adobe Premiere Pro CC
Tip #444: Automatic Audio Ducking
Larry Jordan – LarryJordan.com
Auto-Ducking is a VERY fast way to generate standard audio keyframes.
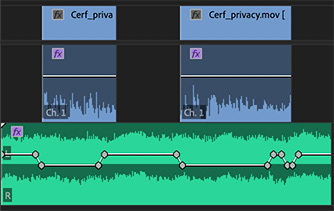

Auto-ducking automatically applies audio level keyframes to a music or sound effects clip in response to dialog clips above it. It generates keyframes very quickly and, even better, each keyframe is fully adjustable after they are applied. Here’s how it works:
- Switch to the Audio workspace in Premiere.
- Select all dialog clips, then apply the Dialog tag.
- Select all the clips you want to “duck,” or lower, when someone is speaking and apply either the Music, Sound Effects or Ambience tag.
- Open, say, the Music tag.
- Check Ducking to enable it.
- Select the icon representing the reference audio for the keyframes; in most cases this will be Dialog.
- Click Generate Keyframes.
- Listen to the results. If you don’t like the overall levels, change the Duck Amount to more accurately reflect how much you want the volume lowered.
- Click Generate Keyframes, again.
Repeat this process until you have levels you like.
NOTE: Modify Fades to adjust how quickly the audio levels change.
EXTRA CREDIT
Every keyframe set by Auto-ducking is a standard keyframe. You can adjust each one individually to create exactly the mix you want. Auto-ducking simply applies them faster.
Leave a Reply
Want to join the discussion?Feel free to contribute!