Tip #515: Using the Active Camera Menu
… for Apple Motion
Tip #515: Using the Active Camera Menu
Larry Jordan – LarryJordan.com
Controlling a camera in 3D space is tricky. The Active Camera menu helps you manage.


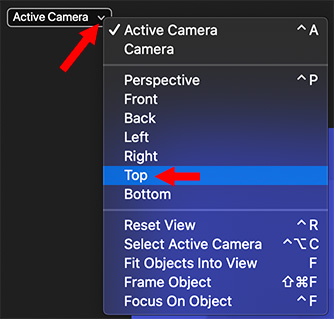
As you move into 3D space in Motion, the Active Camera menu becomes an essential navigation tool. The Camera pop-up menu is divided into three sections: Top, Middle, and Bottom.
The top section lets you select the active scene camera as well as any other scene cameras you’ve added to your project. A Motion project can have more than one camera.
- Active Camera/Camera: When you choose Active Camera from the pop-up menu, the topmost camera in the Layers list at the current playhead position (in the Timeline) becomes the active camera. The active camera is the camera through which you view your project in the canvas. It’s also the camera view that’s rendered when you export your project. If a project contains only one scene camera (as shown above), two items appear at the top of this pop-up menu: Active Camera and Camera, which represent the same camera.
- If a project contains more than one scene camera (as shown below), all scene cameras appear at the top of the Camera pop-up menu, under the Active Camera item. To make a different scene camera the active camera, choose a different camera from the top section of the pop-up menu. (Scene cameras listed in this section of the Camera pop-up menu appear in the same order as they do in the Layers list.)
The middle section of the Camera pop-up menu lets you choose a reference camera to help you see your composition from various angles. Choose any of the following to activate a reference camera view:
- Perspective: Like a real-world camera, views the scene with perspective distortion. For example, layers farther away from the camera appear smaller than layers closer to the camera. The perspective view defaults to a view from the front center.
- Front: This orthogonal camera looks straight down the Z axis and shows a perpendicular view from the front of the scene.
- Back: This orthogonal camera looks straight down the Z axis and shows a perpendicular view from the back of the scene.
- Left: This orthogonal camera looks straight down the X axis and shows a perpendicular view from the left of the scene.
- Right: This orthogonal camera looks straight down the X axis and shows a perpendicular view from the right of the scene.
- Top: This orthogonal camera looks straight down the Y axis and shows a perpendicular view from the top of the scene.
- Bottom: This orthogonal camera looks straight down the Y axis and shows a perpendicular view from the bottom of the scene.
- Note: The orthogonal camera views (Front, Back, Left, Right, Top, and Bottom) ignore perspective.
NOTE: The reference camera views cannot be exported. However, you can still animate a scene camera when a reference camera view is selected.
Because objects (except 3D text) are 2D (flat), they may not be visible in the canvas when you choose an orthogonal camera view (Front, Back, Left, Right, Top, and Bottom). This is because orthogonal views are at right angles (perpendicular) to 2D elements in your project. When you select an object that’s invisible to an orthogonal reference camera, a thin white line represents the object in the canvas.
The bottom section of the Camera pop-up menu allows access to five frequently used commands:
- Reset View: Resets the camera view to its default orientation. (Control-R)
- Select Active Camera: Selects the active camera in the project—the topmost camera in the Layers list that is visible at the current frame (when there are multiple cameras existing at the same frame in time). (Control-Option-C)
- Fit Objects Into View: Reframes the current camera to fit the selected objects into the canvas. (F)
- Frame Object: Frames the selected objects in the active view. If no objects are selected, Frame Object resets the reference camera to view all objects in the scene. (Shift-Command-F)
- Focus On Object: Used when a camera has depth of field turned on. Adjusts the camera’s Focus Offset to the selected object. (Control-F)
After you choose a camera view (scene camera or reference camera), use the 3D view tools to pan, orbit, or dolly the camera.
EXTRA CREDIT
To avoid getting lost, I generally just use the Active Camera and Top perspective.
The Motion help files have much more on working with cameras in 3D space.


Leave a Reply
Want to join the discussion?Feel free to contribute!