Tip #562: The Timeline’s Magic Wrench
… for Adobe Premiere Pro CC
Tip #562: The Timeline’s Magic Wrench
Larry Jordan – LarryJordan.com
There’s a lot of configuration options in this one menu.


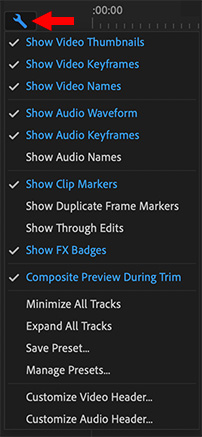
In the top-left corner of the Timeline is a wrench icon. This contains a wide variety of configuration settings to enable the timeline to look the way you want for your style of editing.
As the screen shot illustrates, features in blue are enabled, those in white are not. To toggle a feature on or off, click it.
- Show Duplicate Frame Markers displays a blue bar at the bottom of a clip who’s frames duplicate the same clip used elsewhere in the same sequence. (This is a holdover from the days of film, when there was only one original film negative.)
- Show Audio Names displays the file name in an audio clip. This is useful when editing dual-system sound where the audio file has a different name from the video file.
- Show Through Edits is covered in Tip #563.
- Minimize/Expand All Tracks is a fast way to adjust the height of all tracks in the timeline.
- Save/Manage Presets saves these configuration settings, then switch between them as needed.
- Customize Audio/Video Header customizes the icons displayed in the Track Header.
These provide lots of interesting customization options that you can adjust at any time.


Leave a Reply
Want to join the discussion?Feel free to contribute!