Tip #575: Work Faster with Pancakes in Premiere Pro
… for Adobe Premiere Pro CC
Tip #575: Work Faster with Pancakes in Premiere Pro
Larry Jordan – LarryJordan.com
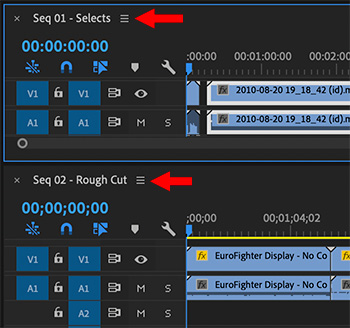
Whichever sequence is highlighted in blue is the active sequence.


This article, written by Jason Boone, first appeared in PremiumBeat.com. This is an excerpt.
Pancake Timeline was a term first coined by Vashi Nedomansky, ACE, of Vashi Visuals. The method derives its name from the vertical stacking of timelines within the interface. Stacking timelines not only speeds your workflow, but will also help you keep a bird’s-eye view on your work.
The pancake technique isn’t just for pulling good takes from raw footage. Let’s say, for example, you’re creating a demo reel. You open up multiple Premiere Projects at the same time, pancaking three to four timelines from varying projects. Then, you can quickly shuttle through numerous source sequences to pull clips for your reel. This technique will also be quite useful for sporting event highlights. Whatever the case, pancaking timelines is a powerful technique to add to your Premiere Pro tool belt.
Here’s a closer look at how to use this technique to quickly sort through a project’s raw footage.
- Prepare the sequences, as normal.
- Open both sequences into the timeline.
- Grab the tab of whichever sequence you want on top and drag it, inside the frame of the Timeline panel, until the top of the timeline panel turns purple, then release it.
- Edit from one timeline to the next. We can now easily bring clips from one sequence to the other, either via drag-and-drop or performing insert and/or overwrite edits.
NOTE: This process is identical to modifying workspaces by dragging panels around, except this time, rather than moving panels, we are moving sequences.


Leave a Reply
Want to join the discussion?Feel free to contribute!