Tip #648: Keyframe a 3D Move
… for Apple Motion
Tip #648: Keyframe a 3D Move
Larry Jordan – LarryJordan.com
Once you set a keyframe, whenever you change a parameter, a new keyframe is set.

Behaviors make it easy to animate text. But, many times, the behavior is just too manic – especially for 3D text. In those situations, keyframes are a better choice. Here’s a quick technique.
Keyframes are set in the Inspector. You can use the Record Keyframe control (the big red circle below the Viewer) but, I find that sets too many keyframes which makes editing harder.
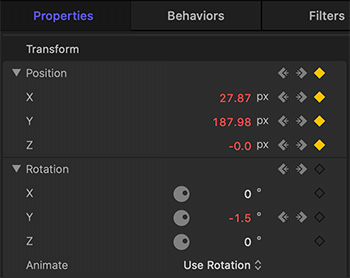
Instead, to animate position or rotation:
- Position and rotate the element to its starting position.
- Position the playhead in the mini-timeline where you want to set the first keyframe.
- Go to Inspector > Properties.
- Twirl down Position and Rotation to review additional X, Y, and Z axis controls.
- Click one of the gray gray diamonds. Gray diamonds indicate frames without a keyframe. Gold diamonds indlcate a rame with keyframes.
- Change the position of the playhead (FIRST!) then reposition the element. New keyframes are created automatically.
- Repeat until the move is complete.
NOTE: I find Y-axis rotation to be the most effective way to display 3D text.
EXTRA CREDIT
- Move between keyframes by clicking the left / right arrows in the Properties panel.
- To change a keyframe, position the playhead on the frame you want to change, then reposition the element. Keyframes are modified automatically.
Leave a Reply
Want to join the discussion?Feel free to contribute!