Tip #665: B-spline Masks in Apple Motion
… for Apple Motion
Tip #665: B-spline Masks
Larry Jordan – LarryJordan.com
The key to the B-spline is feathering and mask blend modes.
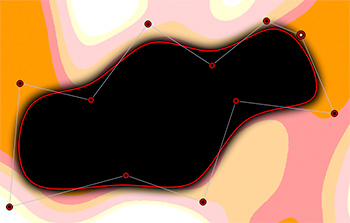

There are five different masks in Apple Motion. The B-spline mask is probably the most misunderstood.
B-spline masks always create curves. (A Bezier mask, on the other hand, can create corners or curves.)
Where B-splines get interesting, however, is when you start changing the Mask Blend Mode. You modify these by selecting the mask, then going to Inspector > Mask. There are four choices:
- Add: Adds the mask to the alpha channel (the default setting). This is useful for adding back regions of an image that other masks are cutting out.
- Subtract: Subtracts a mask from the alpha channel. This is useful for creating holes in the middle of layers, or for masking out additional regions of an image that are untouched by other masks.
- Replace: Replaces the layer’s original alpha channel, as well as any other masks applied to the same layer that appear underneath the current mask in the Layers list, with the current mask. You can add masks above, set to whatever blending mode you like.
- Intersect: Masks out all regions of the layer that do not overlap the mask itself (but does not replace a layer’s original alpha channel). This includes other masks applied to the same layer that appear nested underneath the intersecting mask in the Layers list.
The final mask is the combined result of all image masks applied to the layer.
EXTRA CREDIT
Remember, you can combine different masks to the same layer to allow you to select very specific, non-geometric shapes.
Leave a Reply
Want to join the discussion?Feel free to contribute!