Tip #699: A Fast Way To Color Balance
… for Adobe Premiere Pro CC
Tip #699: A Fast Way To Color Balance
Larry Jordan – LarryJordan.com
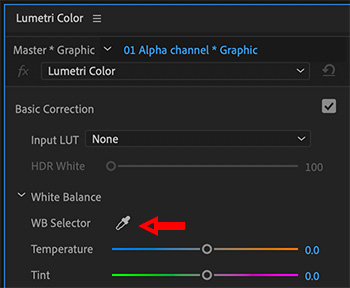
Click the WB Selector on something that’s supposed to be gray to remove color casts.

Deep inside the Lumetri Color panel is a tool that makes removing color casts a snap… well, ah, actually, a click. Here’s how it works.
- Select the clip you want to color correct.
- Switch to the Color workspace and open Lumetri > Basic Correction.
- Click the WB Selector eyedropper. It won’t change color when you select it, which is distracting.
- Click the eyedropped on something in the currently selected image that is supposed to be mid-tone gray or white.
Instantly, the image is corrected so that the color cast disappears.
EXTRA CREDIT
What this tool does is adjust temperature and tint settings to color correct the image. If you don’t like the results, you can manually adjust both sliders to improve the results.
Additionally, once the color correction is to your liking, click the Auto button at the bottom of this section to automatically set grayscale levels for the clip.
Leave a Reply
Want to join the discussion?Feel free to contribute!