Tip #753: Basic Color Correction
… for Adobe Premiere Pro CC
Tip #753: Basic Color Correction
Larry Jordan – LarryJordan.com
These controls provide detailed control over the grayscale values in your image.
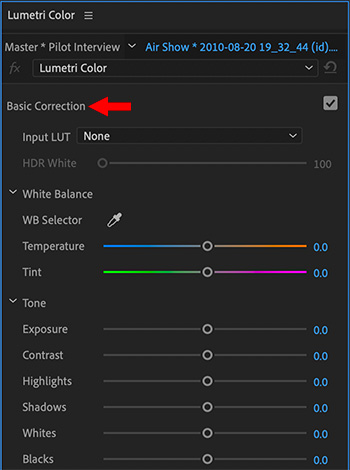

Using controls in the Basic Correction section, you can correct video that’s too dark or too light, and adjust both the hue (color or chroma) and luminance (exposure and contrast) in your clip. Here’s how the Basic Color Correction controls work.
WHITE BALANCE
- White Balance. The white balance in a video reflects the lighting conditions under which the video was shot. Adjusting the white balance can effectively improve the ambient color of your video. Adjust the white balance in your clip by changing the Temperature and Tint properties. Use the slider controls to fine-tune the values until you achieve the desired color balance.
- Temperature. Fine-tunes the white balance using a color temperature scale. Move the slider to the left to make the video appear cooler, and to the right for warmer colors.
- Tint. Fine-tunes the white balance to compensate for a green or magenta tint. To add green tint to the video, move the slider to the left (negative values), and to add magenta, move it to the right (positive values).
TONE
Adjust the tonal scale of the video clip using the different tone controls.
- Exposure. Sets the brightness of the video clip. Moving the Exposure slider to the right increases tonal values and expands highlights, and moving the slider to the left decreases tonal values and expands shadows. Adjust the slider until the video looks good with the desired brightness.
- Contrast. Increases or decreases contrast. Adjusting the contrast mainly affects the midtones of color in your video. When you increase contrast, the middle-to-dark areas become darker. Similarly, decreasing the contrast makes the middle-to-light areas lighter.
- Highlights. Adjusts bright areas. Drag the slider to the left to darken highlights. Drag to the right to brighten highlights while minimizing clipping.
- Shadows. Adjusts dark areas. Drag the slider to the left to darken shadows while minimizing clipping. Drag to the right to brighten shadows and recover shadow details.
- Whites. Adjusts white clipping. Drag the slider to the left to reduce clipping in highlights. Drag to the right to increase highlight clipping.
- Blacks. Adjusts black clipping. Drag the slider to the left to increase black clipping, making more shadows pure black. Drag to the right to reduce shadow clipping.
Leave a Reply
Want to join the discussion?Feel free to contribute!