Tip #755: What the Creative Looks Adjust
… for Adobe Premiere Pro CC
Tip #755: What the Creative Looks Adjust
Larry Jordan – LarryJordan.com
Looks are fast, but the settings provide more flexibility.


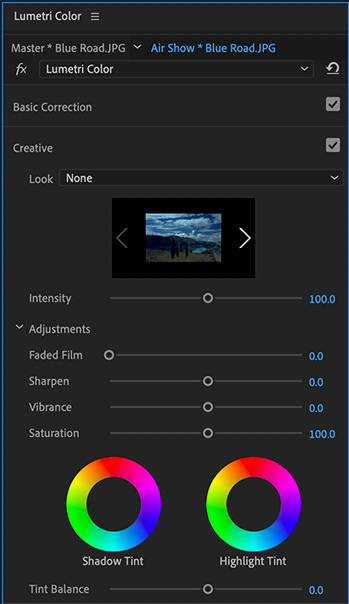
The Looks section of the Lumetri Color panel provides quick settings to adjust the creative look of a clip. Here’s what the different options do.
- Faded Film. Applies a faded film effect to your video. Drag the sliders to the right or left until you achieve the desired vintage look.
- Sharpen. Adjusts edge definition to create a sharper-looking video. Drag the slider to the right to increase the edge definition, and drag to the left to decrease the edge definition. An increased edge definition makes the details in the video more pronounced. So, make sure that you don’t sharpen the edges too much that it looks unnatural.
NOTE: To turn off sharpening, set the slider to zero (0).
- Vibrance. Adjusts the saturation so that clipping is minimized as colors approach full saturation. This setting changes the saturation of all lower-saturated colors with less effect on the higher-saturated colors. Vibrance also prevents skin tones from becoming oversaturated.
- Saturation. Adjusts the saturation of all colors in the clip equally from 0 (monochrome) to 200 (double the saturation).
- Tint wheels. Adjust the tint values in the shadows and highlights using the Shadow Tint and Highlight Tint wheels. Wheels with empty centers indicate that nothing has been applied. To apply the tint, click in the middle of the wheel and drag the cursor to fill in the wheels.
- Tint Balance. Balances out any excess magenta or green in the clip.
EXTRA CREDIT
My recommendation, if you need to make a saturation adjustment, is to use Vibrance, rather than Saturation, to prevent chroma clipping.


Leave a Reply
Want to join the discussion?Feel free to contribute!