Tip #765: Customize Your Timeline
… for Apple Final Cut Pro X
Tip #765: Customize Your Timeline
Larry Jordan – LarryJordan.com
This control only affects the timeline display, it doesn’t change any clips.


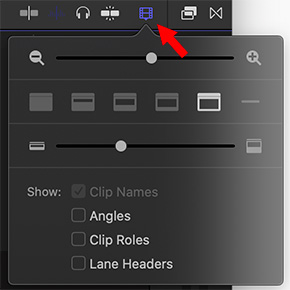
Final Cut offers several ways to customize the look of the timeline. Over in the top right corner of the timeline is an icon that looks like a film strip. This is the Clip Appearance button. This provides a variety of controls over how the timeline looks in Final Cut Pro X.
- The top slider zooms into or out of the timeline. (For me, it is faster to use keyboard shortcuts: Cmd + [plus], Cmd + [minus], and Cmd + Z.)
- The six icons on the second row determine the ratio of waveform to image. Far left is waveform audio only, second from the right is image only. The far right icon reduces the height of all tracks to thinner lines so you can see the overall organization of your project.
- The slider on the third row determines the height of all clips.
The four checkboxes at the bottom enable the display of:
- Clip names.
- Multicam camera angle names.
- Clip Role names.
- Lane Headers. These only apply when you are displaying Roles.


FYI – re: Rating tips.
I fat-thumbed the rating of this tip. I wanted to give it four stars but accidentally hit the third star and could not change it. Not a biggie, in the scheme of things. (I shoulda known there was a keyboard shortcut…).
David:
no problem – thanks.
Larry
Has anyone found a way to change the default view? I always like to use small thumbnails and large wave forms but I have to manually set that every time I create a new timeline.
Steve:
There’s no way I’ve found to change the default setting.
Larry
I vote we add the ability to set a default for these settings, to the FCP wish list, as I change every timeline manually as I create a project – a real pain
Bruce:
I think this is a great idea.
Larry