Tip #838: A Visual Way to Animate Effects
… for Adobe Premiere Pro CC
Tip #838: A Visual Way to Animate Effects
Larry Jordan – LarryJordan.com
The timeline provides an easy way to add keyframes and animate effects.

You probably know that you use keyframes to animate effects and that you can create keyframes in the Effects Panel. But… there’s a faster way, hidden in plain sight.
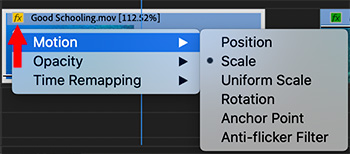
Control-click the small Fx badge in the top right corner of the clip you want to animate.
From the pop-up menu (see screen shot) select the parameter you want to animate with keyframes. The benefit to using the timeline to create keyframes is that you can sync them more easily with other clips located above or below the clip you are adjusting.
A thin, horizontal, white line appears in the selected clip.
- Cmd-click to add a keyframe
- Drag the keyframe up/down to change the value.
- Drag the keyframe left/right to change the timing.
- Control-click the keyframe to add curves or acceleration.
- Control-click the keyframe to delete it.
EXTRA CREDIT
Use the Pen tool (Shortcut: P) to select and change multiple keyframes at once.
Leave a Reply
Want to join the discussion?Feel free to contribute!