Tip #853: Hidden Access to Photoshop Layers
… for Adobe Premiere Pro CC
Tip #853: Hidden Access to Photoshop Layers
Larry Jordan – LarryJordan.com
Merge All Layers is easiest, Sequence, though, tends to be more flexible.

When importing Photoshop images into Premiere, you are given four choices. Here’s a description of what each of these mean.
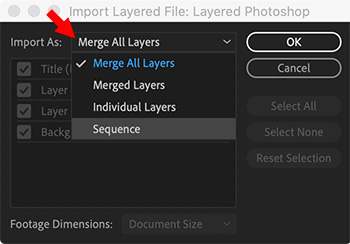
At the top of the Import Layered File window (which is most often used for importing Photoshop documents) is a menu with four choices:
- Merge All Layers. This converts the separate layers in the document into a single, flattened PSD image. This is a good choice when you need to be sure that the entire image is displayed.
- Merge Layers. Like Merge All Layers, this creates a single, flattened PSD image, but you chose which layers will be combined. This is a good choice when multiple versions are stored in the same image.
- Individual Layers. This imports each layer as a separate image into a bin containing one clip for each source layer. This is a good choice when there is no relationship between the layers and you need to manipulate each layer separately.
- Sequence. This imports the image as a sequence where each Photoshop layer is a separate layer in the sequence and stored in its own bin. This is a good choice when you want to adjust timing or animation of each layer separately, while still keeping them together in a single place.
NOTE: Most Photoshop images contain dozens of layers. The buttons on the right simplify checking, unchecking or resetting the status of all the layers in the image.
NOTE: When you import one layer as a single clip, its name in the Project panel consists of the layer name followed by the original filename.
NOTE: You enable or disable the display of a layer by checking the appropriate box in this window.
EXTRA CREDIT
Once an image is flattened, it can’t be “un-flattened.” Your only alternative to regain control over individual layers is to reimport it.
Here’s a tutorial with more details.
Leave a Reply
Want to join the discussion?Feel free to contribute!