Tip #856: Create a New Sequence Preset – FAST!
… for Adobe Premiere Pro CC
Tip #856: Create a New Sequence Preset – FAST!
Larry Jordan – LarryJordan.com
Sequence presets are used to conform clips to match a standard.


The problem with creating sequence presets is that you need to know a LOT of technical specs to accurately create one. Wouldn’t it be great if there was an easier way? There is! Here’s how.
- Create a sequence by dragging a clip with the specs you need – codec, frame size, frame rate and so on – onto the “folded paper” icon in the low-right corner of the Project panel. Most of us do this all the time.
- Go to Sequence > Sequence Settings and verify those are the specs you need. (This step isn’t required, but it’s a good idea to double-check.)
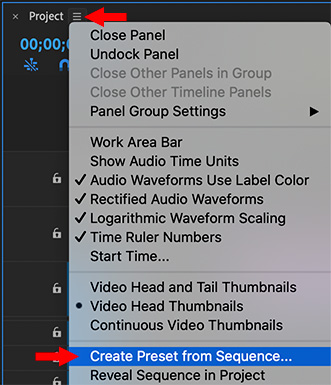
- Then, click the “stacked pancakes” icon next to the Project name in the timeline (see screen shot) and select Create Preset from Sequence.
- The Sequence Preset dialog window opens, allowing you to name this new setting and add a description.
- Click OK to save it.
Done.
EXTRA CREDIT
The benefit to creating a sequence preset is that when you add clips to the sequence that don’t match the setting, they will automatically be “conformed” or transcoded to math the sequence settings.
This solves the problem of not having a clip with the right specs to initially configure a sequence.


Leave a Reply
Want to join the discussion?Feel free to contribute!