Tip #873: The Magic of Auto-Ducking
… for Adobe Premiere Pro CC
Tip #873: The Magic of Auto-Ducking
Larry Jordan – LarryJordan.com
Auto-Ducking saves time with the mix, while still allowing changes at any time.

Auto-ducking is the process of automatically creating keyframes to reduce the level of a musical background when someone is talking. This is a relatively new feature in Premiere and the good news is that this creates settings which are infinitely adjustable, so if you don’t like the results, they are easy to change.
Here’s how this works.
- Switch to the Audio workspace.
- Open the sequence you want to adjust into the Timeline.
- Select all dialog clips, then click Dialogue in the Essential Sound panel to assign the Tag.
NOTE: If you don’t see this button, click the Edit text button near the top of the panel.
- Select all the music clips in the Timeline, then click the Music tag.
- Once you’ve assigned both dialog and music Tags, select the music clip you want to adjust.
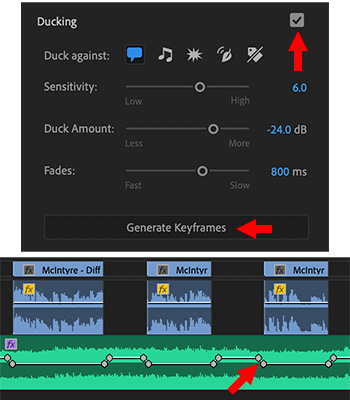
- Check the Ducking checkbox to enable the feature. Leave the default settings as is until you see what this does.
- Click Generate Keyframes and see how Premiere automatically adds keyframes to reduce the volume of the music whenever dialog is going on above it.
EXTRA CREDIT
Review the Premiere Help files to learn the different options for this feature.
Larry,
Auto ducking can a big timesaver! However, I’ve never been pleased with the default settings, and almost always use it as a starting point for creating the necessary keyframes.
Eric