Tip #888: Secrets of the Custom Title
… for Apple Final Cut Pro X
Tip #888: Secrets of the Custom Title
Larry Jordan – LarryJordan.com
Animation can be per letter, word, line or the entire graphic.


With hundreds of titles to choose from in Final Cut Pro X’s Titles Browser, it is easy to overlook a single title. However the Custom title has more animation controls than any other title in Final Cut.
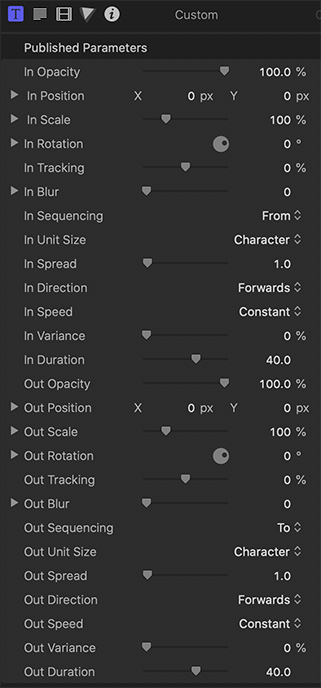
In addition to extensive text formatting controls, clicking the Text Animation Inspector (blue in the screen shot) reveals 26 major animation settings; all in one title. To find it, search for “Custom” in the Titles Browser.
NOTE: There are three Custom titles, one for VR, one for 3D and one for 2D. All have a wide variety of animation settings. This tip describes the 2D title.
Those parameters that start with “In” determine how text enters the screen. Those that start with “Out” determine how text leaves the screen. Both Ins and Outs can be set separately. By default, the text just sits there until you change a setting.
These settings are easier to see by playing with them rather than describe each one – and you can use them in combination with each other. However, there are three I want to call to your attention:
- Unit Size. This sets whether animation is by letter, word, word without spaces, lines, or the entire block of text.
- Duration. This determines how fast the animation occurs.
- Speed. This controls acceleration and deceleration. “Ease Out” means as the effect starts, “Ease In” means as the effect ends.
The easiest setting to play with is Opacity. This fades letters in or out, depending upon the setting. Once you see how this works, you’ll understand how to tweak the others.
If you haven’t played with this title yet, you’ll discover it contains a wealth of animation possibilities… all without using keyframes.


Hi Larry
I would love to receive an “Inside Tips” about the 360 Effects.
Thanks
Dal
Dal:
Great comment. I’ll have something on these next week.
Larry
This is a huge time saver. 🙂 Thanks Larry.