Tip #893: Timeline Mouse Shortcuts
… for Adobe Premiere Pro CC
Tip #893: Timeline Mouse Shortcuts
Larry Jordan – LarryJordan.com
Changing timeline track heights is easily done using the mouse or keyboard.

One of the problems of being a keyboard shortcut junkie is that I can easily overlook interesting mouse shortcuts. Here’s one; well, two, actually.
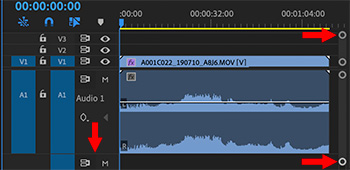
- To change the height of a timeline track, drag the horizontal line that separates two tracks (the left arrow in the screen shot).
- But is it easier to see and drag one of the white circles on the right side of the timeline. The upper circle changes the video track height, the lower circle changes the audio track height.
- Drag the space between the two circles in the middle to change where the division between audio and video occurs in the timeline.
EXTRA CREDIT
Just so keyboard folks are not left out:
- You can change the height of video tracks in the timeline by typing Cmd + [plus] / [minus]
NOTE: Control, for you Windows folks.
- You can change the height of audio tracks in the timeline by typing Option + [plus] / [minus]
NOTE: Alt, for you Windows folks.
Leave a Reply
Want to join the discussion?Feel free to contribute!