Tip #945: Consolidate Your Media
… for Apple Final Cut Pro X
Tip #945: Consolidate Your Media
Larry Jordan – LarryJordan.com
Consolidation can be done at any time – no need to wait to get organized.

You’ve been editing like a mad fiend and the project is done. Now, you need to gather everything together for final backup and archiving. But, with media and files scattered across your system, just how are you going to do this? Easy, watch.
You may not know where all your files are, but Final Cut does. So, as I illustrated in Tip #944, we will create a custom media storage location, then consolidate all our media files into it.
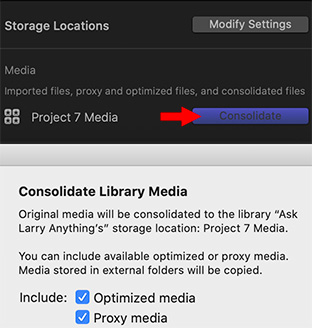
- First, open the Library you want to consolidate and select it’s name in the Library List.
- Go to Inspector > Library Properties and click Modify Settings for Storage Locations.
- Create a new location for the Media menu option.
- Next, click Consolidate in the Media section.
The Consolidate command follows these rules:
- When you consolidate files from a library into an external folder, the files are moved.
- When you consolidate files into a library from an external folder, or from an external folder to another external folder, the files are copied.
- These rules prevent broken links from other libraries.
NOTE: If the media is already external, and no other libraries are using it, you can manually delete the original media after consolidating to save storage space.
EXTRA CREDIT
- If you are in mid-project, DO include Optimized and Proxy media.
- If you are archiving a project, DO NOT include Optimized or Proxy media.
If FCP X needs either of these files and they are missing, it will automatically rebuild them.
Leave a Reply
Want to join the discussion?Feel free to contribute!