… for Codecs & Media

Tip #078: For Best Quality, Export a Master File

Larry Jordan – https://LarryJordan.com

“Highest quality” doesn’t always mean matching your camera format.

Tip Screen Shot

Topic $TipTopic

If you are in a hurry, export what you need to post and get on with your life.

However, one lesson I’ve learned over the years is that there’s never “just one version” of any project. Copies using different codecs and compression always need to be made. My recommendation is to ALWAYS export a master file of any project and archive that, so that when copies need to be made, you don’t need to reopen a project, reconnect media, re-render effects and re-export. A master file saves all that wasted time.

But, what is a master file? In terms of editing, it means exporting a video that matches your project settings. There’s no reason to export a different format, because the highest quality you can export is that which is the same as the project settings.

For example, exporting an H.264 project as ProRes 4444 will generate a larger file, but not higher quality.

This is why I recommend transcoding highly-compressed camera master files into a higher-quality intermediate codec before starting editing. Transcoding won’t improve the quality of what you shot, but it can improve the quality of transitions, effects and color grading; and, thus, the entire project prior to export.


Please rate the helpfulness of this tip.

Click on a star to rate it!

… for Codecs & Media

Tip #088: Where Should You Store Media

Larry Jordan – https://LarryJordan.com

Internal or external storage. Which is best?

Tip Screen Shot

Topic $TipTopic

When it comes to storage and media, there are two essential questions: How much capacity and how much speed do you need?

Most current computers – and all Macs – use high-speed SSDs for their internal boot drives. These provide blazing speed but very limited storage.

So, as you are thinking about where to store media, consider this:

  • If you have a small project, using the internal SSD is fine.
  • If you have a large project, or need to move it between computers or editors, external storage is better.
  • For best results, store cache files (and Libraries in FCP X) on the internal boot drive or your fastest external storage.
  • SSDs are about four times faster than spinning media (traditional hard disks), but spinning media holds more and is much cheaper.
  • A single spinning hard disk is fine for HD, but not fast enough for 4K or HDR
  • RAIDs are preferred for massive projects, like one-hour shows or features, large frame sizes, HDR, or faster frame rates. They hold more and transfer data faster than a single drive.
  • Don’t store media on any gear connected via USB 1, 2, or 3 Gen 1. It won’t be fast enough. Howver, you can use these devices for backups and longer-term storage.
  • Servers are fine for storing and accessing media, but they won’t be as fast as locally-attached storage.
  • In general, if you are getting dropped frame errors, it means your storage is too slow to support the media you are editing. Invest in faster storage.

Please rate the helpfulness of this tip.

Click on a star to rate it!

… for Codecs & Media

Tip #107: Speed Test: Apple Compressor vs. Adobe Media Encoder

Larry Jordan – https://LarryJordan.com

You need to get work done. Which is faster?

Tip Screen Shot

Topic $TipTopic

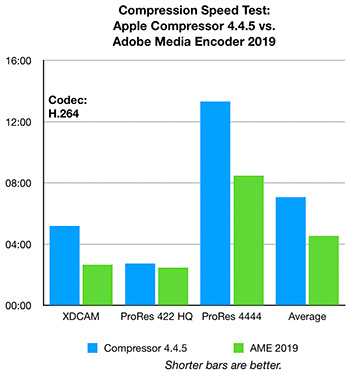
In a recent series of tests between Apple Compressor (v.4.4.5) and Adobe Media Encoder 2019 (AME), I discovered that, in almost all cases, Adobe Media Encoder is faster at compressing a file into either H.264 or HEVC. (Both these formats are commonly used for social media.)

In fact, the speed differences averaged 38% faster for AME compressing files into H.264; as you can see in this chart.

The results were even more dramatic when compressing different codecs into HEVC. Compressor was 45% faster, on average, when compressing into 8-bit HEVC, but AME was 75% faster when compressing into 10-bit HEVC. In fact, Compressor was unable to successfully compress a ProRes 4444 file into 10-bit HEVC; consistently failing during multiple tests.

If speed is your goal, AME is generally the better choice.


Please rate the helpfulness of this tip.

Click on a star to rate it!

… for Codecs & Media

Tip #104: Why Is a Smooth Audio Fade Called +3 dB?

Larry Jordan – https://LarryJordan.com

Audio is a Strange Beast

Tip Screen Shot

Topic $TipTopic

Unlike video, audio levels are logarithmic. For example, whenever the audio level increases (or decreases) by around 10 dB, the perceived volume is doubled (or cut in half). These log values also have an impact in cross-fading between clips.

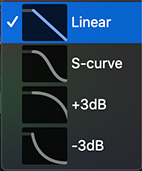
A +3 dB transition adds a 3 dB increase in volume to both clips in the middle of a cross-fade. If the software did not, the audio would sound like it is getting fainter in the middle of a transition, then louder at the end.

When fading to or from black, a straight-line (linear) transition is best. When cross-fading between two clips, both of which have audio, a +3 dB transition is best.

EXTRA CREDIT

Some software allows you to change the shape of the curve manually. These rules still apply, but manual adjustments allow much greater control over how the transition sounds.

The general rule is: Whatever sounds the best to you IS the best.


Please rate the helpfulness of this tip.

Click on a star to rate it!

… for Codecs & Media

Tip #086: How to Create Custom Poster Frames

Larry Jordan – https://LarryJordan.com

Poster frames illustrate the contents of a movie clip in the Finder

Tip Screen Shot

Topic $TipTopic

Ian Brown suggested this tip.

There’s a very fast way to create a poster frame for a QuickTime movie. (Poster frames appear in the Finder, and other locations, to illustrate the contents of a clip.)

  • Open the video in QuickTime Player
  • Move the playhead to the frame you want to use as a poster frame
  • Choose Edit > Copy (shortcut: Cmd + C)
  • Close the video
  • Select the file icon in the Finder
  • Choose File > Get Info (shortcut: Cmd + I)
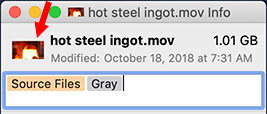
  • Select the small icon in the top left corner
  • Choose Edit > Paste (shortcut: Cmd + V)

Done.

EXTRA CREDIT

Actually, anything you paste into that top left box will become the poster frame. It doesn’t need to be a still from your video – though it can’t be a video itself.


Please rate the helpfulness of this tip.

Click on a star to rate it!

… for Codecs & Media

Tip #100: Optimize Media for YouTube

Larry Jordan – https://LarryJordan.com

Uploading a video isn’t enough.

Tip Screen Shot

Topic $TipTopic

I was reading a blog recently by Richard Tiland about posting videos to YouTube. In it, he wrote: “Uploading your video to YouTube isn’t enough. You need to include metadata so that the site understands what your video is all about.”

His points included:

  • Optimize the title with keywords. Keep it short, but searchable.
  • Add a detailed and accurate description. Length is less important here.
  • Include a transcript to help viewers take in your content without turning up the sound.
  • Organize content using playlists. This helps both viewers and YouTube’s search algorithms.
  • Create a cohesive look to improve branding. Make your videos look like they are coming from the same creative source.
  • Finally, don’t forget the Call to Action. This is the explicit behavior you want the audience to take after watching your video.

Metadata always seems intimidating somehow. But, really, all we are doing is enabling viewers to find our media faster and easier. And that is always a good thing.


Please rate the helpfulness of this tip.

Click on a star to rate it!

… for Codecs & Media

Tip #067: Which Files Should Be Copied From a Camera Card?

Larry Jordan – https://LarryJordan.com

“Pick-and-Choose” is the wrong option for best results.

Tip Screen Shot

Topic $TipTopic

All of them.

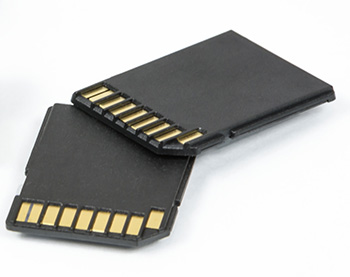
Select the entire contents of the card, even the folders and files that you don’t recognize, and copy the entire contents of the camera card into its own folder on your hard disk.

One folder per camera card. Always.

Why? Because, depending upon the codec, different parts of your media are stored in different folders on the card; especially metadata. Copying everything from the card into its own folder on your local storage means that whichever NLE you use for editing is able to assemble all the pieces and assemble all your media and related metadata without any problems.

BONUS

Copying each card into its own folder allows you to create meaningful folder names for tracking and importing media.


Please rate the helpfulness of this tip.

Click on a star to rate it!

… for Codecs & Media

Tip #099: Benefits of working with 4K in 1080

Larry Jordan – https://LarryJordan.com

4K has benefits aside from increased resolution.

Tip Screen Shot

Topic $TipTopic

I was reading Jason Boone‘s blog on the Benefits of Working with 4K Footage in a 1080 Sequence.

First, while it could be argued that we can’t actually SEE 4K in most situations, that hasn’t stopped distributors from requesting it. Still, even if you don’t plan to deliver 4K, there are benefits to shooting it, as Jason outlines:

  • Reframe a shot. 4K provides so many extra pixels to choose from, you can convert a wide shot into a close-up. However, cutting into the frame won’t change depth of field, so the image won’t look the same as if you had zoomed (or dollied) in.
  • Use the same take multiple times. Using the same take for both wide shots and close-ups makes it seem as though you have two cameras. The benefit is that where talent is looking doesn’t change. The disadvantage is that background and depth of field won’t change either.
  • Create camera moves. Using keyframes you can create movement where there was none in the original shot. However, like moves on a still, elements won’t change position as they would if you used a dolly on set.
  • Stabilize your footage. This is powerful. Stabilization always zooms into a shot. By having lots of extra pixels to work with, the image won’t lose detail or sharpness.
  • Adjust the image for graphics. There’s nothing worse than graphics you can’t read. 4K gives us extra pixels for scaling and repositioning.

4K may not be visible to the eye, but it can be a BIG benefit in post.


Please rate the helpfulness of this tip.

Click on a star to rate it!

… for Codecs & Media

Tip #105: Why Do We Need Intermediate Codecs?

Larry Jordan – https://LarryJordan.com

Intermediate codecs simplify editing.

Tip Screen Shot

Topic $TipTopic

An “Intermediate Codec” is a video format that we use for editing. It is placed between the format shot by the camera and the format we need for final distribution. We convert between formats using “transcoding.”

There are two different reasons for using an intermediate codec:

  • To make really large files manageable
  • To make highly-compressed files easier to edit

MANAGEABILITY

For example, we often use proxy files when rough cutting 4K or larger frame sizes, or working with HDR media, simply because these source files are incredibly massive. Using a smaller intermediate codec allows us to successfully work with less storage on slower systems.

HIGHLY-COMPRESSED

Files that are optimized for editing store each image individually in the file (called an “I-frame”.). These include formats such as ProRes, DNx, and Cineform. I-frame compression means that as soon as the playhead lands on an image, it can be displayed.

I-frame files are very efficient for editing, but large.

Highly-compressed files, such as AVCHD, H.264 or HEVC, only record one image every 15 frames or so. The rest of the “images” are actually text descriptions of the changes between the source frame (“I”) and all the derivative frames (“B” and “P”). In order for the computer to display a B or P frame, it needs to go back to the I frame, then apply all those text-based change documents to calculate the frame the playhead is currently parked on.

If you are playing a clip, GOP compression is not a big deal. But, skimming clips, playing backward, jumping randomly around in a file, or multicam editing can take a while to calculate and display these images because the computer always needs to jump back to the nearest earlier I-frame and recalculate.

Transcoding to an intermediate codec means that editing, rendering and exporting will be faster by converting GOP-based encoding into I-frames.


Please rate the helpfulness of this tip.

Click on a star to rate it!