This is a simple, but subtle trick that improves any product.
Give your product shots a new spin!
Every product shot is about making the product look great. But, what do you do when the product doesn’t move.
Sure, you can zoom in and pan around. But, well, that’s pretty boring.
Here’s the tip: Put the product on a turntable. This allows you to combine multiple moves into a single shot. Now your zoom not only pulls the eye into the shot, but it also reveals new visual information, which makes the shot all that more intriguing
Adding a Lazy Susan turntable to a product shot adds energy and it’s a cheap, totally believable way to increase production value.
Please rate the helpfulness of this tip.
Click on a star to rate it!
https://www.theinsidetips.com/wp-content/uploads/2019/09/Tips-Logo-700x150.jpg00Larry Jordanhttps://www.theinsidetips.com/wp-content/uploads/2019/09/Tips-Logo-700x150.jpgLarry Jordan2019-12-17 01:30:002019-12-15 13:14:18Tip #292: Cool Tip to Improve Product Shots
MXF is an industry-workhorse because it is so flexible.
MXF (Material Exchange Format) was invented by SMPTE in 2004. MXF is a container that holds digital video and audio media. OP1a (Operational Pattern 1a) defines how the media inside it is stored.
MXF has full timecode and metadata support, and is intended as a platform-agnostic stable standard for professional video and audio applications.
MXF had a checkered beginning. In 2005, there were interoperability problems between Sony and Panasonic cameras. Both recorded “MXF” – but the two formats were incompatible. Other incompatibilities, such as randomly generating the links that connect files, were resolved in a 2009 redefinition of the spec.
MXF generally stores media in separate files. For example: video, audio, timecode and metadata are all separate. This means that a single MXF container actually supports a variety of different media codecs inside it.
Another benefit to MXF OP1a is that it supports “growing files.” These are files that can be edited while they are still being recorded. (Think sports highlights.)
Please rate the helpfulness of this tip.
Click on a star to rate it!
https://www.theinsidetips.com/wp-content/uploads/2019/09/Tips-Logo-700x150.jpg00Larry Jordanhttps://www.theinsidetips.com/wp-content/uploads/2019/09/Tips-Logo-700x150.jpgLarry Jordan2019-12-17 01:30:002019-12-15 13:11:13Tip #303: What is MXF OP1a?
Different versions of USB provide different amounts of bandwidth
The speed of USB has increased significantly since its initial release. For example, USB 1.0 was released January 15, 1996, with a maximum speed of 1.5 MB/second. Compare that to USB 4.0 which was released August 29, 2019, with a maximum speed of 5 GB/second! USB4 is based on the Thunderbolt 3 protocol.
However, recently, the USB Implementers Forum (USB-IF) renamed virtually all USB versions and made things REALLY confused. Here are the new names and speeds of the different versions of USB.
Old Name
Released
New Name
Speed
USB 2.0
April, 2000
USB 2.0
Up to 60 MB/sec
USB 3.0
Nov. 2008
USB 3.1 Gen 1
Up to 625 MB/sec
USB 3.1
July, 2013
USB 3.1 Gen 2
Up to 1.25 GB/sec
USB 3.2
August, 2017
USB 3.1 Gen 2×2
Up to 2.5 GB/sec
USB4
August, 2019
USB 4
Up to 5 GB/sec
NOTE: Keep in mind that all versions of USB, except for USB4, are optimized for small file transfers and generally don’t provide all the bandwidth that the spec calls for. I don’t recommend any version of USB earlier than USB 3.2 for video editing.
Please rate the helpfulness of this tip.
Click on a star to rate it!
https://www.theinsidetips.com/wp-content/uploads/2019/09/Tips-Logo-700x150.jpg00Larry Jordanhttps://www.theinsidetips.com/wp-content/uploads/2019/09/Tips-Logo-700x150.jpgLarry Jordan2019-12-10 01:30:002019-12-10 01:30:00Tip #150: USB Bandwidth
Rather than settling for searching on multiple sites for stand alone stock video shots that “kind of” look similar to one another, look for story driven footage. Story-driven shots are ones that show the same subject in action and also provide multiple shot types of similar action.
2. Use high quality, Raw or Log Footage
When searching for stock footage, look for clips that enable high resolution downloads, like Raw, Arri, Red or Phantom. You won’t have to sift through a library full of less-than-stellar quality or overused footage to find what you’re looking for.
3. Don’t pay per clip. Go unlimited
Your film’s budget can easily go through the roof if you pay per clip. This is why we recommend using footage sites that use single umbrella licensing and unlimited subscription models.
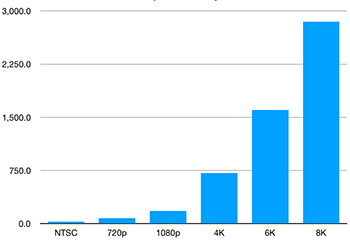
RAM requirements for 30-fps, 8-bit video at different frame sizes (MB/second).
The way most NLEs work is that, during an edit, the software will load (“buffer”) a portion of a clip into RAM. This allows for smoother playback and skimming, as you drag your playhead across the timeline.
When a clip is loaded into RAM, it is uncompressed, allowing each pixel to be processed individually. This means that the amount of RAM used for buffering depends upon several factors:
How much RAM you have
The frame size of the source video clip
The frame rate of the source video clip
The bit-depth of the source video clip
This graph illustrates this. It displays the MB required per second to cache 8-bit video into RAM. As you can see, RAM requirements skyrocket with frame size. These numbers increase when you have multiple clips playing at the same time.
NOTE: These numbers also increase as bit-depth increases, however the proportions remain the same.
The amount of RAM you need varies, depending upon the type of editing you are doing.
8 GB RAM. You can edit with this amount of RAM, but editing performance may suffer for anything larger than 720p HD
16 GB RAM. Good for most editing.
32 GB RAM. My recommendation for editing 4K, 6K, multicam and HDR.
64 GB RAM. Potentially good for massive frame sizes, but not required.
Anything more than 64 GB of RAM won’t hurt, but you won’t see any significant improvement in performance; especially considering the cost of more RAM.
Please rate the helpfulness of this tip.
Click on a star to rate it!
https://www.theinsidetips.com/wp-content/uploads/2019/09/Tips-Logo-700x150.jpg00Larry Jordanhttps://www.theinsidetips.com/wp-content/uploads/2019/09/Tips-Logo-700x150.jpgLarry Jordan2019-12-10 01:30:002019-12-05 12:58:22Tip #228: How Much RAM Do You Need For Editing?
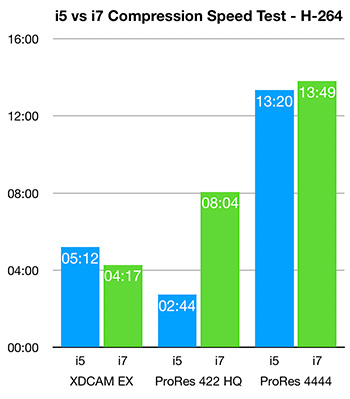
Speed comparison of i5 vs. i7 CPUs running Apple Compressor.
In a series of tests that I ran comparing the speed of Apple Compressor 4.4.5 running on a 3.8 GHz i5 vs. a 3.2 GHz i7, I discovered that you can’t predict which processor will be faster.
Testing involved XDCAM EX, ProRes 422 HQ and ProRes 4444 media and compressing it into H.264, 8-bit HEVC and 10-bit HEVC. (The three test files had different durations, so we can’t compare speed between formats.)
H.264 and HEVC 8-bit are hardware-accelerated. HEVC 10-bit is not. I used the same compression settings for each test.
When compressing media for H.264, the i7 is faster 33% of the time (2 out of 6).
When compressing media for HEVC 8-bit, the i7 is faster 66% of the time (4 out of 6).
Both CPUs running Apple Compressor were unable to successfully compress a ProRes 4444 file into 10-bit HEVC.
Based upon these tests with the latest version of Compressor, I would say the speed is a wash. Some tasks are faster, some are slower.
However, if you are doing any HEVC compression – 8-bit or 10-bit – based on my full suite of tests, Adobe Media Encoder is consistently and significantly faster than Apple Compressor.
https://www.theinsidetips.com/wp-content/uploads/2019/09/Tips-Logo-700x150.jpg00Larry Jordanhttps://www.theinsidetips.com/wp-content/uploads/2019/09/Tips-Logo-700x150.jpgLarry Jordan2019-12-03 01:30:002019-12-03 01:30:00Tip #108: Speed Test: i5 vs. i7 CPUs for Video Compression
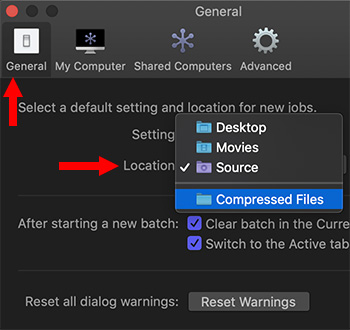
Set a default location for all your compressed files.
Set a default compression location in Compressor preferences.
By default, Apple Compressor stores compressed media in the same folder as the source media. Which just confuses the heck out of me, because I can’t ever remember which folder I used for which source media file.
To solve this problem of not knowing where my compressed files are stored, I create a folder on my external storage called “Compressed Files.” Then, I make sure that ALL the files I compress go into that folder.
How? By setting it up as an automatic Location.
Create the folder you want to use as your destination using the Finder.
Start Compressor and switch to the Locations panel on the left.
Click the small plus icon in the lower left corner. Then, navigate to the Compressed Files folder you just created and select it. You’ve now created a custom location for Compressor.
Finally, go to Compressor > Preferences > General and select the custom Location you just created in the Location menu.
Now, every time you import a file into Compressor, the compressed version will automatically appear in the Compressed Files folder.
Great! One less thing to worry about.
Please rate the helpfulness of this tip.
Click on a star to rate it!
https://www.theinsidetips.com/wp-content/uploads/2019/09/Tips-Logo-700x150.jpg00Larry Jordanhttps://www.theinsidetips.com/wp-content/uploads/2019/09/Tips-Logo-700x150.jpgLarry Jordan2019-12-03 01:30:002019-12-03 01:30:00Tip #110: Set a Default Location in Apple Compressor
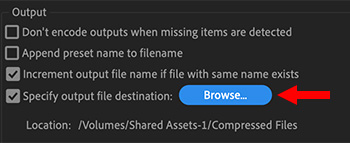
Set a default compression location using this preference checkbox.
By default, Adobe Media Encoder (AME) stores compressed media in the same folder as the source media. Which just confuses me. How am I supposed to remember where I stored all my source media?
To solve this problem of not knowing where AME hid my compressed files, I created a folder on my external storage called “Compressed Files.” Then, I make sure that ALL the files I compress go into that folder.
How? By setting it up as an automatic destination.
Create the folder you want to use as your destination using the Finder.
Start Adobe Media Encoder and go to Media Encoder > Preferences > General.
About 2/3s the way down, in the Output section, check Specify output file destination.
Click Browse and navigate to the Compressed Files folder you just created and click Choose.
Now, every time you import a file into AME, the compressed version will automatically appear in the Compressed Files folder.
Great! One less thing to worry about.
Please rate the helpfulness of this tip.
Click on a star to rate it!
https://www.theinsidetips.com/wp-content/uploads/2019/09/Tips-Logo-700x150.jpg00Larry Jordanhttps://www.theinsidetips.com/wp-content/uploads/2019/09/Tips-Logo-700x150.jpgLarry Jordan2019-12-03 01:30:002019-12-03 01:30:00Tip #126: Set a Default Location in Adobe Media Encoder
MP3 compression sounds best when audio levels are not excessive.
The MP3 audio compression standard was invented back in the days of analog audio. Because of this, the compression standard was optimized for audio levels lower than 0 dB to prevent problems with high-energy transient audio peaks, which an analog system often didn’t catch.
Specifically, MP3 audio files sound the best if average peak levels are around -6 dB.
AAC (MPEG-4) audio files, however, being newer and taking advantage of digital technology, are optimized for audio levels that peak right at 0 dB.
Storage performance is key to successful video editing.
As you might expect, storage performance is dependent upon multiple factors – and how it connects is only a part. Storage speed, which is often called “bandwidth,” is determined by:
How it is connected to your computer, including the protocol used for communication
The number of drives or devices it contains
For example, Thunderbolt 3 is very, very fast – up to 3,000 MB/second! But, if that device only has one spinning hard disk inside, the actual speed will be closer to 150 MB/second. Here are three typical examples:
A single spinning hard drive transfers data about 150 MB/sec.
A single PCIe SSD transfers data around 400 MB/sec
A single NVMe SSD transfers data around 2,500 MB/sec
Think of it this way: The Thunderbolt 3 protocol is a very, very large water pipe. The devices connected to it determine how much water flows inside that pipe.
You can have a very large pipe, but if you are only filling it with a garden hose, you won’t get a whole lot of water through of it.
Please rate the helpfulness of this tip.
Click on a star to rate it!
https://www.theinsidetips.com/wp-content/uploads/2019/09/Tips-Logo-700x150.jpg00Larry Jordanhttps://www.theinsidetips.com/wp-content/uploads/2019/09/Tips-Logo-700x150.jpgLarry Jordan2019-11-26 01:30:002019-11-23 10:24:34Tip #031: What Determines Storage Speed?
We may request cookies to be set on your device. We use cookies to let us know when you visit our websites, how you interact with us, to enrich your user experience, and to customize your relationship with our website.
Click on the different category headings to find out more. You can also change some of your preferences. Note that blocking some types of cookies may impact your experience on our websites and the services we are able to offer.
Essential Website Cookies
These cookies are strictly necessary to provide you with services available through our website and to use some of its features.
Because these cookies are strictly necessary to deliver the website, refuseing them will have impact how our site functions. You always can block or delete cookies by changing your browser settings and force blocking all cookies on this website. But this will always prompt you to accept/refuse cookies when revisiting our site.
We fully respect if you want to refuse cookies but to avoid asking you again and again kindly allow us to store a cookie for that. You are free to opt out any time or opt in for other cookies to get a better experience. If you refuse cookies we will remove all set cookies in our domain.
We provide you with a list of stored cookies on your computer in our domain so you can check what we stored. Due to security reasons we are not able to show or modify cookies from other domains. You can check these in your browser security settings.
Google Analytics Cookies
These cookies collect information that is used either in aggregate form to help us understand how our website is being used or how effective our marketing campaigns are, or to help us customize our website and application for you in order to enhance your experience.
If you do not want that we track your visit to our site you can disable tracking in your browser here:
Other external services
We also use different external services like Google Webfonts, Google Maps, and external Video providers. Since these providers may collect personal data like your IP address we allow you to block them here. Please be aware that this might heavily reduce the functionality and appearance of our site. Changes will take effect once you reload the page.
Google Webfont Settings:
Google Map Settings:
Google reCaptcha Settings:
Vimeo and Youtube video embeds:
Other cookies
The following cookies are also needed - You can choose if you want to allow them:
Privacy Policy
You can read about our cookies and privacy settings in detail on our Privacy Policy Page.


 The speed of USB has increased significantly since its initial release. For example, USB 1.0 was released January 15, 1996, with a maximum speed of 1.5 MB/second. Compare that to USB 4.0 which was released August 29, 2019, with a maximum speed of 5 GB/second! USB4 is based on the Thunderbolt 3 protocol.