… for Codecs & Media

Tip #346: Compressor is Not Faster in Catalina

Larry Jordan – LarryJordan.com

No speed improvements for H.264 or HEVC in Catalina

In all tests, average compression speeds in Catalina are slower than Mojave. (Shorter bars are faster.)

Topic $TipTopic

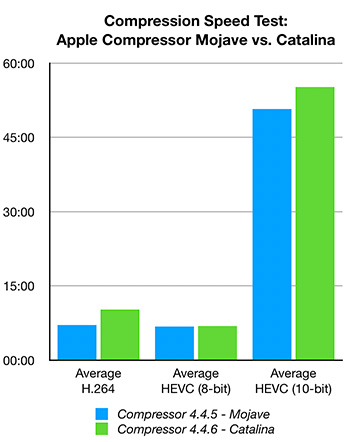
One of the new features in macOS Catalina is a revised graphics engine called Metal 2. Both Final Cut Pro X and Compressor were recently upgraded to support it.

Last week, I did an initial test comparing the speed of Apple Compressor running in macOS Mojave vs. Catalina. I ran these tests on the same computer (an i5) using the same data files and same compression settings using Apple Compressor. The Mojave tests used Compressor 4.4.5. The Catalina tests used Compressor 4.4.6.

NOTE: Additional tests indicate that H.264 compression is faster on iMac Pros and Mac Pros which use the T-2 chip. As well, compression speeds vary depending upon the number and type of applications open at the time of compression.

The short answer is that the latest version of Apple Compressor running on Catalina is slightly slower across all tests than Compressor running on Mojave. I will look at compression results using Adobe Media Encoder in the next Codec Tip Letter.

EXTRA CREDIT

Here’s the full article.


Please rate the helpfulness of this tip.

Click on a star to rate it!

… for Codecs & Media

Tip #347: Codecs – Explained (Part 1)

Larry Jordan – LarryJordan.com

Always something new to learn about codecs.

Topic $TipTopic

I’ve used the term “codec” for years. Still, there’s always something new to learn. For example, according to Wikipedia, “A codec is a device or computer program which encodes or decodes a digital data stream or signal. Codec is a portmanteau of coder-decoder.”

NOTE: A “portmanteau” is a linguistic blend of words, in which parts of multiple words or their phonemes (sounds) are combined into a new word. (Right, I didn’t know that either.)

“In the mid-20th century,” Wikipedia continues, “a codec was a device that coded analog signals into digital form using pulse-code modulation (PCM). Later, the name was also applied to software for converting between digital signal formats, including compander functions.

“In addition to encoding a signal, a codec may also compress the data to reduce transmission bandwidth or storage space. Compression codecs are classified primarily into lossy codecs and lossless codecs.

NOTE: See Tip #348 for a description of lossy vs. lossless.

“Two principal techniques are used in codecs, pulse-code modulation and delta modulation. Codecs are often designed to emphasize certain aspects of the media to be encoded. For example, a digital video (using a DV codec) of a sports event needs to encode motion well but not necessarily exact colors, while a video of an art exhibit needs to encode color and surface texture well.
Audio codecs for cell phones need to have very low latency between source encoding and playback. In contrast, audio codecs for recording or broadcast can use high-latency audio compression techniques to achieve higher fidelity at a lower bit-rate.”

Many multimedia data streams contain both audio and video, and often some metadata that permit synchronization of audio and video. Each of these three streams may be handled by different programs, processes, or hardware; but for the multimedia data streams to be useful in stored or transmitted form, they must be encapsulated together in a container format; such as MXF or QuickTime.

Here’s the original Wikipedia article.


Please rate the helpfulness of this tip.

Click on a star to rate it!

… for Codecs & Media

Tip #348: Codecs – Explained (Part 2)

Larry Jordan – LarryJordan.com

Lossy is smaller, Lossless is better

Topic $TipTopic

As we learned in Tip #347, there are two types of codecs: lossless and lossy. In this tip, I want to explain the difference. For this, we’ll turn to a Wikipedia article.

LOSSLESS

Lossless codecs are often used for archiving data in a compressed form while retaining all information present in the original stream. If preserving the original quality of the stream is more important than eliminating the correspondingly larger data sizes, lossless codecs are preferred. This is especially true if the data is to undergo further processing (for example editing) in which case the repeated application of processing (encoding and decoding) on lossy codecs will degrade the quality of the resulting data such that it is no longer identifiable (visually, audibly or both). Using more than one codec or encoding scheme successively can also degrade quality significantly. The decreasing cost of storage capacity and network bandwidth has a tendency to reduce the need for lossy codecs for some media.

LOSSY

Many popular codecs are lossy. They reduce quality in order to maximize compression. Often, this type of compression is virtually indistinguishable from the original uncompressed sound or images, depending on the codec and the settings used. The most widely used lossy data compression technique in digital media is based on the discrete cosine transform (DCT), used in compression standards such as JPEG images, H.26x and MPEG video, and MP3 and AAC audio. Smaller data sets ease the strain on relatively expensive storage sub-systems such as non-volatile memory and hard disk, as well as write-once-read-many formats such as CD-ROM, DVD and Blu-ray Disc. Lower data rates also reduce cost and improve performance when the data is transmitted.


Please rate the helpfulness of this tip.

Click on a star to rate it!

… for Codecs & Media

Tip #308: Archive Active Versions of Compressor

Larry Jordan – LarryJordan.com

Archives allow future access to earlier versions.

Apple Compressor logo
The file icon for Apple Compressor.

Topic $TipTopic

It is often necessary, especially if you are working with different clients, to have earlier versions of Compressor available to you. However, only one version of Compressor can be active on your system at a time. Recently, I read an Apple KnowledgeBase article that explained how to create archives.

NOTE: While this won’t get you access to earlier versions of Compressor, it does mean that you’ll have access to all versions going forward.

To back up the currently installed Compressor application:

  1. Create a new folder in the Applications folder, and name it after the application (for example, “Compressor 4.4.6”). To check your version of Compressor, open the application and choose About Compressor from the Compressor menu.
  2. Select the Compressor application in the Applications folder. Choose File > Compress “Compressor.” It will take a few minutes to compress.
  3. Move the resulting “Compressor.zip” file into the folder you created in step 1.
  4. Move the folder containing the .zip file to a backup drive.

EXTRA CREDIT

These ZIP files can be stored anywhere, but I generally try to keep all my program archives in the same place. Remember, before you revert back to an earlier version, archive or delete the version of Compressor currently stored in your Applications folder.

Also, if you revert to an earlier version of Compressor, it may also require an earlier version of the macOS, so keep a note of which version of Compressor uses which version of the macOS.


Please rate the helpfulness of this tip.

Click on a star to rate it!

… for Codecs & Media

Tip #310: A Fast Way to Set a Poster Frame

Larry Jordan – LarryJordan.com

Three steps to poster frame happiness.

The Get Info box in the Macintosh Finder.
Paste the image you want to use for a poster frame into this icon.

Topic $TipTopic

In an earlier tip I illustrated one way to create a poster frame for a QuickTime movie. After reading it, a reader pointed out an even faster way to create a poster frame. Here are the steps:

  • Open the movie in QuickTime Player that you want to create a poster frame for.
  • Move the playhead to the frame you want to use, then copy it to the clipboard (Edit > Copy).
  • Close the file.
  • Select the file in the Finder.
  • In the Finder, chose File > Get Info.
  • In the top left corner, select the small icon to the left of the name.
  • Choose Edit > Paste.

Poof! Instant poster frame.


Please rate the helpfulness of this tip.

Click on a star to rate it!

… for Codecs & Media

Tip #321: Blend Modes in Brief

Larry Jordan – LarryJordan.com

Blend modes create textures.

Blend mode options from Apple Motion.
Blend modes combine textures between clips. They are found in all modern NLEs.

Topic $TipTopic

Iain Anderson, at MacProVideo, wrote this up in more detail. But I liked his summary of blend modes, which I have modified from his article.

Blend modes allow us to combine textures, and sometimes colors, between clips or elements that are stacked vertically on top of each other.

Whether you are in Photoshop or Premiere, Final Cut or Motion, blend modes work the same way. These are arithmetical expressions, with nothing to adjust. You either like the effect or you don’t.

NOTE: If you don’t like the effect, tweak either the gray-scale or color value of the top clip and the results will change.

All these settings should be applied to the top clip. It will be the only clip that changes. Here’s what the settings mean.

  • Normal. This leaves the top clip’s image unaltered
  • Subtract, Darken, Multiply, Color Burn, and Linear Burn. These combine clips based upon darker grayscale values. For example, the top clip will darken clips below it. Multiply usually works best for adding darker areas.

NOTE: If nothing changes when you apply this setting, your top clip is too light. Darken it.

  • Add, Lighten, Screen, Color Dodge, and Linear Dodge. These combine textures between clips based upon lighter grayscale values. Screen usually works best for adding bright elements like sparks and flame.

IMPORTANT: Avoid using Add. It creates highlights that exceed legal white values. Screen does not.

  • Overlay, Soft Light, Hard Light, Vivid Light, Linear Light, Pin Light, and Hard Mix. These combine textures based on mid-tone grayscale values, often in a way that increases contrast. Overlay usually works best, though more often these days, I find myself using Soft Light.

NOTE: For better results, reduce opacity and play with the grayscale settings.

  • Difference and Exclusion. These mess with color values to create very hallucinogenic effects. What’s happening is that color values in the top clip are mathematically removed from the clips below in slightly different ways. Also useful for spotting the difference between two clips.
  • Stencil Alpha and Stencil Luma. These insert the background image into the foreground image. Use Stencil Alpha, provided the foreground has an alpha channel. If it doesn’t, use Stencil Luma, but the results may not be as good.
  • Silhouette Alpha and Silhouette Luma. These cut a hole into the background image based upon the foreground image shape. Again, use Silhouette Alpha if the foreground image has an alpha channel.
  • Behind. This displays the clips below the current effect. It is used when you are also using Stencil Alpha to insert one image into another.

The bottom choices will vary by application, and are covered in the Help files.


Please rate the helpfulness of this tip.

Click on a star to rate it!

… for Codecs & Media

Tip #282: When to Use HEVC vs. H.264

Larry Jordan – LarryJordan.com

Which to choose and why?

Topic $TipTopic

As media creators, there’s a lot of confusion over whether we should use H.264 or HEVC to compress our files for distribution on the web. Here’s my current thinking.

The big benefit to HEVC is that it achieves the same image quality with a 30-40% savings in file size.

The big disadvantage is that HEVC takes a lot longer to compress and not all systems – especially older systems – can play it.

If you are sending files to broadcast, cable or digital cinema, they will want something much less compressed than either of these formats. So, for those outlets, this is not a relevant question.

For me, the over-riding reason to use H.264 instead of HEVC is that YouTube, Facebook, Twitter and most other social media sites recompress your video in order to create all the different formats needed to them to re-distribute it. (I read somewhere a while ago that YouTube creates 20 different versions of a single video.)

For this reason, spending extra time creating a high-quality HEVC file, when it will only get re-compressed, does not make any sense to me. Instead, create a high-bit-rate H.264 version so that when the file is recompressed, it won’t lose any image quality.

Where HEVC makes sense is when you are serving files directly to consumers via streaming on your website. And, even in those cases, HTTP Live Streaming will be a better option to support mobile devices.

HEVC is mostly a benefit to service providers and social media firms.


Please rate the helpfulness of this tip.

Click on a star to rate it!

… for Codecs & Media

Tip #284: What is a Proxy File?

Larry Jordan – LarryJordan.com

Proxies save time, money and storage space.

Topic $TipTopic

A Proxy file, regardless of the codec that created it, is designed to meet three key objectives: save time, save money and use less expensive gear. Proxies meet these objectives because they:

  • Reduce required storage capacity
  • Reduce required storage bandwidth
  • Reduce the CPU load to process the file

It accomplishes these goals in two significant ways:

  • It converts all media into a very efficient intermediate codec that is easy to edit. For example, ProRes 422 or DNx.
  • It cuts the frame size by 50%. So, a UHD file, with a source frame size of 3840 x 2160, has a proxy size of 1920 x 1080. A 6K frame becomes 3K.

Proxies are best used for the initial editorial where you are reviewing footage, creating selects, building a rough cut and polishing the story. For most of us, that’s 80% of the time we spend editing any project. Proxy files can also be used for most client review exports, because they render and export faster and, at the early stage, clients aren’t looking for the final look.

Using proxies means we can use less powerful and much less expensive computers and storage for the vast majority of time spent on a project. Proxy files also allow us to get out of the edit suite and edit on more portable gear.

Switching out of proxy mode is necessary for polishing effects, color grading, final render and master export.

Many editors feel that it is a sign of weakness to edit proxies. This is nonsense. Back when we edited film, we used workprints – which is the film version of a proxy file – for everything. Somehow, great work was still turned out.

Avid, Adobe and Apple all support proxy workflows. Proxies are worth adding to your workflow.


Please rate the helpfulness of this tip.

Click on a star to rate it!

… for Codecs & Media

Tip #304: What is FFmpeg?

Larry Jordan – LarryJordan.com

An open source project supporting hundreds of media formats.

The FFmpeg logo, reflecting how many media files are compressed.

Topic $TipTopic

FFmpeg is a free and open-source project consisting of a vast software suite of libraries and programs for handling video, audio, and other multimedia files and streams. At its core is the FFmpeg program itself, designed for command-line-based processing of video and audio files, and widely used for format transcoding, basic editing (trimming and concatenation), video scaling, video post-production effects, and standards compliance.

FFmpeg is part of the workflow of hundreds of other software projects, and its libraries are a core part of software media players such as VLC, and has been included in core processing for YouTube and the iTunes inventory of files. Codecs for the encoding and/or decoding of most of all known audio and video file formats are included, making it highly useful for the transcoding of common and uncommon media files into a single common format.

The name of the project is inspired by the MPEG video standards group, together with “FF” for “fast forward”. The logo uses a zigzag pattern that shows how MPEG video codecs handle entropy encoding.

The FFmpeg project was started by Fabrice Bellard in 2000. Most non-programmers access the FFmpeg suite of programs using a “front-end.” This is software that puts a user interface on the FFmpeg engine. Examples include: Handbrake, ffWorks, MPEG Streamclip, and QWinFF.


Please rate the helpfulness of this tip.

Click on a star to rate it!

… for Codecs & Media

Tip #112: How to Update Apple’s Pro Video Codecs

Larry Jordan – LarryJordan.com

These codecs benefit all Mac-based editors.

Topic $TipTopic

If you, like me, go to the Mac App Store when you get an update alert, you are missing some key media updates.

Whenever Apple updates Final Cut Pro X, Motion or Compressor, they generally also update the Pro Video codecs. However, these do NOT update through the Mac App Store.

These are “system-level” codecs. This means that these codecs are valuable to all editors: Avid, Premiere and Final Cut. Any Mac-based editor can benefit.

You can update to them using System Preferences > Software Update – or – this website: https://support.apple.com/kb/DL2020?locale=en_US


Please rate the helpfulness of this tip.

Click on a star to rate it!