… for Codecs & Media

Tip #1211: What Is “Clean Aperture?”

Larry Jordan – LarryJordan.com

Clean Aperture is most helpful for images transferred from analog tape.

The Clean Aperture option in Compressor > Video Properties panel. It

Topic $TipTopic

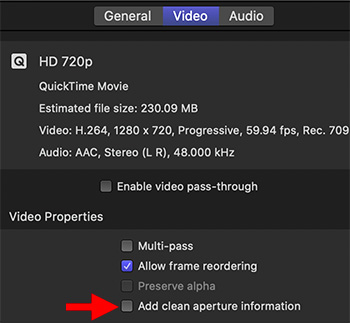
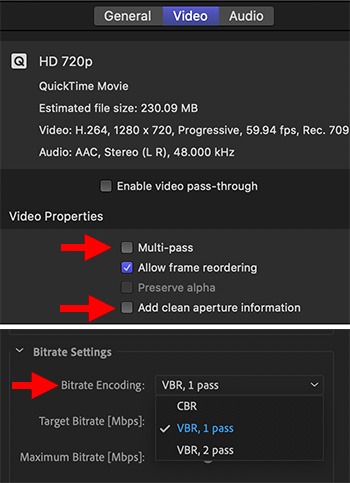
You may have seen this “Clean Aperture” checkbox in Apple Compressor and wondered what it does and when to use it. Apple has it On by default.

Here’s what Apple’s Help Files say:

“Select this checkbox to define clean picture edges in the output file. This property adds information to the output file to define how many pixels to hide, ensuring that no artifacts appear along the edges. When you play the output file in QuickTime Player, the pixel aspect ratio will be slightly altered. This process doesn’t affect the actual number of pixels in the output file—it only controls whether information is added to the file that a player can use to hide the edges of the picture.”

In general, if you have an image recorded from analog tape, you’ll have this problem. Most current digital images don’t need this.

While it is on by default, I generally turn this off.


Please rate the helpfulness of this tip.

Click on a star to rate it!

… for Codecs & Media

Tip #1210: Tips for Faster Video Compression

Larry Jordan – LarryJordan.com

These settings can disable hardware acceleration, without benefitting the image.

Apple Compressor (top) and Adobe Media Encoder. Preferred settings are shown.

Topic $TipTopic

Last week, I wrote about the hardware acceleration provided by both the T-2 and M-1 chips in Apple computers Tip #1190. As well, most current Intel CPUs also support hardware acceleration of 8-bit H.264 and HEVC media.

However, it is possible to accidentally turn OFF hardware acceleration by changing one setting in either Apple Compressor or Adobe Media Encoder.

NOTE: I can’t think of a single good reason to do this, so, um, don’t do it.

SETTING 1 – COMPRESSOR

Hardware acceleration is always single pass. Enabling multi-pass turns off hardware acceleration. (The top screen shot illustrates this setting in Apple Compressor.)

SETTING 2 – ADOBE MEDIA ENCODER

AME has two Bit Rate settings that can turn off hardware acceleration: CBR and VBR 2-pass. For fastest compression be sure to always select VBR 1-pass.

EXTRA CREDIT

In the past, we used 2-pass software compression because it looked better. Based on my observations, using today’s CPUs, hardware-accelerated compression looks as good as, or better than, media compressed using software.

And, it finished a WHOLE LOT faster, as well.

In Apple Compressor, for digital images, you can also turn off Clean Aperture. Tip #1211 explains why.


Please rate the helpfulness of this tip.

Click on a star to rate it!

… for Codecs & Media

Tip #1209: I Need Your Help

Larry Jordan – LarryJordan.com

The Inside Tips encourages reader-contributed tips. Please share yours with us.

We don’t know what we don’t know until we learn it from someone else.

Topic $TipTopic

I want to encourage you to submit a tip or two for “The Inside Tips.” We all benefit when we take the time to share what we know.

The Inside Tips for Codecs & Media is a Tip Letter focused on the technical aspects of media and compression. This is a large topic – far more than any single person can master.

Each of us, during our career, has benefited by learning from others – sometimes in a formal setting, more often in the course of daily work.

For this reason, it would be great if you could contribute a tip or two from your own experience. The Inside Tips are read in every state in the US, as well as 50 countries around the world.

Even the “simple things” only seem simple after we learn them.

Click this link to submit a tip…. And thanks!


Please rate the helpfulness of this tip.

Click on a star to rate it!

… for Adobe Premiere Pro CC

Tip #1206: Reset a Compression Job in AME

Larry Jordan – LarryJordan.com

To reset the status, Control-click the status and reset it.

The Reset Status menu, which is accessed by Control-clicking the status for a job.

Topic $TipTopic

(This tip is from a recent webinar on Media Compression in Adobe Media Encoder.)

When Adobe Media Encoder (AME) completes a compression task, it flags the job as Done (Tip #1205).

However, what if you discover a problem with the file? Once that Done flag is set, AME won’t recompress it.

Unless…. you know this simple tip to resetting the status of a clip.

Simply Control-click the Status (the word “Done”) for the file you need to recompress and reset it. (See screen shot.)

EXTRA CREDIT

This reset is typically needed when you compress a file, only to discover that one of the settings was wrong, or an overlay was misspelled, or the data rate was too low.

Resetting the status is much faster than recreating the entire compression setting.


Please rate the helpfulness of this tip.

Click on a star to rate it!

… for Adobe Premiere Pro CC

Tip #1205: Display the Compression Log in AME

Larry Jordan – LarryJordan.com

AME’s log summarizes everything that was done to compress a file.

The Status column in Adobe Media Encoder.

Topic $TipTopic

(This tip is from a recent webinar on Media Compression in Adobe Media Encoder.)

Every compression job in Adobe Media Encoder is logged in a hidden log file. This log shows how long it took to compress a file, where the file is stored and what settings were applied to it.

To display the log, after a file has been compressed, click Done in the Status column.

The compression log appears almost instantly. The latest files will be located at the bottom.

EXTRA CREDIT

This is a text file. The contents can be copied and pasted into the word processor of your choice if you need to make this report prettier.


Please rate the helpfulness of this tip.

Click on a star to rate it!

… for Adobe Premiere Pro CC

Tip #1164: How to Retime a Clip in AME

Larry Jordan – LarryJordan.com

Retiming ALWAYS changes the playback speed of a clip.

The ‘Interpret Footage” option linked to the media file in Adobe Media Encoder.

Topic $TipTopic

(This tip is from a recent webinar on Media Compression in Adobe Media Encoder.)

Retiming a clip means to change the frame rate at which a clip plays back. For example, from 24 fps to 25 fps. This can easily be done in Adobe Media Encoder. Here’s how.

  • Open Adobe Media Encoder. (Any version will do, this isn’t a new feature.)
  • Using the Media Browser, import the clip who’s speed you want to change into the Queue.
  • Control-click the name of the movie file in the Queue (see screen shot) and select Interpret Footage.
  • In the resulting dialog, change “Assume this frame rate:” to the new frame rate you want to use for playback.
  • Click OK and you are done.

NOTE: When retiming clips, while you can convert these into any codec, it is a good practice to convert them into a high-quality intermediate codec like ProRes 422, or a high-data rate GoPro Cineform or DNx file. This retains the maximum image quality during the conversion.

EXTRA CREDIT

Unlike changing the frame rate, which drops or adds frames, interpreting footage plays every frame in the clip, but at a different speed.

So, going from a faster frame rate to a slower one creates slow motion, while going from a slower frame rate to a faster one creates a timelapse.


Please rate the helpfulness of this tip.

Click on a star to rate it!