… for Apple Final Cut Pro X

Tip #1214: Unlock the Timeline Index

Larry Jordan – LarryJordan.com

CommandPost provides hundreds of shortcuts and features for Final Cut Pro, After Effects and the Finder.
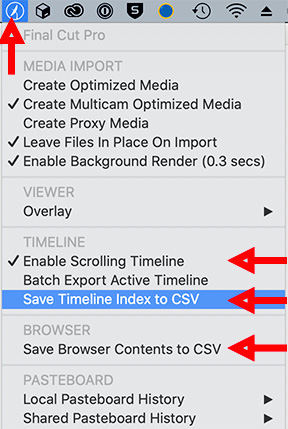
The CommandPost menu.

Topic $TipTopic

Here’s a very handy free utility that I use in every edit. It’s called CommandPost. One of my favorite features is that it unlocks the data stored in the Timeline Index.

CommandPost is a free and open source native macOS application that acts as a bridge between control surfaces, and software that doesn’t natively support control surfaces, such as Apple’s Final Cut Pro X and Adobe After Effects.

CommandPost requires macOS Sierra 10.12.1 or later (including macOS Mojave, Catalina & Big Sur). It also supports Final Cut Pro 10.4.4 and later (including Final Cut Pro 10.4.10).

There are many features that make this worth using in Final Cut, here are my three favorites:

  • Scrolling timeline!!
  • Export the contents of the currently active panel in the Timeline Index
  • Multiple and shared clipboards.

There are many other features for both FCP X and the Finder that make CommandPost an essential utility. It’s one I use every time I open Final Cut.

Website: https://commandpost.io.


Please rate the helpfulness of this tip.

Click on a star to rate it!

… for Random Weirdness

Tip #1217: Create Loglines that Sell Movies

Larry Jordan – LarryJordan.com

Taglines intrigue audiences. Loglines sell films to investers.

Screen shot of “Back to the Future” (Image courtesy of Universal Pictures.)

Topic $TipTopic

This article, written by Darin Bradley, first appeared in PremiumBeat.com. This is a summary.

Every creative medium uses some version of the elevator pitch to condense a project into a simple, memorable description — in the movie business, it’s the logline. Agents and producers of all stripes across the entertainment industry use these one-liners when jockeying scripts, books, or games between the creators they represent and the buyers they’re trying to convince.

A logline is a simple descriptive sentence that identifies the inciting incident (motivation and/or risks), the protagonist, the primary action, and the antagonist. This straightforward sentence reduces all the complexity and nuance of your script into a digestible takeaway that makes it simpler for the various brokers who bring movies to life to move big, beautiful, ungainly scripts around.

Here are the “Rules:”

  1. Create Strong Protagonists
  2. Specific About Character Actions
  3. The Unexpected Is Your Friend

The article then provides almost a dozen examples of both successful and unsuccessful loglines, with an analysis of each.


Please rate the helpfulness of this tip.

Click on a star to rate it!

… for Random Weirdness

Tip #1216: A Split-Screen Movie – that Works.

Larry Jordan – LarryJordan.com

80 minutes – two separate locations – both shot in real-time at the same time.

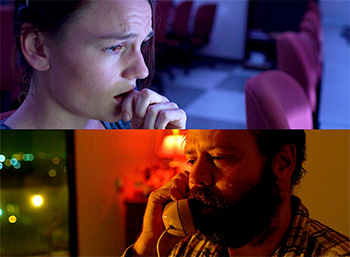
Screen shot from the film “Last Call.”

Topic $TipTopic

When does film become theater… and when does theater become film?

This article first appeared in NoFilmSchool.com. This is a summary.

The film, “Last Call” is about a suicidal alcoholic (played by the film’s co-writer Daved Wilkins) on the anniversary of his son’s death. When he attempts to call a crisis hotline, a mis-dial connects him with Beth, a single mother working as the night janitor (Sarah Booth) at a local community college. The split screen feature showcases both characters in real-time as they navigate a life-changing conversation.

80 minutes – two separate locations – both shot in real-time at the same time. 10 days of rehearsal, 4 days to shoot, 5 good takes.

“We were either going to get it or not,” director/co-writer Gavin Michael Booth says. “We filmed every rehearsal and watched it back to see if a particular section was getting boring and therefore to try something visually to spice it up. I was like an NFL coach being able to watch the game plays back to perfect the technical aspects of the performance.”

Not content with shooting both takes simultaneously in realtime, they shot in locations several blocks away from each other. The crew for each was a camera operator and a sound operator. Cinematographer Seth Wessel-Estes was in charge of Daved’s storyline, while Booth took charge of the other storyline featuring his wife. They shot with a part of RED Helium cameras in 8K.

Shot almost exactly two years ago, the film picked up 25 awards on the festival circuit including the Founders Award at Napa Valley and Best Feature at Hamilton, eventually landing a theatrical release with Mutiny Pictures and a streaming distribution deal with Apple TV+ with more to follow.

The article provides lots more details, plus a trailer and production shots.


Please rate the helpfulness of this tip.

Click on a star to rate it!

… for Random Weirdness

Tip #1207: I Need Your Help

Larry Jordan – LarryJordan.com

The Inside Tips encourages reader-contributed tips. Please share yours with us.

We don’t know what we don’t know until we learn it from someone else.

Topic $TipTopic

I want to encourage you to submit a tip or two for “The Inside Tips.” We all benefit when we take the time to share what we know.

Random Weirdness about Media is a Tip Letter focused on media production. Production is a vast topic, far more than any single person can master.

Each of us, during our career, has benefited by learning from others – sometimes in a formal setting, more often in the course of daily work.

For this reason, it would be great if you could contribute a tip or two from your own experience. The Inside Tips are read in every state in the US, as well as 50 countries around the world.

Even the “simple things” only seem simple after we learn them.

Click this link to submit a tip…. And thanks!


Please rate the helpfulness of this tip.

Click on a star to rate it!

… for Apple Motion

Tip #1221: Interpreting the Alpha Channel

Larry Jordan – LarryJordan.com

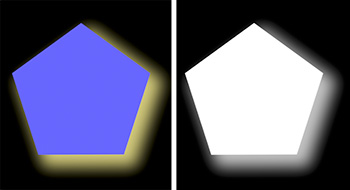
The Alpha channel displays transparency as shades of gray.

The source image with a drop shadow. The same image displayed as an alpha channel.

Topic $TipTopic

The alpha channel represents the transparency of each pixel, the same way color channels represent the amount of color in each pixel. But, how do you interpret what the alpha channel display shows?

At the top right of the Viewer is a small color square, immediately to the right of the screen display percentage indicator. Click it and choose Alpha.

Instantly, the screen switches to black and white. (The screen shot displays the color image on the left, and the alpha channel image on the right.)

NOTE: Since transparency ranges from transparent to opaque, the alpha channel is represented in most applications as a black-gray-white image.

  • Black. This represents regions which are fully transparent.
  • White. This represents regions which are fully opaque.
  • Gray. This represents regions which are translucent. The brighter the gray, the more “solid” that region appears.

The image in the screen shot is a fully opaque pentagon, with a translucent (75%) shadow set against a transparent background. This means that if this shape is added to a video, the pentagon will be superimposed, along with its shadow, over the video.

Shadows are almost always translucent. However, chroma-keys need the foreground to be solidly opaque with the background fully transparent, with no shades of gray. Now, using the alpha channel, you can quickly spot and fix problems.


Please rate the helpfulness of this tip.

Click on a star to rate it!

… for Apple Motion

Tip #1220: What is the Active Camera?

Larry Jordan – LarryJordan.com

The Active Camera is the shot that’s currently displayed in the timeline.

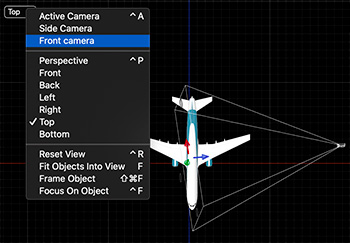
The Camera view menu with two different cameras applied to the scene.

Topic $TipTopic

Apple Motion allows us to add multiple cameras to any project; which means we need to understand the “Active Camera.”

When you switch between views in Motion, the top option is called Active Camera (Shortcut: Control + A). If you only have one camera, this choice is all you need.

But, if you create a scene where you have two or more cameras, as the screen shot illustrates, you need more choices.

Active Camera is the shot currently displayed at the position of the playhead.

Other cameras are on stand-by, waiting for their turn in the spotlight. For example, here, I have two cameras: Front camera, recording this airplane from directly in front of the nose. Then, halfway through the project, I cut to a second cameras, presenting the image from the side.

NOTE: Using the new 3D shapes, multiple cameras make for a very interesting scene change.

In this camera view menu, I can choose:

  • The camera under the playhead; this is the default>
  • The front camera, whether it is active or not
  • The side camera, whether it is active or not

These camera selection options make it easier to align elements regardless of whether the camera is active or not


Please rate the helpfulness of this tip.

Click on a star to rate it!

… for Apple Motion

Tip #1219: Split the Viewer into Multiple Views

Larry Jordan – LarryJordan.com

Multiple views allow faster 3D work in Motion.

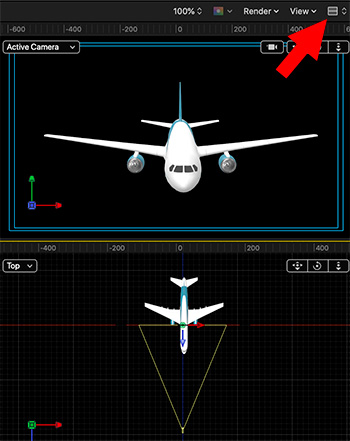
Two separate, stacked images. Top shows the active camera, bottom shows the scene from the top (like a floor plan).

Topic $TipTopic

In the top right corner of the Viewer is an icon composed of small boxes (see red arrow in screen shot). This is actually a big benefit when working in 3D. Here’s how.

Click this icon and you are presented with a number of ways to create multiple independent screens in the Viewer. For example, in the screen shot, two independent views are stacked above each other.

And that’s the key word: Independent. You can view multiple views of the same project. In my example, the top box shows the active camera – the screen that will be output during export – while the bottom screen shows the Top view in 3D, which, for me, is the best way to position and animate lights and cameras.

By having both these screens open at once, you can work more quickly without needing to switch back and forth between views.

When the time comes to go back to one screen, which you select from this same popup menu, whichever image has a yellow box around it will be displayed.


Please rate the helpfulness of this tip.

Click on a star to rate it!

… for Visual Effects

Tip #1218: Free After Effects Courses from Adobe

Larry Jordan – LarryJordan.com

Simple steps to help build After Effects mastery.

After Effects composite (Image courtesy of Adobe, Inc.)

Topic $TipTopic

Adobe has created a series of courses to help After Effects users become more proficient. These include:

  • After Effects Get Started
  • Understand Layers
  • Animating Essentials
  • Paint, Clone and Rotoscope Layers
  • Build and Animate Custom Shapes
  • Isolate and Remove Objects
  • Export from After Effects
  • Beginner Projects

And many more. Each runs 2 – 10 minutes and all are free.

Here’s the link.


Please rate the helpfulness of this tip.

Click on a star to rate it!

… for Visual Effects

Tip #1215: Create a Crash Zoom from Two Shots

Larry Jordan – LarryJordan.com

A crash-zoom rapidly zooms from one shot to the next. Here’s how to do it in post.

A crash-zoom in action. (Image courtesy of PremiumBeat.com.)

Topic $TipTopic

This article, written by Jason Boone, first appeared in PremiumBeat.com. This is a summary.

The crash (or snap) zoom is a cinematography technique you’ll see quite often in big-budget films. Quentin Tarantino frequently uses it to snap the viewer’s attention to specific items on screen, such as the tip of a shotgun or the blade of a Hattori Hanzo sword.

Here are the steps to create this effect in post using After Effects:

  • Step 1: Capture a WS and a CU
  • Step 2: Align the clips so the object centers match
  • Step 3: Animate the Crash Zoom
  • Step 4: Cover up the cut
  • Step 5: Add Camera Shake

The great thing about this technique is that you can quickly add motion graphics elements, as the Crash Zoom is already animated separate from the layers. To add an element, just parent it to the Crash Zoom and switch on the motion blur. Some anime speed lines might work nicely here as well.

EXTRA CREDIT

The article includes step-by-step instructions, along with two demo videos.


Please rate the helpfulness of this tip.

Click on a star to rate it!

… for Visual Effects

Tip #1208: I Need Your Help

Larry Jordan – LarryJordan.com

The Inside Tips encourages reader-contributed tips. Please share yours with us.

We don’t know what we don’t know until we learn it from someone else.

Topic $TipTopic

I want to encourage you to submit a tip or two for “The Inside Tips.” We all benefit when we take the time to share what we know.

The Inside Tips for Visual Effects is a Tip Letter focused on visual effects. This is a vast topic – far more than any single person can master.

Each of us, during our career, has benefited by learning from others – sometimes in a formal setting, more often in the course of daily work.

For this reason, it would be great if you could contribute a tip or two from your own experience. The Inside Tips are read in every state in the US, as well as 50 countries around the world.

Even the “simple things” only seem simple after we learn them.

Click this link to submit a tip…. And thanks!


Please rate the helpfulness of this tip.

Click on a star to rate it!