Media Apple FCP X

… for Codecs & Media

Tip #1236: Comparing ProRes 422 HQ, 422 vs. 422 LT

Larry Jordan – LarryJordan.com

Apple ProRes logo.

Topic $TipTopic

I got into a discussion recently about the differences between ProRes 422 and ProRes 422 HQ. After that, I did some research and here’s what I learned.

NOTE: This material was taken from Apple’s ProRes White Paper.

Apple ProRes 422 HQ: A higher-data-rate version of Apple ProRes 422 that preserves visual quality at the same high level as Apple ProRes 4444, but for 4:2:2 image sources. With widespread adoption across the video post-production industry, Apple ProRes 422 HQ offers visually lossless preservation of the highest-quality professional HD video that a single-link HD-SDI signal can carry. This codec supports full-width, 4:2:2 video sources at 10-bit pixel depths, while remaining visually lossless through many generations of decoding and re-encoding. The target data rate of Apple ProRes 422 HQ is approximately 220 Mbps at 1920 x 1080 and 29.97 fps.

Apple ProRes 422: A high-quality compressed codec offering nearly all the benefits of Apple ProRes 422 HQ, but at 66 percent of the data rate for even better multistream, real-time editing performance. The target data rate of Apple ProRes 422 is approximately 147 Mbps at 1920 x 1080 and 29.97 fps.

Apple ProRes 422 LT: A more highly compressed codec than Apple ProRes 422, with roughly 70 percent of the data rate and 30 percent smaller file sizes. This codec is perfect for environments where storage capacity and data rate are at a premium. The target data rate of Apple ProRes 422 LT is approximately 102 Mbps at 1920 x 1080 and 29.97 fps.

Which would I use personally?

  • ProRes 422 HQ. Only if the camera recorded source footage in this format.
  • ProRes 422. Anything shot by a non-HDR camera.
  • ProRes 422 LT. All review copies sent to clients or collaborators to decrease file size.

I’m interested in your comments.


Please rate the helpfulness of this tip.

Click on a star to rate it!

… for Codecs & Media

Tip #1237: An Overview of GoPro Cineform

Larry Jordan – LarryJordan.com

The Cineform logo.

Topic $TipTopic

One of the long-standing intermediate codecs for Adobe Premiere Pro is GoPro Cineform.

As Adobe writes: The GoPro CineForm codec is a cross-platform intermediate codec designed for editing high-resolution footage.

An intermediate codec can be best described as a video encoding format designed for professional video editing. You typically use an intermediate codec to pass media files from one application to another in a post-production workflow.

The GoPro CineForm codec is optimized for encoding video content with 4K and higher resolution, including support for smart rendering. You can also render and transcode files in mixed formats into a single GoPro CineForm codec to archive, or share with other teams and systems.

A distinct advantage of using the GoPro CineForm codec is the minimal loss in quality even after multiple encodes.

As GoPro writes: CineForm, first developed in 2001, was the first of its type to focus on speed, while supporting higher bit depths for image quality. More recent examples would be Avid DNxHD and Apple ProRes, although both divide the image into blocks using DCT. The full frame wavelet has a subjective quality advantage over DCTs, so you can compress more without classic ringing or block artifact issues.

It supports compression ratios between 10:1 and 4:1, greater ranges are possible. CineForm is a constant quality design, bit-rates will vary as needed for the scene.

This link – though it looks intimdating at the start – contains a useful description of the codec, along with it’s history and what makes it different from DNx or ProRes. Scroll down, past the developer information at the top.


Please rate the helpfulness of this tip.

Click on a star to rate it!

… for Codecs & Media

Tip #1238: An Overview of Alpha Channels

Larry Jordan – LarryJordan.com

Alpha channels are the magic that make compositing and most effects possible.

Viewing the alpha channel: White is opaque, black is transparent & gray is translucent.

Topic $TipTopic

The process of adding an alpha channel to an image – as a developer – is highly complex. Fortunately, we don’t need to understand how the channel is added to take advantage of it.

Just as the red, blue and green channels describe the amount of red, blue or green in each pixel, the alpha channel describes the amount of transparency in each pixel. An alpha channel provides a way to store images and their transparency information in a single file without disturbing the color channels.

Many file formats can include an alpha channel, including Adobe Photoshop, ElectricImage, TGA, TIFF, EPS, PDF, and Adobe Illustrator. ProRes, AVI and QuickTime (saved at a bit depth of Millions Of Colors+), also can contain alpha channels, depending upon the codecs used to generate these file types.

Alpha channels store transparency information in files in one of two ways: straight or premultiplied. Although the alpha channels are the same, the color channels differ.

With straight (or unmatted) channels, transparency information is stored only in the alpha channel, not in any of the visible color channels. With straight channels, the effects of transparency aren’t visible until the image is displayed in an application that supports straight channels.

With premultiplied (or matted) channels, transparency information is stored in the alpha channel and also in the visible RGB channels, which are multiplied with a background color. The colors of semitransparent areas, such as feathered edges, are shifted toward the background color in proportion to their degree of transparency.

Some software lets you specify the background color with which the channels are premultiplied; otherwise, the background color is usually black or white.

Straight channels retain more accurate color information than premultiplied channels. While premultiplied channels are compatible with a wider range of programs, such as Apple QuickTime Player.

Often, the choice of whether to use images with straight or premultiplied channels has been made before you receive the assets to edit and composite. Premiere Pro and After Effects recognize both straight and premultiplied channels, but only the first alpha channel they encounter in a file containing multiple alpha channels.

Use ProRes 4444 when you need to create or transfer clips with alpha channels.

Alpha channels are supported in all NLEs, and there are dozens of articles on the web detailing how to work with them to create a variety of different effects.


Please rate the helpfulness of this tip.

Click on a star to rate it!

… for Codecs & Media

Tip #1173: What is ProRAW?

Larry Jordan – LarryJordan.com

ProRAW is a pre-processed raw still image format designed to improve image quality.

(Image courtesy of Pexels.com.)

Topic $TipTopic

Apple ProRAW is a new still image raw format that is coming to the iPhone 12 Pro and iPhone Pro Max later in 2020.

According to TomsGuide.com: “ProRAW, in a nutshell, will capture RAW images but apply some image processing on top. This includes merging frames from several shots captured by the cameras on the iPhone 12 Pro, using Apple’s Deep Fusion and Smart HDR tech, or applying noise reduction.”

According to Tom’s Guide: “This new imaging format has been designed to tap into the upgraded triple rear camera array on both the iPhone 12 Pro and iPhone 12 Pro Max, which also feature a LiDAR sensor to gather more image information.”

“Think of it like this:,” Tom’s Guide wrote, “producing a finished image from RAW is like cooking a meal from scratch, including prepping all the ingredients. JPEG images on the other hand are the cooked meal. So using this analogy, ProRAW is like cooking a meal, only you have all the ingredients that are measured out and ready to use. Effectively, ProRAW provides base processing on an image for people to then [more easily] edit into final photographs.”

Here’s the link to the Tom’s Guide article.


Please rate the helpfulness of this tip.

Click on a star to rate it!

… for Random Weirdness

Tip #1156: How to Organize Editing a Feature

Larry Jordan – LarryJordan.com

Larry’s Rule: Keep things as simple as possible for as long as possible.

Topic $TipTopic

At a recent webinar, Alan asked:

What’s the best organizational system for editing a scripted feature film?

I told him that every editor ultimately creates their own system, because file naming and media organization is intimately tied up in this, too. However, when thinking about the edit, my suggestion is to keep things as simple as possible for as long as possible.

Start with one scene per timeline. This allows you to focus just on the clips for that scene, without getting intimidated by the vastness of the entire project. One scene per timeline also allows you to edit your scenes out of order and easily shuffle clips or scenes around until they make the most sense for the story you want to tell.

Then, as all the scenes for an act are completed – at least, completed well enough that you want to see them integrated into a larger picture – copy / paste the clips from each scene in order into an Act.

NOTE: You can use nests or compound clips if you want. These keep projects neater. But, at this level, I still like the ability to move/trim individual clips without having to go in and out of the nest.

Finally, as you near the end, create a new project / library and copy each act into it. This means that only the clips you are actually using will be stored in this master file.

Once you have all your clips, scenes and acts built into the right order, do the final color correction and audio mixing in preparation for final output.

This system allows you to focus on what’s important for each phase of the edit: individual clips, scenes, acts to the final complete project.


Please rate the helpfulness of this tip.

Click on a star to rate it!

… for Adobe Premiere Pro CC

Tip #1154: Options for Converting Frame Rate

Larry Jordan – LarryJordan.com

Try letting Premiere convert frame rates first. If playback is smooth, you’re all set.

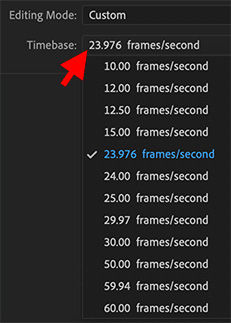
The Timebase menu in Premiere’s Sequence Settings.

Topic $TipTopic

During a recent webinar, Ian asked:

I shoot/edit in the UK at 25/50 fps with images up to 4k. At times I have B-roll either from an iPhone or GoPro 8 shot at 30 fps 4K. Should I retime these to 25/50 fps before importing or let Premiere do the job?

My answer is that, in general, go with the simplest solution first: let Premiere handle the frame rate conversion.

Because all video is just a string of still images, changing the frame rate while still maintaining the same apparent speed during playback requires dropping or duplicating frames.

Whenever you drop or duplicate a frame, there’s the potential for stutter in the video playback. The more drastic the frame rate conversion, the more potential for obvious stuttering.

However, you’ll find that Premiere does a good job dropping frames to convert the frame rate for most movement. (You won’t notice the impact of changing frames on stationary images with a locked down camera.)

If Premiere doesn’t do a good job, try converting your footage using Adobe Media Encoder. This uses a different process for frame rate conversion that may look better to you.

Every movie is different. Experiment with different tools until you get the results you want.


Please rate the helpfulness of this tip.

Click on a star to rate it!

… for Codecs & Media

Tip #1155: Rescue Your Legacy Media

Larry Jordan – LarryJordan.com

Access legacy media without using a legacy computer.

The Kyno logo.

Topic $TipTopic

One of the challenges in keeping up with the onrushing changes driven by technology is that older media, often, can no longer be played. This is a major problem when you are trying to repurpose old assets.

NOTE: Here’s an article that discusses codecs that are no longer supported in macOS Catalina or Big Sur.

Recently, I was talking with Robert Krüger, CEO of LessPain Software, the developers of Kyno. Kyno is media asset management and transcoding software. Personally, I like Kyno and have used it a lot.

Larry: I’m getting new questions about converting older 32-bit media AFTER someone has upgraded to Catalina – or, perhaps, Big Sur. As you know, Apple has discontinued support for all 32-bit codecs. I’m looking for ways for us to access older media files (i.e. archives) into the future.

Robert: That shouldn’t be the case as we’re not relying on the OS for decoding 32-bit material at all.

So, if you are having problems accessing older media, Kyno might be the solution.

Website: https://lesspain.software/kyno/
Pricing: $159 (US) or $349 for more NLE integration
A 30-day free trial is available.

NOTE: The free trial is the perfect opportunity to test your media and make sure you can convert it.


Please rate the helpfulness of this tip.

Click on a star to rate it!

… for Codecs & Media

Tip #1158: File Size is NOT Image Quality

Larry Jordan – LarryJordan.com

How long is a piece of string? Don’t focus on file size, focus on image quality.

Topic $TipTopic

During a recent webinar, Lane asked:

I’m creating a program of Christmas carols that may run about 30 minutes. I’m concerned about the file size because, when compressed, this program will likely give me a huge file. What should I do to keep file size down?

All too often, editors obsess about the size of their compressed file. This is the wrong thing to worry about.

File size is determined by two factors: bit rate and the duration of the movie. Longer programs will, by definition, have larger file sizes. There’s just more movie than in something shorter.

Instead, we need to focus on image quality. This is a combination of six factors:

  • The codec you are using
  • The frame size of the compressed file
  • The frame rate of the compressed file
  • The amount of movement between frames
  • Whether the movie is for streaming, download or posting to social media
  • The bit rate at which you compressed it

In general, for a 1080p movie, assume a ROUGH compressed file size of 20 MB/running minute. For a UHD file, assuming 60 MB/running minute. Both of these use the H.264 codec, which I recommend instead of HEVC.

These are rough guides, but any longer program is going the create some really large files.


Please rate the helpfulness of this tip.

Click on a star to rate it!

… for Codecs & Media

Tip #1126: How Much Does Journaling Slow a RAID?

Larry Jordan – LarryJordan.com

Journaling improves data recovery, but slows both reads and writes.

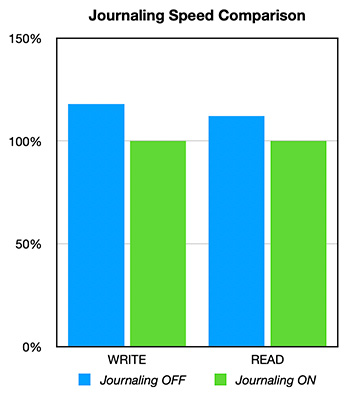
Journaling slows writes by 18% and reads by 12%.

Topic $TipTopic

I’ve spent the last two weeks optimizing my network and two of my locally-attached RAIDs. In this process, I found myself with two identical fully-optimized 4-drive RAIDs; except one had journaling turned on and the other had it turned off.

DEFINITION: “Journaling is a Mac OS X feature that is extremely helpful in protecting the system against the problems that arises due to power failures, hardware failures and directory corruptions. When the journaling is enabled on Mac, it keeps record entries of the changes to the files present on the disk. These entries are maintained in a special type of data structure called “Journal”…. In an event of an abrupt shutdown of the system due to power outage or another failure, these journal entries make it possible to restore the system to the last known consistent state of working.” (MacintoshDataRecovery.com)

So, I decided to test one of them to see how much journaling affects data transfer speeds. Since journaling is easy to enable, I tested the speed of the same RAID with journaling on, then again with it off.

What I learned is that journaling, though better for data recovery in the event of a power failure, slows reads by 12% and slows writes by 18%, on average.

For the complete details on my tests and the results, read this article.


Please rate the helpfulness of this tip.

Click on a star to rate it!

… for Codecs & Media

Tip #1131: Thunderbolt 4 = Thunderbolt 3 (Mostly)

Larry Jordan – LarryJordan.com

For Mac users, Thunderbolt 4 provides no new capability compared to Thunderbolt 3.

(Image courtesy of Intel.)

Topic $TipTopic

Thunderbolt 4, which is available for some PCs but not Macs (yet), is causing a lot of confusion in terms of performance and capability. To learn more, I interviewed Larry O’Connor, CEO of OWC, a company that specializes in Thunderbolt peripherals.

Here are four relevant quotes:

“Thunderbolt 4 is the latest “version” of Thunderbolt created by Intel. While Thunderbolt 3 brought a brand new connector and a doubling of bandwidth over the prior Thunderbolt 2 standard, Thunderbolt 4 is more a new name, rather than a new technology.”


“While Apple implemented Thunderbolt 3 in the fullest way, that is not the case with PC/Windows. There are multiple, different, allowed implementations that are possible for PCs as Intel pushed for broader Thunderbolt adoption. The result is an inconsistent experience between different PCs listed as having Thunderbolt or being Thunderbolt-ready.”


“What Thunderbolt 4 does is tell PC users that, no exceptions, you have the full Thunderbolt implementation. For Apple users, all Thunderbolt 3 equipped Macs since 2016 already have the full implementation across the board. So for Mac users, there’s no change.”


“Unlike Thunderbolt 3 cables, Thunderbolt 4 cables will universally provide the fully-rated interface speed that host and device support. This solves many tech support issues regarding cable length, speed and power delivery.”

Read the full interview here – it is worth your time.


Please rate the helpfulness of this tip.

Click on a star to rate it!