AI-driven, automatic audio mixing for Premiere and Resolve.
Alex Audio Butler product logo.
Alex Audio Butler just released an upgrade to its automatic audio mixing package for Adobe Premiere Pro and DaVinci Resolve.
Alex Audio Butler consists of 4 unique plug-ins that, combined, can mix most, if not all, types of video projects. Every audio track in your project (including the Master track) will contain exactly one Alex Audio Butler instance based on the type of audio in the track (Voice, Music, Sound FX, Master). All these instances work together by listening to your audio and sharing their internal analyses to create a series of audio settings that will make your audio sound as good as possible.
Using presets you only need to tell Alex Audio Butler high-level choices that fit your project: you want a Pumping Loud video, or something more Natural. Based on these instruction the plugin suite will tune every setting creating the right volume so you don’t have to think about dBs, Hz, et cetera.
A floating Status Window informs you if Alex Audio Butler has enough information for a correct export so you can be sure you never upload videos with audio mistakes.
The future of media is streaming – but what should broadcasters do?
The Next TV logo.
This article, written by Alan Wolk, first appeared in NextTV.com. This is a summary.
There are a few ways you can look at NBCUniversal’s decision to shut down its NBC Sports Network channel and distribute NBCSN’s programming to the USA network and Peacock.
On one level, it’s a cost-saving measure and a way to boost USA and Peacock at a time when both could use a little love.
On another, it’s the first of many similar decisions NBCU and other big networks are going to be making as they consolidate their offerings on linear and prepare to migrate the bulk of their business to streaming.
The powers that be at all of the major networks seem to understand that the future belongs to streaming. Their goal is to make the switch-over as painless as possible by gradually reducing their footprint on linear TV while increasing it on streaming. The process of reducing their linear footprint is a lot like one of those peg board games, the ones you find at Cracker Barrel, where the goal is to jump one piece over another and remove the piece you’ve jumped, till you’re left with just a single piece.
At the same time, they’ve got to keep their traditional linear businesses in shape, as that is still (for now) their major source of revenue.
In addition to viewers, networks are going to have to manage advertiser expectations during the switchover, as well. Today’s conventional wisdom is that younger, more affluent audiences are on streaming, while older and less affluent audiences are still on linear.
On the programming end, we’re already seeing how traditional networks are making excellent use of their streaming networks to promote their linear properties, giving them a strategic advantage over tech-only players like Amazon and Apple, especially when it comes to those viewers who are still primarily on linear but thinking of making the switch.
EXTRA CREDIT
The entire article is worth readiing, as is the NextTV website itself.
Please rate the helpfulness of this tip.
Click on a star to rate it!
https://www.theinsidetips.com/wp-content/uploads/2019/09/Tips-Logo-700x150.jpg00Larry Jordanhttps://www.theinsidetips.com/wp-content/uploads/2019/09/Tips-Logo-700x150.jpgLarry Jordan2021-02-09 01:30:002021-02-09 01:30:00Tip #1401: The Future of Media is Streaming
Hardware compression sets the standard for both speed and quality.
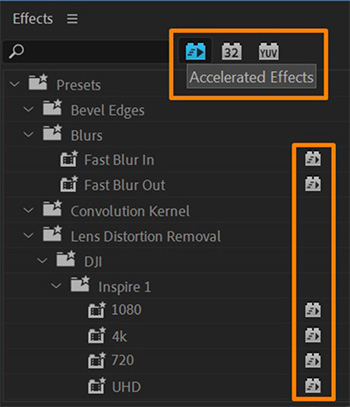
The Effects panel in After Effects, showing which effects are accelerated.
In the past, when we needed to render or export a file, the software in the NLE did all the work. This worked fine, but took a long time. As video production became more of a mass market, there was incentive for hardware developers to incorporate video compression circuits onto the CPU.
This was MUCH faster than software compression, but, for video pros, still not fast enough.
Now, video compression is moving from the CPU to the GPU. For example, according to Adobe, Adobe Premiere Pro and Adobe Media Encoder can take advantage of available GPUs on your system to distribute the processing load between the CPU and the GPU to get better performance. Currently, most of the processing is done by CPU and GPU assists in processing certain tasks and features.
The Mercury Playback Engine (GPU Accelerated) renderer is used to render GPU accelerated effects and features.
Here is the list of GPU accelerated effects in Adobe Premiere Pro. To identify the GPU accelerated effects, navigate to the Effects panel and look for the Accelerated Effects icon.
Apart from processing these effects, the Mercury Playback Engine (GPU Accelerated) is used for image processing, resizes, color space conversions, recoloring and more. It is also used for timeline playback/scrubbing and full-screen playback using Mercury Transmit.
EXTRA CREDIT
A wild card in hardware acceleration is the new Apple silicon chips. In the past, hardware acceleration for both H.264 and HEVC was handled by the T-2 chip.
With the move to Apple silicon, all compression is now done using the M1 chip.
From a quality point of view, my studies show that for most compression, hardware acceleration looks the same as software compression, yet processes files much more quickly.
Please rate the helpfulness of this tip.
Click on a star to rate it!
https://www.theinsidetips.com/wp-content/uploads/2019/09/Tips-Logo-700x150.jpg00Larry Jordanhttps://www.theinsidetips.com/wp-content/uploads/2019/09/Tips-Logo-700x150.jpgLarry Jordan2021-01-12 01:30:002021-01-08 17:32:55Tip #1322: What is Hardware-Accelerated Encoding?
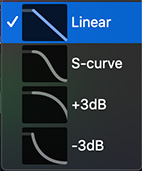
Four different fade shapes available in Apple Final Cut Pro.
Unlike video, audio levels are logarithmic. For example, whenever the audio level increases (or decreases) around 10 dB, the perceived volume is doubled (or cut in half). These log values also have an impact in cross-fading between clips.
A +3 dB transition adds a 3 dB increase in volume to both clips in the middle of a cross-fade. If the software did not add this “bump,” the cross-fade would sound fainter in the middle of a transition, then louder at each end.
When fading to or from black, a straight-line (linear) transition is best. When cross-fading between two clips, both of which have continuous audio, a +3 dB transition will sound better.
EXTRA CREDIT
Some software allows you to change the shape of the curve manually. These rules still apply, but manual adjustments allow much greater control over how the transition sounds.
Still, the general rule of audio is: Whatever sounds the best to you IS most likely the best.
Please rate the helpfulness of this tip.
Click on a star to rate it!
https://www.theinsidetips.com/wp-content/uploads/2019/09/Tips-Logo-700x150.jpg00Larry Jordanhttps://www.theinsidetips.com/wp-content/uploads/2019/09/Tips-Logo-700x150.jpgLarry Jordan2021-01-12 01:30:002021-01-12 01:30:00Tip #1325: Why Is an Audio Fade Called +3 dB?
This article, written by Jason Hellerman, first appeared in NoFilmSchool.com. This is a summary.
JustWatch.com, an international streaming guide, compiled a list of what people were streaming the most this year.
Here’s the list:
Parasite
Knives Out
Jojo Rabbit
Contagion
Once Upon a Time… in Hollywood
1917
Joker
The Lighthouse
Little Women
Ford v. Ferrari
NOTE: This tracked movies viewed only in the US from Jan. 1 – Dec. 1, 2020.
Please rate the helpfulness of this tip.
Click on a star to rate it!
https://www.theinsidetips.com/wp-content/uploads/2019/09/Tips-Logo-700x150.jpg00Larry Jordanhttps://www.theinsidetips.com/wp-content/uploads/2019/09/Tips-Logo-700x150.jpgLarry Jordan2021-01-08 01:30:002021-01-08 01:30:00Tip #1307: Top 10 Streaming Movies in 2020
Frame sizes will continue to increase, here’s how they benefit current projects.
We are in the middle of determining the “optimum” frame size for video projects as frame sizes continue to scale up. New projects are consistently shooting in 4k frame sizes, with cameras pushing up to 8K frame sizes and beyond.
First, while it could be argued that we can’t actually SEE 4K in most situations, that hasn’t stopped distributors from requesting it. However, even if we are creating HD projects, there is a value in shooting larger frame sizes. Recently, Jason Boone wrote a blog about the benefits of scaling larger frame sizes to fit smaller projects.
Reframe a shot. 4K provides so many extra pixels to choose from, you can convert a wide shot into a close-up. However, cutting into the frame won’t change depth of field, so the image won’t look the same as if you had zoomed in.
Use the same take multiple times. Using the same take for both wide shots and close-ups makes it seem as though you have two cameras. The benefit is that where talent is looking change. The disadvantage is that background and depth of field won’t change either.
Create camera moves. Using keyframes you can create movement where there was none in the original shot. However, like moves on a still, elements won’t change position as they would if you used a dolly on set.
Stabilize your footage. This is powerful. Stabilization always zooms into a shot. By having lots of extra pixels to work with, the image won’t lose detail or sharpness.
Adjust the image for graphics. There’s nothing worse than graphics you can’t read. 4K gives us extra pixels for scaling and repositioning.
4K may not be visible to the eye, but it can be a BIG benefit in post. And the same holds true for larger frame sizes yet – provided your storage is fast and large enough to hold it!
Alpha channels are the magic that make compositing and most effects possible.
Viewing the alpha channel: White is opaque, black is transparent & gray is translucent.
The process of adding an alpha channel to an image – at the developer level – is highly complex. Fortunately, we don’t need to understand how the channel is added to take advantage of it.
Just as the red, blue and green channels describe the amount of red, blue or green in each pixel, the alpha channel describes the amount of transparency in each pixel. An alpha channel provides a way to store images and their transparency information in a single file without disturbing the color channels.
Many file formats can include an alpha channel, including Adobe Photoshop, ElectricImage, TGA, TIFF, EPS, PDF, and Adobe Illustrator. ProRes, AVI and QuickTime (saved at a bit depth of Millions Of Colors+), also can contain alpha channels, depending upon the codecs used to generate these file types.
Alpha channels store transparency information in files in one of two ways: straight or premultiplied. Although the alpha channels are the same, the color channels differ.
With straight (or unmatted) channels, transparency information is stored only in the alpha channel, not in any of the visible color channels. With straight channels, the effects of transparency aren’t visible until the image is displayed in an application that supports straight channels.
With premultiplied (or matted) channels, transparency information is stored in the alpha channel and also in the visible RGB channels, which are multiplied with a background color. The colors of semitransparent areas, such as feathered edges, are shifted toward the background color in proportion to their degree of transparency.
Some software lets you specify the background color with which the channels are premultiplied; otherwise, the background color is usually black or white.
Straight channels retain more accurate color information than premultiplied channels. While premultiplied channels are compatible with a wider range of programs, such as Apple QuickTime Player.
Often, the choice of whether to use images with straight or premultiplied channels has been made before you receive the assets to edit and composite. Premiere Pro and After Effects recognize both straight and premultiplied channels, but only the first alpha channel they encounter in a file containing multiple alpha channels.
ProRes 4444 is a good choice when you need to create or transfer clips with alpha channels.
Alpha channels are supported in all NLEs, and there are dozens of articles on the web detailing how to work with them to create a variety of different effects.
Please rate the helpfulness of this tip.
Click on a star to rate it!
https://www.theinsidetips.com/wp-content/uploads/2019/09/Tips-Logo-700x150.jpg00Larry Jordanhttps://www.theinsidetips.com/wp-content/uploads/2019/09/Tips-Logo-700x150.jpgLarry Jordan2020-12-22 01:30:002020-12-22 01:30:00Tip #1266: Interpreting an Alpha Channel
MKV files, like QuickTime or MXF, are containers that hold media files.
This morning, a reader emailed me a question asking whether MKV files are supported in Big Sur. That got me thinking about what an MKV file is.
According to HowToGeek.com, “MKV files are actually multimedia container formats. An MKV container can incorporate audio, video, and subtitles into a single file—even if those elements use different types of encoding….
MKV container files were designed to be future proof, meaning that the files would not become outdated.”
Features of an MKV file include:
Fast seeking
Chapter, menu, and metadata support
Different selectable audio and video streams
Online streaming compatibility
Subtitle (hard-coded and soft-coded) support
Error recovery, which allows for playback of corrupted files
The MKV container itself also supports almost any audio and video format, making the format highly adaptive and easy to use. However, while the MKV file may not become outdated, the players that support them can. For example, QuickTime Player does not support MKV files.
Here’s a list, published by Wondershare, of the top 10 MKV players for Windows, Mac, iOS and Android devices.
So, as for compatibility, if your MKV player runs on Big Sur, the MKV files should play as well.
Please rate the helpfulness of this tip.
Click on a star to rate it!
https://www.theinsidetips.com/wp-content/uploads/2019/09/Tips-Logo-700x150.jpg00Larry Jordanhttps://www.theinsidetips.com/wp-content/uploads/2019/09/Tips-Logo-700x150.jpgLarry Jordan2020-12-22 01:30:002020-12-22 01:30:00Tip #1273: What is an MKV File?
Here are a variety of tools you can use to convert, repair and play QuickTime files.
QuickTime is a very flexible media container, but, when it breaks, it breaks badly. There are three big problems with video files that won’t play:
The file lacks an extension
The codec is no longer supported
The QuickTime movie itself is broken
The first problem generally shows up when you store media files on a server. Servers don’t use the Mac operating system, which means that all files on a server must use an extension. Sometimes, simply adding the correct extension – either .mov or .mp4 – will allow a movie to play.
A bigger problem with video files are codecs that are no longer supported. Apple removed support for 32-bit codecs in macOS Catalina, which means many early videos no longer play. Even my audio-only files, stored in early QuickTime movies, won’t play.
To play older files, I have several older computers that I’m not upgrading. As well, Kyno, from LessPain Software will convert older codecs, even if the movies won’t play on a current operating system.
The third problem, though is trickier. When dealing with QuickTime movies, the entire file needs to be perfect for the video to play. If one small part of a QuickTime movie is damaged, the entire movie is dead. For this reason, much though I love QuickTime, I’m also converting any movies that need future proofing into MPEG-4. Keep the bit rate high – 10 Mbps or above – to retain high image quality. Then, I have both a ProRes version and an MPEG-4 version. One of those should last.
If the media file is damaged, I’ve had great success using Wondershare UniConverter. While this hasn’t fixed all my files, it HAS fixed most of them. This software has a free trial that converts the first third of any video. If it can convert a third, the paid version (subscription or purchase) will convert all of it. I used this software to recover over 100 files that wouldn’t play.
As well, the folks at Digital Rebellion also have a family of QuickTime repair utilities called Pro Maintenance Tools. I’m hoping to give it a try in the next week or two. I have great respect for their developers!
Please rate the helpfulness of this tip.
Click on a star to rate it!
https://www.theinsidetips.com/wp-content/uploads/2019/09/Tips-Logo-700x150.jpg00Larry Jordanhttps://www.theinsidetips.com/wp-content/uploads/2019/09/Tips-Logo-700x150.jpgLarry Jordan2020-12-15 01:30:002020-12-12 09:56:20Tip #1257: Repair a Broken QuickTime Movie
We may request cookies to be set on your device. We use cookies to let us know when you visit our websites, how you interact with us, to enrich your user experience, and to customize your relationship with our website.
Click on the different category headings to find out more. You can also change some of your preferences. Note that blocking some types of cookies may impact your experience on our websites and the services we are able to offer.
Essential Website Cookies
These cookies are strictly necessary to provide you with services available through our website and to use some of its features.
Because these cookies are strictly necessary to deliver the website, refuseing them will have impact how our site functions. You always can block or delete cookies by changing your browser settings and force blocking all cookies on this website. But this will always prompt you to accept/refuse cookies when revisiting our site.
We fully respect if you want to refuse cookies but to avoid asking you again and again kindly allow us to store a cookie for that. You are free to opt out any time or opt in for other cookies to get a better experience. If you refuse cookies we will remove all set cookies in our domain.
We provide you with a list of stored cookies on your computer in our domain so you can check what we stored. Due to security reasons we are not able to show or modify cookies from other domains. You can check these in your browser security settings.
Google Analytics Cookies
These cookies collect information that is used either in aggregate form to help us understand how our website is being used or how effective our marketing campaigns are, or to help us customize our website and application for you in order to enhance your experience.
If you do not want that we track your visit to our site you can disable tracking in your browser here:
Other external services
We also use different external services like Google Webfonts, Google Maps, and external Video providers. Since these providers may collect personal data like your IP address we allow you to block them here. Please be aware that this might heavily reduce the functionality and appearance of our site. Changes will take effect once you reload the page.
Google Webfont Settings:
Google Map Settings:
Google reCaptcha Settings:
Vimeo and Youtube video embeds:
Other cookies
The following cookies are also needed - You can choose if you want to allow them:
Privacy Policy
You can read about our cookies and privacy settings in detail on our Privacy Policy Page.