Media Apple FCP X

… for Codecs & Media

Tip #1128: Apple Wins Engineering Emmy

Larry Jordan – LarryJordan.com

Apple won an Engineering Emmy for the ProRes family of codecs.

Television Academy logo.

Topic $TipTopic

Apple won a Engineering Emmy for exceptional engineering development which will be announced at the Oct. 29 Emmy Awards ceremony.

According to the announcement from the Academy:

Engineering Emmys are presented to an individual, company or organization for developments in engineering that are either so extensive an improvement on existing methods or so innovative in nature that they materially affect the production, recording, transmission or reception of television. This year the Academy is recognizing nine companies and five individuals with the prestigious award.

Apple was specifically honored for its ProRes family of codecs. As the Academy wrote:

Introduced in 2007, Apple ProRes has become a ubiquitous video codec in the film and television industry. It offers excellent preservation of source video quality and, thanks to innovative algorithm design, fast encoding and ultra-fast decoding. These two properties—combined with Apple’s industry licensing and certification support—make ProRes among the most widely used codecs for end-to-end content-creation workflows: from high-quality acquisition to high-performance editing, color correction, broadcast ingest and playout, and FX creation to master content distribution and archiving.

Joining Apple for Engineering Awards this year are:

  • Codex – for high-speed data migration of RAW content
  • Dan Dugan – for gain sharing automatic microphone mixing
  • Epic Games – for the Unreal Engine
  • Re:Vision Effects – for optical flow-based video tools
  • Sound Radix – for Auto-Align Post for audio phase/time corrections
  • Bill Spitzak, Jonathan Egstad, Peter Crossley and Jerry Huxtable – for Nuke.

Here’s an Apple summary of the ProRes codec family.


Please rate the helpfulness of this tip.

Click on a star to rate it!

… for Codecs & Media

Tip #1129: What is the Alpha Channel?

Larry Jordan – LarryJordan.com

Invented in the 1970’s, alpha channels are an indispensable workhorse for visual effects.

Topic $TipTopic

Invented in the 1970’s by Alvy Ray Smith, Techopedia defines the alpha channel as a color component that represents the degree of transparency (or opacity) of a color (i.e., the red, green and blue channels). It is used to determine how a pixel is rendered when blended with another.

The alpha channel controls the transparency or opacity of a color. Its value can be represented as a real value, a percentage, or an integer: full transparency is 0.0, 0% or 0, whereas full opacity is 1.0, 100% or 255, respectively.

When a color (source) is blended with another color (background), e.g., when an image is overlaid onto another image, the alpha value of the source color is used to determine the resulting color. If the alpha value is opaque, the source color overwrites the destination color; if transparent, the source color is invisible, allowing the background color to show through. If the value is in between, the resulting color has a varying degree of transparency/opacity, which creates a translucent effect.

The alpha channel is used primarily in alpha blending and alpha compositing.

ALPHA COMPOSITING

Wikipedia defines “alpha compositing” as:

In computer graphics, alpha compositing is the process of combining one image with a background to create the appearance of partial or full transparency. It is often useful to render picture elements (pixels) in separate passes or layers and then combine the resulting 2D images into a single, final image called the composite. Compositing is used extensively in film when combining computer-rendered image elements with live footage. Alpha blending is also used in 2D computer graphics to put rasterized foreground elements over a background.

In order to combine the picture elements of the images correctly, it is necessary to keep an associated matte for each element in addition to its color. This matte layer contains the coverage information—the shape of the geometry being drawn—making it possible to distinguish between parts of the image where something was drawn and parts that are empty.

Although the most basic operation of combining two images is to put one over the other, there are many operations, or blend modes, that are used.


Please rate the helpfulness of this tip.

Click on a star to rate it!

… for Codecs & Media

Tip #1130: Not All Proxy Files are the Same

Larry Jordan – LarryJordan.com

Proxies are smaller files than camera masters, but not all proxies are equal.

Topic $TipTopic

While working on my webinar this week on Multicam Editing in Adobe Premiere Pro I started looking into proxy files. By definition, a proxy file is a smaller file than the camera native file is is derived from. But not all proxy files are created equal.

  • Final Cut Pro X, for example, defaults to ProRes Proxy for all proxy files.
  • Premiere Pro provides the choice of H.264, ProRes or Cineform. (DNx is reserved for 360° VR video.)

H.264 provides the smallest files. Based on my tests, H.264 files are about 1/10 the size of ProRes Proxy, while ProRes Proxy is about 1/10 the size of ProRes 422. But, due to the GOP-compression that H.264 uses, these files are less efficient to edit; especially on slower systems.

  • If you are looking for smooth playback and faster rendering, ProRes Proxy is a better choice.
  • If you are looking for the smallest files, for example, to transfer over the web for another editor to work on, H.264 is a better choice. Just remember that H.264 will require a newer computer with a fast CPU to edit effectively.

The webinar has more details on all of these.


Please rate the helpfulness of this tip.

Click on a star to rate it!

… for Codecs & Media

Tip #1102: What is a Render File?

Larry Jordan – LarryJordan.com

A render file is a media file calculated based on the effects applied to a source clip.

(Image courtesy of Pexels.com.)

Topic $TipTopic

Since all NLEs are non-destructive editors (leaving original media intact), render files are created when you alter an original clip, create a clip via a generator or use a still image in the Timeline. Those alterations need to be turned into media. That process is called “rendering.”

Essentially render files are new media files that match your project/sequence settings that your NLE uses instead of the original clips. They effectively ‘replace’ the original media and the NLE will refer to them instead of the original media once they’ve been rendered.

If you make additional changes to a rendered clip, the NLE will delete the old render file and it will be replaced by a new render file.

Generally, render files are retained by the NLE if you delete a clip from the timeline, which saves time in case you put it back in.

To pick up storage space, you can delete render files. If that file is needed again, the NLE will re-render it.

Once a project is complete, render files can be deleted. If they are needed in the future, the NLE will re-render them, as well.


Please rate the helpfulness of this tip.

Click on a star to rate it!

… for Codecs & Media

Tip #1104: Generate More Viewers on YouTube

Larry Jordan – LarryJordan.com

Simply uploading a video isn’t enough.

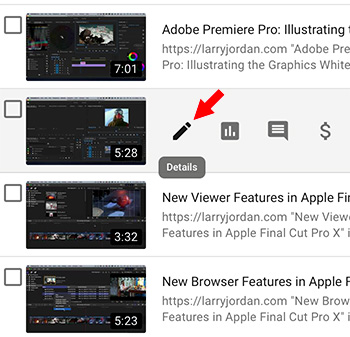
The Details section for each video in YouTube Studio for entering metadata.

Topic $TipTopic

I was reading a blog recently by Richard Tiland about posting videos to YouTube. In it, he wrote: “Uploading your video to YouTube isn’t enough. You need to include metadata so that the site understands what your video is all about.”

His points included:

  • Optimize the title with keywords. Keep it short, but searchable.
  • Add a detailed and accurate description. Length is less important here.
  • Include a transcript to help viewers take in your content without turning up the sound.
  • Organize content using playlists. This helps both viewers and YouTube’s search algorithms.
  • Create a cohesive look to improve branding. Make your videos look like they are coming from the same creative source.
  • Finally, don’t forget the Call to Action. This is the explicit behavior you want the audience to take after watching your video.

Metadata always seems intimidating somehow. But, really, all we are doing is enabling viewers to find our media faster and easier. And that is always a good thing.


Please rate the helpfulness of this tip.

Click on a star to rate it!

… for Codecs & Media

Tip #1105: What is Sharpening?

Larry Jordan – LarryJordan.com

Sharpening means enhancing the contrast of edges in an image.

Original file (left), blurred image, the subtracted image, the final result (right).

Topic $TipTopic

This article, written by Henry Guiness, first appeared in Photography.Tutsplus.com. This is a summary.

We have all heard the term “sharpening.” But what is it and how do we apply it? There are three main reasons to sharpen your image: to overcome blurring introduced by camera equipment, to draw attention to certain areas and to increase legibility.

Before I explain how to sharpen, we need to understand that sharpness is subjective.

Sharpness is a combination of two factors: resolution and acutance. Resolution is straightforward and not subjective. It’s just the size, in pixels, of the image file. All other factors equal, the higher the resolution of the image—the more pixels it has—the sharper it can be. Acutance is a little more complicated. It’s a subjective measure of the contrast at an edge. There’s no unit for acutance—you either think an edge has contrast or think it doesn’t. Edges that have more contrast appear to have a more defined edge to the human visual system.

Sharpening then, is a technique for increasing the apparent sharpness of an image. Once an image is captured, Photoshop can’t magically add more details: the actual resolution remains fixed. Yes, you can increase the file’s size but the algorithms any image editor uses to do so will decrease the sharpness of the details.

In the image in the screen shot, the author mimicked the Unsharp Mask effect in Photoshop. The first image is the original file, the second is a blurred copy, the third is the one subtracted from the other so as to detect the edges, and the fourth is the original image sharpened using the edge layer. Unsharp masking is the oldest sharpening technique. It subtracts a blurred (unsharp) copy from the original image to detect any edges. A mask is made with this edge detail. Contrast is then increased at the edges and the effect is applied to the original image. While unsharp masking was originally a film technique, it’s now the basis of digital sharpening.

The article continues with sharpening settings and illustrations of both good and bad sharpening, along with links to learn more.


Please rate the helpfulness of this tip.

Click on a star to rate it!

… for Codecs & Media

Tip #1083: Pick the Right Version of ProRes

Larry Jordan – LarryJordan.com

ProRes provides lots of choices – all supporting 10-bit, high-quality images.

The Apple ProRes logo.

Topic $TipTopic

Apple ProRes comes in a variety of formats. Which one should you pick for your projects? Here’s some advice.

NOTE: Much this tip is taken from the Apple ProRes White Paper (Jan. 2020). (Link)

Apple ProRes is one of the most popular codecs in professional post-production and, as of Oct. 2020, it also won an Engineering Emmy Award for its quality, licensing and innovation. The ProRes family of video codecs has made it both possible and affordable to edit full-frame, 10-bit, 4:2:2 and 4:4:4:4 high-definition (HD), 2K, 4K, 5K, and larger video sources.

ProRes codecs take full advantage of multicore processing and feature fast, reduced-resolution decoding modes. All ProRes codecs support any frame size (including SD, HD, 2K, 4K, 5K, and larger) at full resolution. The data rates vary based on codec type, image content, frame size, and frame rate.

Here are the current formats:

  • Apple ProRes RAW. Captures data from the camera sensor. Existing media can’t be converted into ProRes RAW.
  • Apple ProRes 4444 XQ. The highest-quality version of ProRes for 4:4:4:4 image sources (including alpha channels), with a very high data rate to preserve the detail in high-dynamic-range imagery generated by today’s highest-quality digital image sensors.
  • Apple ProRes 4444. An extremely high-quality version of ProRes for 4:4:4:4 image sources (including alpha channels). This codec features full-resolution, mastering-quality 4:4:4:4 RGBA color and visual
  • fidelity that is perceptually indistinguishable from the original material.

NOTE: Apple ProRes 4444 XQ and Apple ProRes 4444 are ideal for the exchange of motion graphics media because they are virtually lossless, and are the only ProRes codecs that support alpha channels.

  • Apple ProRes 422 HQ. A higher-data-rate version of Apple ProRes 422 that preserves visual quality at the same high level as Apple ProRes 4444, but for 4:2:2 image sources.
  • Apple ProRes 422. A high-quality compressed codec offering nearly all the benefits of Apple ProRes 422 HQ, but at 66 percent of the data rate for even better multistream, real-time editing performance.
  • Apple ProRes 422 LT. A more highly compressed codec than Apple ProRes 422, with roughly 70 percent of the data rate and 30 percent smaller file sizes. This codec is perfect for environments where storage capacity and data rate are at a premium.
  • Apple ProRes 422 Proxy. An even more highly compressed codec than Apple ProRes 422 LT, intended for use in offline workflows that require low data rates but full-resolution video.

WHICH TO PICK?

  • Use ProRes RAW if your camera or external storage can record it from the sensor.
  • Use ProRes 4444 for images recorded using HDR values, or for media created on the computer. (For example using Motion or After Effects.)
  • Use ProRes 422 for images recorded using a camera for Rec. 709 (HD) media.
  • Use ProRes Proxy where image quality is less important than small file size; for example in screening and rough cuts.

Please rate the helpfulness of this tip.

Click on a star to rate it!

… for Codecs & Media

Tip #1068: When to Choose JPEG, PNG or TIFF

Larry Jordan – LarryJordan.com

Pick the codec that works best for your project.

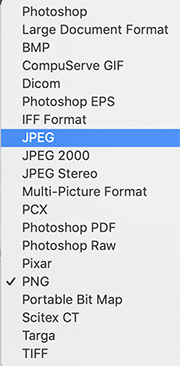
Export codec list from Adobe Photoshop.

Topic $TipTopic

A codec is the mathematical formula that determines how to convert light, or sound, into binary digits for the computer to store or display. While there are a LOT of still image codecs, there are only four that you’ll need to choose between for most of your video projects:

  • PSD
  • JPG
  • PNG
  • TIFF

So, which should you choose? Here are some tips.

PSD

This is the native Photoshop format.

Use this when you need to retain the ability to edit the elements of an image or when you want to enable, or disable, specific layers within the image.

NOTE: For best results, always embed media into the Photoshop file.

JPG or JPEG

This is a highly-compressed file best used for final distribution. Good image quality in a very small file size.

Part of compressing a JPEG file involves throwing away color data and reducing some of the image quality. While this is almost always OK for images destined for the web, it is not a good idea for any image that you want to edit.

NOTE: Compressing an already compressed file will materially damage quality.

PNG

This is a modestly compressed image format. Excellent image quality with a large file size.

This is a more modern format than TIFF and is the best choice for outputting finished images at high quality. While you can’t reedit a PNG image the way you can a PSD, this provides excellent image quality. PNGs, unlike JPEG, supports an alpha channel for transparent image elements.

The only limit of PNG is that it is only supports 8-bit color.

TIFF

This is a lightly compressed image format, providing excellent image and color quality with a large file size.

TIFF is my go-to still image format. Supporting up to 10-bit color, alpha channels and essentially lossless images, it has been around for a long, long time.

The only limitation of TIFF is that, unlike PSD, you can’t edit elements within the image.


Please rate the helpfulness of this tip.

Click on a star to rate it!

… for Codecs & Media

Tip #1069: Create a Custom Poster Frame

Larry Jordan – LarryJordan.com

Poster frames represent your media in the Finder.

Copy a new poster frame image into the image well in the Finder > Get Info window.

Topic $TipTopic

Ian Brown suggested this tip.

There’s a very fast way to create a poster frame for a QuickTime movie. (Poster frames appear in the Finder, and other locations, to illustrate the contents of a clip.)

  • Open the video in QuickTime Player
  • Move the playhead to the frame you want to use as a poster frame
  • Choose Edit > Copy (shortcut: Cmd + C)
  • Close the video
  • Select the file icon in the Finder
  • Choose File > Get Info (shortcut: Cmd + I)
  • Select the small icon in the top left corner
  • Choose Edit > Paste (shortcut: Cmd + V)

Done.

EXTRA CREDIT

Actually, anything you paste into that top left box will become the poster frame. It doesn’t need to be an image, it could also be a graphic.


Please rate the helpfulness of this tip.

Click on a star to rate it!

… for Codecs & Media

Tip #1070: What Determines Storage Performance?

Larry Jordan – LarryJordan.com

Aerial density, RPM and whether an SSD is in the mix all affect storage performance.

The Seagate logo.

Topic $TipTopic

Seagate published an interesting article, titled: Choosing High Performance Storage Isn’t Just About RPM. This is a summary.

The performance of a hard drive is most effectively measured by how fast data can be transferred from the spinning media (platters) through the read/write head and passed to a host computer. This is commonly referred to as data throughput and typically measured in gigabytes (or gigabits) per second. In either case, data throughput is directly related to how densely data is packed on the hard drive platters and how fast these platters spin.

Higher revolutions per minute represent a faster hard drive, but the rate of media transfer is just as important for data storage solutions.

For the areal density specification, we can measure data density on a hard drive in two ways: bits per inch (BPI) and tracks per inch (TPI). As tracks are placed closer together, TPI increases. Similarly, as data bits are placed closer and closer to each other along a track, BPI increases. Together, these represent areal density.

As a rule, when areal density increases on a hard drive, so does data throughput performance. This is because the data bits pass by the read/write head of the hard drive faster, which leads to faster data rates.

For the RPM specification, platters need to spin faster to increase performance in a hard drive. This results in moving the data bits past the read/write head faster, which results in higher data rates. Hard drives have been engineered with spin rates as low as 1200 RPM and as high as 15K RPM. But today’s most common RPM rates, in both laptop and desktop PCs, are between 5400 and 7200 RPM.

Given two identically designed hard drives with the same areal densities, a 7200 RPM drive will deliver data about 33% faster than the 5400 RPM drive. Consequently, this specification is important when evaluating the expected performance of a hard drive or when comparing different HDD models.

However, when moving to a solid state hybrid drive (SSHD), RPM is largely irrelevant. Why?

SSHD design is based on identifying frequently used data and placing it in the solid state drive (SSD) or NAND flash portion of the drive. NAND flash media is very fast, partly because there are no moving parts—since it’s made of solid state circuitry. Therefore, when data is requested by host computers there is typically not a dependence on pulling this data directly from the spinning media in the hard drive portion.

Sometimes, however, data will be requested that is not in the NAND flash, and only during these instances does the hard drive portion of the device become a bottleneck. Since the technology is so effective at identifying and storing frequently used data in the NAND area, SSHD technology is much more efficient in delivering data to a host computer quickly.

In tests conducted by Seagate to illustrate this article, the fastest performance for an SSHD drive came from one where the platters only spun at 5400 RPM.

Here’s a link to the full article.


Please rate the helpfulness of this tip.

Click on a star to rate it!