Media Apple FCP X

… for Codecs & Media

Tip #1043: Comparing HDR Grayscale to SDR

Larry Jordan – LarryJordan.com

HDR HLG matches SDR shadows and midtones, but adds more highlights.

(Graph courtesy of Wikipedia.com.)
This chart compares grayscale values between SDR and HDR HLG media.

Topic $TipTopic

As I was researching my recent webinar on “New Features in Adobe Premiere Pro,” I came across an interesting graph that compares HDR HLG grayscale values with SDR.

We are all familiar with the grayscale values in SDR (Standard Dynamic Range) media. It’s the Rec. 709 HD footage we work with on a daily basis.

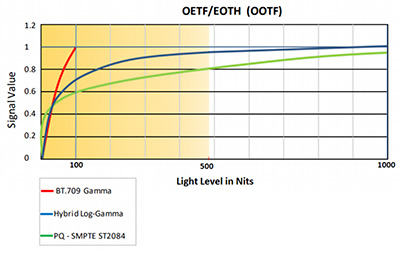
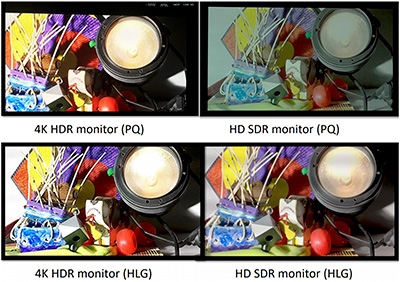
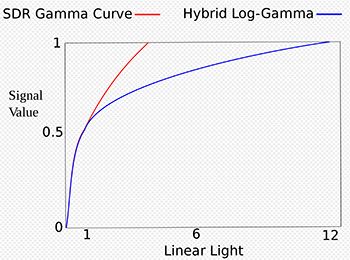
While HDR consists of more than simply brighter pixels, grayscale is the relevant concept here. HDR has two formats: HLG and PQ. HLG (Hybrid Log Gamma) is optimized for broadcast, while PQ is optimized for digital display. Both Final Cut and Premiere support HLG media. But, what does it mean to say “optimized for broadcast?” That’s where this chart comes in.

SDR grayscale values are essentially linear, a “straight line” from 0 IRE (pure black) to 100 IRE (pure white). This range of 100 IRE values is what the entire broadcast signal path is designed to support.

HDR HLG mirrors the linear SDR grayscale values from 0 to 75 IRE – though there is some variation between standards in different countries – then expresses highlights as log values, rather than linear for the top 25% of highlights.

This allows HDR HLG to pack much brighter highlights than SDR, yet still fit within a 100 IRE range. However, there’s a trade-off. While HDR HLG is compatible with broadcast, HDR PQ has more highlight detail. Both HDR formats are much brighter than SDR.

EXTRA CREDIT

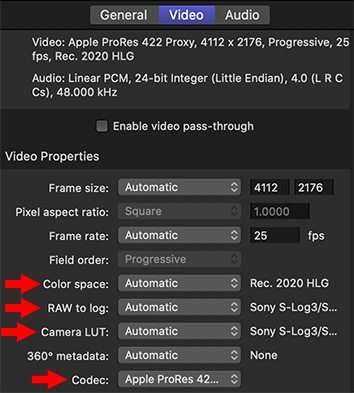
If you are creating an HDR project, it is important to know what format your distributor supports BEFORE you do the color grade, because grading HLG and PQ is not the same and you can not switch between them.


Please rate the helpfulness of this tip.

Click on a star to rate it!

… for Codecs & Media

Tip #1046: For HDR, Shadows are More Important

Larry Jordan – LarryJordan.com

Shadow detail is important to perception that highlights – as both SDR and HDR reflect.

Image courtesy of Venera Technologies.
In both SDR and HDR, 50% of all grayscale values are the shadows.

Topic $TipTopic

In earlier tips (#1043 and #1049) we compared differences in grayscale values between SDR and HDR. What I discovered during this research is how important shadow detail is for both SDR and HDR.

NOTE: The screen shot and the information in this article are taken from a Venera Technologies article.

Human beings are more sensitive to changes in darker regions compared to changes in brighter regions. This property is exploited in HDR systems providing more granularity (detail) in darker regions compared to brighter regions. The screenshot depicts that the light level range in darker regions are represented by a larger signal value range compared to the brighter regions – meaning more detail in the shadows.

While grayscale values are more evenly distributed for Rec. 709-based displays, they become less granular for HDR displays in the brighter regions. In the case of HLG, more than half of signal values are represented for light levels between 0-60 Nits while the remaining signal values span 60-1000 Nits. Similarly, in the case of PQ-based displays, approximately half of the signal values are represented for light levels between 0-40 Nits while the remaining half of the signal values are represented in a range of 40-1000 Nits.

In other words, for both HDR and SDR, half the total signal range is reserved for shadow values of less than 50 IRE; while, for HDR, the remaining highlight values are spread up to 10,000 IRE (Nits)!


Please rate the helpfulness of this tip.

Click on a star to rate it!

… for Codecs & Media

Tip #1049: HDR HLG vs PQ on SDR Monitors

Larry Jordan – LarryJordan.com

HLG looks better on SDR than PQ. But PQ looks better on HDR monitors.

Image courtesy of Venera Technologies.
HLG looks better on SDR monitors, but PQ has more detail in the highlights.

Topic $TipTopic

Tip #1043 compared the grayscale differences between HDR HLG and SDR. This tip illustrates the differences between watching HLG and PQ on an SDR monitor.

NOTE: The screen shot and the information in this article are taken from a Venera Technologies article.

To display the digital images on the screen, display devices need to convert the pixel values to corresponding light values. This process is usually non-linear and is called EOTF (Electro-Optical Transfer Function).

While SDR uses Rec. 709, HDR defines two additional transfer functions to handle this issue – Perceptual Quantizer (PQ) and Hybrid Log-Gamma (HLG). HDR PQ is an absolute, display-referred signal while HDR HLG is a relative, scene-referred signal. This means that HLG-enabled display devices automatically adapts the light levels based on the content and their own display capabilities while PQ enabled display devices need to implement tone mapping to adapt the light levels.

Under ideal conditions, dynamic PQ based transformation will achieve the best quality results at the cost of compatibility with existing display systems.

As you can see from the screen shot, HLG images look better on SDR monitors than PQ images. However, while PQ based transforms promise to display the best quality results on HDR enabled monitors, in comparison to HLG, PQ requires proper tone mapping by the display device.

EXTRA CREDIT

As you may be able to see in the screenshot, PQ offers more detail in the highlights than HLG.


Please rate the helpfulness of this tip.

Click on a star to rate it!

… for Codecs & Media

Tip #1029: HDR Playback to TV Screens

Larry Jordan – LarryJordan.com

HEVC was designed with HDR in mind. However, compression times are very slow.

(Image courtesy of Pexels.com.)

Topic $TipTopic

Stephen asks: I have been filming home movies for more than 60 years. I try to get the best output I can and future-proof my movies. Earlier this year my wife and I did an Antarctic cruise and managed to avoid Covid 19. I filmed this in HLG with a Sony PXW Z90.

I want to produce a deliverable HLG movie that I can watch on my HDR TV, an LG OLED. What format should I use?

Larry replies: You’ll need to use 10-bit HEVC. There are two flavors of HEVC: 8-bit and 10-bit. You MUST use the 10-bit version, 8-bit codecs, whether HEVC or H.264, do not support HDR media. (ProRes, though 10-bit and great for editing, is not a supported playback format for televisions.)

Apple Compressor, among other software, compresses into HEVC. However, on older computers, 10-bit HEVC will take a LOOOONNNGGGG time to compress. Probably 10 hours for a one-hour program. So, do a short test to verify this format will work on your TV, then allow enough time to compress the longer version.

Newer computers use hardware acceration for 8-bit HEVC, which speeds things a lot. However, I don’t know of any Mac hardware that accelerates 10-bit HEVC. I expect that to change in the near future.


Please rate the helpfulness of this tip.

Click on a star to rate it!

… for Codecs & Media

Tip #1013: The Coming File Size Tsunami

Larry Jordan – LarryJordan.com

The impact of increasing frame size AND frame rate requires exponential growth in storage.

Data based on ProRes 422, numbers provided by Apple ProRes White Paper.

Topic $TipTopic

Last week, I presented a webinar on media management that applied to both Premiere and Final Cut. During the presentation I was discussing the impact frame size, frame rates and bit depth have on the file size of our media files.

The world of 8K images is coming – whether we like it or not; though, personally, I’m not looking forward to it. But, the impact of 8K on our storage capacity and bandwidth is dramatic!

As I was presenting, I realized I was missing a chart that showed the result of both frame size AND frame rate increasing. So, here it is. As this chart shows, as both frame size and frame rate increase, we see an exponential growth in file size and bandwidth.

  • 720p24 uses 23 GB/hour
  • 1920p30 uses 66 GB/hour
  • UHD/30 uses 530 GB/hour
  • 8K/60 uses 2,263 GB/hour

This means that as you plan future projects make sure your storage system has the capacity to handle it!


Please rate the helpfulness of this tip.

Click on a star to rate it!

… for Codecs & Media

Tip #1015: Media Planning Guidelines

Larry Jordan – LarryJordan.com

Guidelines to plan and use media more efficiently.

Topic $TipTopic

As you plan your next project, here are some media guidelines to help you think about your media and the storage necessary to support smooth playback and editing:

  • If deadlines are extremely tight AND you are not adding a lot of effects, you can edit H.264 or HEVC directly in your NLE. Otherwise, transcode all highly-compressed media into an easier-to-edit intermediate format, such as ProRes, DNx or GoPro Cineform.
  • Always shoot the frame rate you need to deliver. Changing frame rates after production is complete almost always looks “jittery.”
  • Image quality is not lost in transcoding (converting) a highly-compressed video format into ProRes.
  • If the media was shot by a camera, transcode into ProRes 422.
  • If the media was created on a computer, transcode into ProRes 4444.
  • If the media was shot in log or raw formats, edit it natively and do the rough cut using proxies.
  • Proxies are your friend. Use proxies to create a rough cut when using HDR or raw media; or frame sizes larger than 4K.
  • Color grading high-quality 4K HDR media can require over 500 MB / second of data bandwidth! Make sure your storage is fast enough.
  • Always have a reserve budget for more high-performance storage. You’ll need it.
  • Always allow time to test your entire workflow from capture to final output before starting production. It is much easier to find and fix problems when not staring at a looming deadline. “I didn’t have time to test!” is never a good excuse.

Yes, there are exceptions to these rules, but not in most cases.

EXTRA CREDIT

Here’s an article I wrote that goes into more detail for each of these.


Please rate the helpfulness of this tip.

Click on a star to rate it!

… for Codecs & Media

Tip #991: HDV vs. “Normal” Media

Larry Jordan – LarryJordan.com

Make sure your projects match the aspect ratio of the pixels, as well as project.

An example of rectangular pixels (2:1). image courtesy of Wikipedia.

Topic $TipTopic

The big difference between HDV and “normal” media is the aspect ratio of each pixel. Just today, I got an email from a reader asking why their footage looked “stretched.” Here’s what you need to know.

Back in the old days, as we were making the transition from standard definition video to HD, cameras and storage devices were neither big enough nor fast enough to capture and record a full HD video stream.

To solve this problem, Sony and Panasonic created HD formats with non-square pixels. This meant that they could record fewer pixels, then stretch them horizontally in the final display so that fewer pixels would fill more space.

For example, while HDV records 720p footage using square pixels, instead of recording an image at 1920 x 1080, it records it using 1440 x 1080, then stretches each pixel’s width to fill the space of 1920 pixels, using only 1440 of them.

The problem this causes in editing is that, today, NLEs expect HD pixels to be square. When you work with older footage, if your image looks squished, check your pixel aspect ratio – or your project settings – to make sure you are compensating for these earlier rectangular pixels.

EXTRA CREDIT

Here’s a link from a few years ago that looks at HDV in more detail.


Please rate the helpfulness of this tip.

Click on a star to rate it!

… for Codecs & Media

Tip #995: Apple Compressor Supports ProRes RAW

Larry Jordan – LarryJordan.com

Compressor supports ProRes RAW making it useful on set creating proxy files.

Video Inspector settings for ProRes RAW images in Apple Compressor.

Topic $TipTopic

In a recent update, Apple added support for ProRes RAW in Compressor. Apple ProRes RAW and Apple ProRes RAW HQ bring the same performance, quality, and ease of use introduced by Apple ProRes to raw media.

When you add a ProRes RAW clip to a Compressor Batch, new options appear in the Video Inspector (see screen shot).

You can use Compressor to:

  • Convert between color spaces
  • Convert RAW to a log file
  • Apply a camera LUT

EXTRA CREDIT

While the Compressor help files don’t provide any detailed help on these settings, you can learn more about ProRes RAW here.


Please rate the helpfulness of this tip.

Click on a star to rate it!

… for Codecs & Media

Tip #996: More Proxy Options in Compressor

Larry Jordan – LarryJordan.com

Proxy workflows are very helpful for multicam edits, as well as frame sizes greater than 4K.

The new proxy compression options in Apple Compressor.

Topic $TipTopic

With the 4.4.7 update to Apple Compressor, Apple added more proxy options as compression settings. In the past, we could only convert proxies to ProRes Proxy. Now, however, we can create proxies using either ProRes or H.264.

NOTE: Well, that statement isn’t completely true. You could create custom compression settings for just about any format, but this update makes proxy creation a lot easier by pre-building more compression presets.

A new “Proxy” category was added to Compressor. Inside you can choose between ProRes Proxy and H.264. H.264 files will be smaller, but ProRes will be more efficient to edit (meaning they will render and export faster).

NOTE: Using HEVC for editing proxies is not recommended because the complexity of the compression format makes them tend to bog down the system.

In addition to the two codecs, you can also choose the frame size of the proxy as a percentage of the frame size of the master file. Reducing the frame size shrinks file sizes still smaller, but also decreases image quality. To minimize storage requirements, pick the smallest proxy file that still shows enough detail to make informed editing decisions. If space isn’t an issue, use one-half size; that always yields the highest image quality.

I did a quick test. Starting with a 1 GB ProRes 422 master, a half-size ProRes Proxy file was about 90% smaller than the original. In comparison, H.264 was about 10% the size of each ProRes Proxy file. As well, each reduction in frame size cut file size by roughly 2/3.

If file storage is not a big issue or if you are editing on an older system, choose ProRes Proxy. This is a highly-efficient codec, optimized for editing, that runs well on slower systems. It also provides a slightly higher image quality, compared to H.264.

If conserving file storage is important, you need to share project files with another editor, or you have a newer system, H.264 may be the better choice.

Most of the time, we just need to see proxy files to make basic editorial decisions. When the time comes for adding effects and color grading, its a single click in the NLE to switch back to full-quality masters. As with all projects, run tests to see what works best for you before starting a major project. On the other hand, you can always regenerate proxy files and relink them, if you change your mind.

EXTRA CREDIT

You can use Compressor to create proxy files for any NLE. Final Cut also replicates these same proxy formats, so you can use the built-in proxy creation process in FCP X, if you prefer.


Please rate the helpfulness of this tip.

Click on a star to rate it!

… for Adobe Premiere Pro CC

Tip #948: What’s a Rectified Waveform?

Larry Jordan – LarryJordan.com

Rectified audio displays only the positive half of an audio waveform.

The same audio clip displayed as rectified audio (top) and full audio wave (bottom).

Topic $TipTopic

Another timeline display option in Premiere is “Rectified Audio Waveforms.” Any guesses what these are – and why you might use them?

All audio is a wave that travels through the air from its point of origination to our ears; or a microphone. When the sound is recorded, it is recorded as a wave, where the audio has both positive and negative values above and below a centerline. That centerline is defined as the place where audio has no volume.

The farther audio gets from the centerline, the louder it becomes.

However, seeing audio as a wave makes it harder to determine volume, because the loudest portions of a clip are at both the top and bottom of the wave.

To solve this problem, Premiere, like other NLEs, displays only half the audio wave – the positive values which are above the zero (center) line. This “sliced” version of audio is called “rectified.”

The entire wave is still captured and processed, but only the top half is displayed.

You can turn this display on or off using the fly-out (pancake) menu in the top-left corner of the timeline, next to the sequence name and uncheck Rectified Audio Waveforms.

The benefit to seeing the full wave is that, rarely, there may be audio level differences on one side of the wave but not the other. Most of the time, though, displaying audio as rectified will be fine.


Please rate the helpfulness of this tip.

Click on a star to rate it!