… for Apple Final Cut Pro X

Tip #056: Use Motion to Tweak Your Effects

Larry Jordan – https://LarryJordan.com

Apple makes it easy to customize your effects.

Tip Screen Shot

Topic $TipTopic

While it is true that you can’t directly modify an Apple-supplied effect, there’s a workaround: You just need to make a copy of it first.

Control – click (right-mouse-click) any effect, transition, generator or title and choose Open a Copy in Motion.

Final Cut will copy that effect and open the copy in Motion, where you can make as many changes as you want.

When you save the file, Motion displays a dialog allowing you to create a new template and category for this effect. This makes it easy for you to organize your custom effects.

NOTE: While the ability to open effects in Motion is true for Apple and 3rd-party effects, many developers “lock” their effect so that you can’t modify it.


Please rate the helpfulness of this tip.

Click on a star to rate it!

… for Apple Final Cut Pro X

Tip #095: Apply Keywords Faster!

Larry Jordan – https://LarryJordan.com

Adding Keywords doesn’t have to be a drag…

Tip Screen Shot

Topic $TipTopic

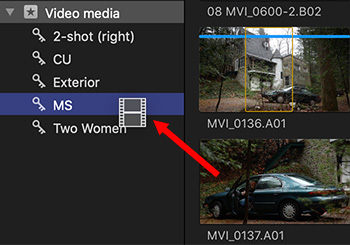
A faster way to apply an existing keyword to multiple clips in the Browser is to select all the clips to which you want to apply the keyword, then, drag them on top of the keyword in the Library List.

Poof! Instant keywords.

EXTRA CREDIT

This also adds those clips to any relevant Keyword Collections.


Please rate the helpfulness of this tip.

Click on a star to rate it!

… for Apple Final Cut Pro X

Tip #131: YouTube Share Settings Use Wrong Colors

Larry Jordan – https://LarryJordan.com

4K files default to the wrong color space.

Tip Screen Shot

Topic $TipTopic

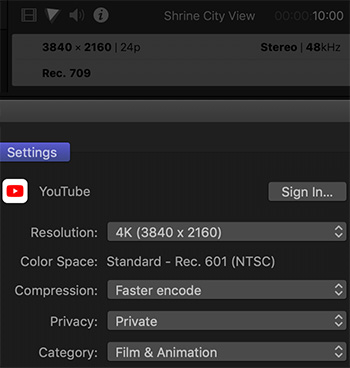
As you can see in this screen shot, the project settings are 4K frame size using Rec. 709 color space. (The settings are displayed at the very top.)

But the Share to YouTube settings default to Rec. 609, with no ability to change them back to Rec. 709.

NOTE: While the color values used in Rec. 601 (used for standard-def video) are similar to those in Rec. 709 (used for high-def video), they are not the same. Worse, FCP X should allow changing from one to the other, except that it doesn’t.

The workaround is to export your project as a master file (File > Share > Master File), then compress it using Compressor; or the compression program of your choice.


Please rate the helpfulness of this tip.

Click on a star to rate it!

… for Apple Final Cut Pro X

Tip #109: Solve the “Missing Camera” Alert

Larry Jordan – https://LarryJordan.com

Using a consistent workflow is important.

Tip Screen Shot

Topic $TipTopic

Bill Rabkin writes:

Recently, when I opened a library that I’ve been editing for a while and selected “Clip #1” in the Browser, FCP X displayed its red “Missing Camera!” warning. Apparently it still thinks Clip #1 resides in a camera card, despite my deleting Preferences and not having the DCIM, MISC, or PRIVATE folders on my external drive.

When I spoke to an editor at Access Framingham, our city’s Public Access Station for whom I do most of my videos, he suggested that I select Clip #1 in the Browser and then choose File > Import > Reimport from Camera/Archive.

I had never used this command before, never even knew it existed.

It worked! FCP X no longer complains when I try to share either a Master File or Current Frame.

I think the problem likely was caused because the SDHC card with the AVCHD file was the last camera card that I had copied to my external hard drive, and I don’t think I had ejected the SDHC card before I imported all of the raw footage into my FCP X Library from the hard disk sub-folders. The presence of the mounted SDHC card must have confused FCP X.

From now on, you can bet that I won’t create a new Library until all of the SDHC cards are back in their case!


Please rate the helpfulness of this tip.

Click on a star to rate it!

… for Apple Final Cut Pro X

Tip #113: Remove a Yellow Alert – Option 2

Larry Jordan – https://LarryJordan.com

Sometimes, alerts happen because the FCP X database doesn’t update.

Tip Screen Shot

Topic $TipTopic

Ziggy reports:

If you are getting a yellow alert in FCP X, it may be because the FCP X database doesn’t seem to update very quickly when you make a change to an external file, such as a motion graphics or VFX file.

If you know you just updated such a file here’s a quick workaround:

  • Select everything in the timeline (shortcut: Cmd + A)
  • Copy it to the Clipboard (shortcut: Cmd + C)
  • Then click anywhere in the timeline to deselect everything.

Your yellow alert should disappear.


Please rate the helpfulness of this tip.

Click on a star to rate it!

… for Apple Final Cut Pro X

Tip #119: Move Around in Final Cut – Hands-Free!

Larry Jordan – https://LarryJordan.com

There are better ways to get around than the Hand tool

Tip Screen Shot

Topic $TipTopic

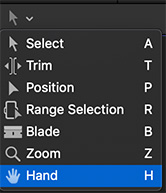
The Hand tool (shortcut: H) allows you to move around the Timeline with just a click and drag.

However, if you have a trackpad or a mouse with a scroll wheel, you can move around simply by scrolling.

NOTE: If you have a scroll wheel that only moves vertically, press the SHIFT key to scroll from side to side.

You can also very quickly move horizontally by dragging the light gray handle at the very bottom of the timeline. (This handle only shows up if you are zoomed into the timeline.)

Finally, if you want to see your entire timeline at once, type Shift + Z.

For all these reasons, I can’t think of the last time I actually used the Hand tool.


Please rate the helpfulness of this tip.

Click on a star to rate it!

… for Apple Final Cut Pro X

Tip #124: Update the Browser When a Multicam Clip Changes

Larry Jordan – https://LarryJordan.com

How to get the Browser to pay attention

Tip Screen Shot

Topic $TipTopic

Antoine Le Pourhiet writes:

I solved a problem with multicam editing in Final Cut Pro X. I’m sharing it in case it helps others.

When you manually change the content of a multicam clip, the clip length doesn’t change in the Browser.

But what if I want to see the full clip in the browser to use keywords or Favorite/Rejected tags?

The solution is to make the clip fully visible in the Timeline (project) and then do a match frame (Cmd + F) so the clip refreshes in the Browser.


Please rate the helpfulness of this tip.

Click on a star to rate it!

… for Apple Final Cut Pro X

Tip #055: When to Pick Optimized or Native Media

Larry Jordan – https://LarryJordan.com

Picking the wrong option will slow things down.

Tip Screen Shot

Topic $TipTopic

Final Cut supports a variety of media for editing, not just codecs, but native, optimized and proxy media. Which should you choose? Here’s a simple guide.

NATIVE MEDIA

Native media is what your camera shoots.

Use native media in your edit when you are in a hurry, don’t need to apply a lot of effects or transitions, or when working with high-end log or HDR media.

OPTIMIZED MEDIA

Optimized media is native media that Final Cut transcodes in the background to ProRes 422; most often using the Transcoding options in the Media Import window.

Use optimized media in your edit for projects that have lots of effects, were recorded using very compressed camera formats such as H.264 or HEVC, require lots of exports for client review, require extensive color grading.

PROXY MEDIA

There’s a belief among some editors that editing proxies is somehow “weak.” Actually, virtually every film ever edited was created using proxy files – except they were called “work prints.”

Proxies are smaller files, great for creating rough cuts where you are concentrating on telling stories, because they don’t require as much storage, and you can easily switch from proxy to optimized/native media – retaining all effects – at the click of a button.

Use proxy files in your edit when storage space is tight, you need to edit on an older/slower system or when you are working with large frame size files (4K and above).

When you are ready to color grade and output, switch back to optimized/native.

SUMMARY

Optimized files are faster and more efficient to edit and, in the case of highly compressed native files, yield better color grading, gradients and effects. But they take up more space. Most of the time, the trade-off is worth it.


Please rate the helpfulness of this tip.

Click on a star to rate it!

… for Apple Final Cut Pro X

Tip #090: A Faster Way to Create Audio Fades

Larry Jordan – https://LarryJordan.com

Apply fades using a keyboard shortcut.

Tip Screen Shot

Topic $TipTopic

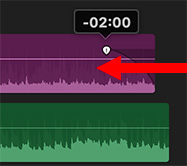
You probably know that you can add an audio fade to either the beginning or the end of an audio clip by dragging the small white “audio fade dot” at the edges of an audio clip.

What you may NOT know, though, is that there is a much faster way to add fades, but it isn’t enabled by default.

Here’s how:

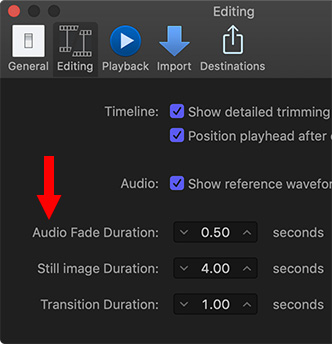
  • Go to Preferences > Editing and enter the Audio Fade Duration you want to use as a default setting.
  • Next, go to Commands > Customize, make sure you are in the Default command set (upper left corner), then  search for “Audio Fades”
  • Set Apply Audio Fades to the shortcut you want to use. (In my case, I set this to Option + A.)

Now, whenever you want to quickly apply an audio fade, select the clips you want to apply the fade to, then type Option + A. Poof! – fades appear at the end of all selected clips.

EXTRA CREDIT

These fades are fully adjustable by dragging the fade dot. All you are doing with this shortcut is applying a standard audio fade quickly.


Please rate the helpfulness of this tip.

Click on a star to rate it!

… for Apple Final Cut Pro X

Tip #103: Add an Audio Fade Without Using Keyframes

Larry Jordan – https://LarryJordan.com

This is a fast way to add fades.

Tip Screen Shot

Topic $TipTopic

In the Timeline, select an audio clip. Then, look very carefully at the edges.

Just above the volume control line you’ll see a small dot at each edge. This is the Audio Fade dot.

Drag the Dot to add a fade to the beginning or end of each clip.

To change the duration of the fade, simply slide the position of the dot left or right.


Please rate the helpfulness of this tip.

Click on a star to rate it!