… for Apple Final Cut Pro X

Tip #084: Find What You Need (Part 2)

Larry Jordan – https://LarryJordan.com

Final Cut supports searches on far more than text.

Tip Screen Shot

Topic $TipTopic

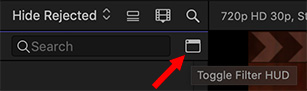
After you open the Search Filter window (see Tip #75) click the Plus icon in the top right corner.

This displays ten different categories you can use to search for specific media, as illustrated in this screen shot.

While all of these are useful, the two that I use the most are:

  • Text
  • Keywords

Text searches on file names, of course. But it also searches for all text entered in the Notes field as well as other metadata fields entered using the Info > Inspector.

NOTE: Metadata entered into clips in the Browser is searchable. Metadata entered into clips in the Timeline is not. So be sure to enter any metadata you want to search for later by applying it to clips in the Browser.

You can combine multiple categories in the same search. For example, Text AND Keywords AND Not used.

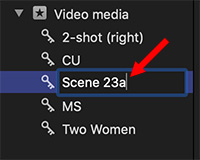
Keywords allow us to search for clips which contain, or don’t contain, keywords. Since FCP X now supports an almost unlimited number of keywords, I find myself using this feature frequently.

However, Tip #85 covers an equally important search feature – Boolean selection.


Please rate the helpfulness of this tip.

Click on a star to rate it!

… for Apple Final Cut Pro X

Tip #096: A Faster Way to Rename Keywords

Larry Jordan – https://LarryJordan.com

Renaming a keyword is easy – if you know where to make the change.

Tip Screen Shot

Topic $TipTopic

What happens if you’ve applied keywords to a lot of clips, only to discover that you misspelled one of the keywords. Or want to change a keyword for a different word?

Relax! This is easy.

  • Select the Keyword in the Library List
  • Press Enter to open the name for editing
  • Rename it
  • Press Enter to apply the name

Instantly, every clip with this keyword is updated to the new name.


Please rate the helpfulness of this tip.

Click on a star to rate it!

… for Apple Final Cut Pro X

Tip #024: Trim Clips Without the Mouse

Larry Jordan – https://LarryJordan.com

The faster you trim, the faster you edit.

Tip Screen Shot

Topic $TipTopic

Trimming by using the mouse to drag the edges of clips is easy. But there’s another way that I find is both faster and more accurate: using the keyboard.

OPTION 1

Using the Arrow tool, select either the In or the Out of clip. (Or use the Trim tool to select both In and Out.)

  • Comma trims the selected edit point one frame left
  • Shift + comma trims the selected edit point ten frames left
  •  

  • Period trims the selected edit point one frame right
  • Shift + period trims the selected edit point ten frames right

OPTION 2

Again, select either the In, Out or both.

Using either the numeric keypad or the numbers on your keyboard, type the number of frames you want the edit point to move.

Type [plus] followed by a number to shift the edit point right. Type [minus] followed by a number to shift the edit point left.

OPTION 3

You can use this same keyboard technique to move entire clips, but you first need to select the Position tool.


Please rate the helpfulness of this tip.

Click on a star to rate it!

… for Apple Final Cut Pro X

Tip #075: Display a Custom Search (Part 1)

Larry Jordan – https://LarryJordan.com

This insignificant little icon opens a wealth of ways to find exactly the clip you need.

Tip Screen Shot

Topic $TipTopic

The magnifying glass in the top right corner of the Browser highlights the Search box. This allows us to find clips based upon text in their file name, or, if you’ve entered anything, the Notes field. (This Search box does not search Event names.)

NOTE: I’ve found that trying to enter Notes in the Browser often doesn’t work. Instead, use the Info Inspector to enter Notes. This works more reliably and can be searched just like file names.

However, there is a much more powerful search option just to the right of the Search box. Its the icon indicated by the red arrow in this screen shot.

It’s called the Search Filter window and over the next three tips, I’ll explain how it works.


Please rate the helpfulness of this tip.

Click on a star to rate it!

… for Apple Final Cut Pro X

Tip #087: Get Rid of a Yellow Alert

Larry Jordan – https://LarryJordan.com

Here’s what to do when nothing else works.

Tip Screen Shot

Topic $TipTopic

JR Drew suggested this:

Here’s something to add to your list of “How do I get rid of that annoying little yellow alert on my event when I have checked every piece of media/title/generator/transition, looked inside every compound clip created in the entire library, and they are all present and accounted for???”

I don’t know why this worked for me, but it did:

SHARE (export) the timeline in each file type available (.m4v, .mp4, .mov).

Again, no idea what was probably created during the writing, but it magically made the alert icon disappear.

Larry adds: This sounds like you were experienced bad render files. By exporting into different formats, you repaced the bad versions with good. You probably only need to do this with a couple of different formats to clean out all the bad render files.


Please rate the helpfulness of this tip.

Click on a star to rate it!

… for Apple Final Cut Pro X

Tip #028: A Faster Way to Export – Part 2

Larry Jordan – https://LarryJordan.com

Exporting isn’t just for single files anymore.

Tip Screen Shot

Topic $TipTopic

There are two ways you can export faster:

  • Use keyboard shortcuts
  • Take advantage of background processing and export multiple clips or projects at the same time

This tip covers the second option. Tip #27 covered the first.

THE OLD WAY

In the Olde Days, we needed to wait for a project to finish exporting before we could do anything else. Then, Final Cut Pro X was released.

Final Cut was designed to both render and export in the “background.” This means that anytime you are not playing a clip in the Browser or the timeline, FCP X will render or export whatever needs to be rendered or exported.

There’s nothing you need to do to “enable” this – but you can take advantage of it.

THE NEW WAY

Let’s say you want to export four projects that the client just approved.

  • Select them in the Browser.
  • Choose File > Share. Notice that this menu now says: Share 4 Clips [ or Projects]

In the Export > Settings window, you will need to apply the same export settings to all the selected items, but the good news is that with one menu choice – or keyboard shortcut – you can export multiple files at the same time.


Please rate the helpfulness of this tip.

Click on a star to rate it!

… for Apple Final Cut Pro X

Tip #057: Move Between Projects Faster

Larry Jordan – https://LarryJordan.com

Timeline History: Hard to see – Fast results!

Tip Screen Shot

Topic $TipTopic

If you look carefully at the center-top of the timeline, to the left and right of the project name, you’ll see two tiny arrows; one pointing left and the other pointing right.

These are the Timeline History arrows.

They allow you to move back (left) to earlier projects that you opened in the timeline. Or, forward (right) to projects that you opened after the current project. Simply click the arrow pointing in the direction you want to move.

NOTE: If you hold an arrow down, you’ll see a list of all the projects that you’ve opened into the timeline. Select the one you want and it will immediately open.

While there is no limit to the number of projects you can move between, these arrows will only display projects that were opened into the timeline. Unopened projects still in the Browser are ignored.


Please rate the helpfulness of this tip.

Click on a star to rate it!

… for Apple Final Cut Pro X

Tip #068: Remove Specific Effects Fast!

Larry Jordan – https://LarryJordan.com

This trick makes it easy to remove specific effects from one or more selected clips.

Tip Screen Shot

Topic $TipTopic

There are two ways we can remove effects from one or more clips in Final Cut: we can remove all the effects applied to a clip or just selected effects.

Here’s how.

REMOVE ALL EFFECTS

  • Select the clip, or clips, that have the effect you want to remove.
  • Choose Edit > Remove Effects.

This deletes all the effects applied to the selected clips.

NOTE: This is a really fast way to reset a batch of clips back to their native state.

REMOVE SPECIFIC EFFECTS

To remove selected effects from a clip:

  • Select the clip(s) containing the effects you want to remove.
  • Choose Edit > Remove Attributes.
  • Uncheck any blue check-box to remove that specific effect from the selected clips.

The nice part about this technique is that you have the flexibility to remove specific effects without altering the effects you want to keep.


Please rate the helpfulness of this tip.

Click on a star to rate it!

… for Apple Final Cut Pro X

Tip #027: A Faster Way to Export – Part 1

Larry Jordan – https://LarryJordan.com

One simple keystroke is all it takes – except, it doesn’t exist.

Tip Screen Shot

Topic $TipTopic

When you’ve finished a project and it is time to create a master file, there are two ways you can export faster: you could create a keyboard shortcut or take advantage of background processing and export multiple clips or projects at the same time

This tip covers the first option. Tip #28 covers the second.

THE OLD WAY

Normally, you select what you want to export in either the timeline or Browser, then choose File > Share > Master file. (Or the export option of your choice.)

THE NEW WAY

However, in Final Cut Pro X > Preferences > Destinations, you have the option to assign a keyboard shortcut (Cmd + E) to the export/share option of your choice.

Because I tend to create multiple versions of my projects for various different distribution channels, I always export a Master file from FCP X. However, this process works for any Destination.

Right-click (Cntrl – click) the Destination to which you want to assign this shortcut and choose Make Default.

NOTE: A keyboard shortcut can be assigned to only one destination.

Close the Preferences window and you’re done.

The next time you want to export, type Cmd + E and – Poof! – the Export Settings window appears.

Faster than a mouse!


Please rate the helpfulness of this tip.

Click on a star to rate it!

… for Apple Final Cut Pro X

Tip #063: Secrets of the FCP X Dock

Larry Jordan – https://LarryJordan.com

Clicking the Dock is fast – this is faster.

Tip Screen Shot

Topic $TipTopic

Final Cut’s Dock icon holds a lot of secrets – and several very nice shortcuts – if you know how to unlock them.

Control-click the Final Cut Pro X Dock icon and you’ll see:

  • A list of recently opened libraries
  • The ability to automatically start Final Cut when you log into your computer
  • And a variety of other options.

This is a very fast way to get Final Cut started and the library you need opened all at once.


Please rate the helpfulness of this tip.

Click on a star to rate it!