… for Apple Final Cut Pro X

Tip #125: Edit Vertical Video – Fast

Larry Jordan – https://LarryJordan.com

Edit vertical video the easy way in FCP X.

Tip Screen Shot

Topic $TipTopic

In spite of all our hopes, vertical video is here to stay. Not to worry, Final Cut makes editing vertical video easy. When the time comes to edit, transfer the video to your editing computer, then:

  • Choose File > Import Media (Shortcut: Cmd + I) and navigate to the footage. (You can transfer media directly from your iPhone if it is connected.)
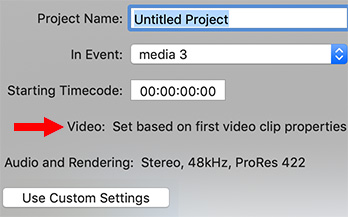
  • Next, create a new project and use the Automatic settings. (This is the screen where the button in the lower left reads: Use Custom Settings.)
  • MOST IMPORTANT: don’t change any project settings. Make sure that the text: Video: Set based upon first video clip properties is visible. This is what makes configuring vertical video easy.
  • Next, edit a vertical clip into the empty, new project. This is important, even if this isn’t the first clip you want the audience to see, because FCP X uses this clip to configure the project settings.
  • When that first, non-standard video clip is edited into the timeline, a dialog appears asking if you want to change the project settings to match the video.
  • Click YES and FCP X will automatically configure the timeline to match your media. After you edit a couple more clips into the timeline, you can delete that first clip that you used to set Project settings.

After that, edit as normal.

When it comes time to export the final project, choose: File > Share > Master file to create a high-quality master file for compression later.

NOTE: Make sure that the aspect ratio of your final export matches the aspect ratio of the original media. Both 1080 x 1920 and 608 x 1080 match for aspect ratios.


Please rate the helpfulness of this tip.

Click on a star to rate it!

… for Apple Final Cut Pro X

Tip #076: Save A Custom Search (Part 4)

Larry Jordan – https://LarryJordan.com

Smart Collections are simply “saved searches.”

Tip Screen Shot

Topic $TipTopic

A Smart Collection is Apple’s way of saying “saved search.” In other words, you are saving the search criteria to use again in the future. Saving a search has two big benefits:

  • It is dynamic. As additional clips are added to the the library, the results of this search will update include those clips as well.
  • It is reusable. Smart Collections show up at the top of the Library window for each project. Once you create a Smart Collection, all you need to run it again is to click it.

To create a Smart Collection, open the Custom Search window, enter your search criteria, then click New Library Smart Collection.

Final Cut will save the search criteria, then, over in the Library List, prompt you to name it. Give it a name that makes sense to you.

Poof! Instant, reusable and highly-complex searches at your fingertips.


Please rate the helpfulness of this tip.

Click on a star to rate it!

… for Apple Final Cut Pro X

Tip #018: Export Multiple Segments or Clips at Once

Larry Jordan – https://LarryJordan.com

A hidden trick that makes exporting multiple segments even faster.

Tip Screen Shot

Topic $TipTopic

While it’s true that you can only have one In and Out in the timeline, that is NOT true for the Browser. Clips in the Browser support selecting and exporting as many segments as you want.

To select more than one section in a clip, drag to set the In and Out for the first section, then press the Command key and drag to set as many additional sections as you want!

NOTE: To delete a selected range in the Browser, select it, then type Option + X.

With the ranges you want to export selected, choose File > Share and note that this menu now displays the number of segments you have selected.

BONUS

You can also use this technique to select and export multiple clips in the Browser, not just segments inside a single clip. As well, you can use this technique to select and edit multiple clips or segments into the timeline at once.


Please rate the helpfulness of this tip.

Click on a star to rate it!

… for Apple Final Cut Pro X

Tip #074: Automatic Keywords Using Finder Tags

Larry Jordan – https://LarryJordan.com

A Fast Way to Organize Media Before You Import

Tip Screen Shot

Topic $TipTopic

Finder tags are the next step beyond changing the color of a file or folder: They allow a greater amount of customization and can be used, when importing media into Final Cut Pro, to create keywords automatically.

Right-click (Control-click) any file in the Finder and choose Tags.

The Finder ships with seven color tags. You can use these or create your own; for example, Interviews, B-roll, Scene 23, etc.).

Once a tag has been created, you can assign it to as many other clips as you want. Tags allow you to organize clips using the Finder before importing them into Final Cut.

In the Finder you can find files using tags. In Final Cut, when you import a file and select From Finder Tags in the Media Import window, FCP X will assign a keyword to match each Finder tag. These, then, work the same as any other keyword.

Think of it as automatic file organization.

Cool.


Please rate the helpfulness of this tip.

Click on a star to rate it!

… for Apple Final Cut Pro X

Tip #089: Create Subclips Using Keywords

Larry Jordan – https://LarryJordan.com

Subclips are defined sections within large clips. And, they are easy to create in FCP X.

Tip Screen Shot

Topic $TipTopic

Keywords provide more and better ways to find clips, true. But… they also allow us to create subclips. Here’s how.

In the Browser, select a range within a clip either by dragging with the skimmer or playhead, or setting an In (shortcut: I) and Out (shortcut: O).

With that range selected, create a keyword (shortcut: Cmd + K) and give it a name.

NOTE: Use whatever name makes the most sense to you, but shorter is better.

Now, when you click that keyword, only the selected section shows up as a subclip in the Browser.

EXTRA CREDIT

In this screen shot, the top image shows the selected range. After a keyword is created (“Key Reveal”), selecting that keyword displays only the portion of the original clip that was selected.

Cool.


Please rate the helpfulness of this tip.

Click on a star to rate it!

… for Apple Final Cut Pro X

Tip #085: Narrow Your Search (Part 3)

Larry Jordan – https://LarryJordan.com

Boolean selection simplify finding that needle in a haystack.

Tip Screen Shot

Topic $TipTopic

A “Boolean Selection” is a search based upon logical criteria. Specifically, “any,” “and,” and “not.” These are most often applied to searches using keywords, but you can find these options in a variety of places in Final Cut.

Here’s how these work. Let’s say you are searching the media in your project. These clips have some combination of the following keywords applied to each clip: “Red,” “Green,” and “Blue.”

  • Any. This will find clips that contain even one (“any”) of the keywords you are searching for. If a clip contains Red – or – Green – or – Blue, it will appear in the results of your search.
  • All. This will find clips that contain all of the keywords you are searching for. Only clips that contain Red – and – Green – and – Blue will appear.
  • Does Not Include Any. This lists only those clips that do not hold any of the keywords you are searching for. For example, searching for Red and Blue and enabling this option means only clips that do not contain either Red or Blue will appear.
  • Does Not Include All. This lists only those clips that do not hold all of the keywords you are searching on. For example, searching for Red and Blue and enabling this option, will show clips with Red – or – Blue, but not both.

I like keywords a lot. What I like even more is how, using Boolean selection, we can really narrow our searches to find exactly the media we need next for our project.


Please rate the helpfulness of this tip.

Click on a star to rate it!

… for Apple Final Cut Pro X

Tip #058: You Can’t Have Too Many Great Shortcuts

Larry Jordan – https://LarryJordan.com

Sometimes one shortcut just isn’t enough…

Tip Screen Shot

Topic $TipTopic

One of the frustrations in using different software multiple times during the day is that I often get confused as to which keyboard shortcuts work with which software; especially shortcuts which are essential to operating the program.

NOTE: I can’t tell you how many times I type “V” in Final Cut or “A” in Premiere and wonder why the Arrow tool is not selected. Sigh…

Premiere has long had the ability to create multiple shortcuts for the same command. What you may not know is that Final Cut does too!

NOTE: There’s no limit on the number of shortcuts you can assign to the same command.

Here’s how.

Open Final Cut Pro X > Commands > Customize.

In the top left corner, if you haven’t done this already, duplicate the Default command set. Why? Because Apple does not allow you to make changes to the default shortcuts shipped with the program.

Click whichever modifier keys you want to use at the top of the screen, then look for a gray key. Gray means that no shortcut is assigned to that key for those modifiers.

Drag the command you want from the Command list at the bottom and drop it on top of the key you want to assign it to.

Poof! Instant duplicate.

NOTE: You also use this same procedure to create a shortcut for any command that doesn’t have a shortcut assigned. Since FCP X has more than 400 menues without a shortcut, you can practice this technique a LOT!


Please rate the helpfulness of this tip.

Click on a star to rate it!

… for Apple Final Cut Pro X

Tip #065: Faster Ways to Apply an Effect

Larry Jordan – https://LarryJordan.com

Dragging is easy, but these tricks are quicker.

Tip Screen Shot

Topic $TipTopic

Normally, to apply an effect, you open the Effects Browser (shortcut: Cmd + 5), then drag the effect on top of the clip you want to add it to in the Timeline.

Works great. Takes forever.

Here are two variations that are faster.

OPTION 1

  • Select one or more clips in the Timeline. (The real time-savings with this technique come when need to apply the same effect to multiple clips.) The clips can be located anywhere in the Timeline.
  • Open the Effects Browser and find the effect you want to apply to ALL the selected clips.
  • Double-click the effect to instantly apply it to all selected clips.

OPTION 2

  • Select a Timeline clip that has the effect you want to apply to other clips.
  • Choose Edit > Copy.
  • Select all the other clips in the Timeline to which you want to apply this effect.
  • Choose Edit > Paste Effects. This pastes ALL the effects attached to the first clip into the selected clips

VARIATION

  • Choose Edit > Paste Attributes. This allows you to select which of the effects applied to the first clip are applied to the selected clips.

Please rate the helpfulness of this tip.

Click on a star to rate it!

… for Apple Final Cut Pro X

Tip #102: Change the “Shape” of an Audio Fade

Larry Jordan – https://LarryJordan.com

Audio fades are optimized for cross-dissolves.

Tip Screen Shot

Topic $TipTopic

Hidden inside the audio fade dot is the ability to change the “shape” of a fade. The shape controls how the audio fades and there’s a reason for each shape. To see the choices, Control-click the dot itself.

Here are the choices:

  • Linear. This is a straight-line fade from full-volume to dead quiet, or dead quiet to full-volume depending upon whether you are at the end or beginning of a clip. This is the best choice when fading to or from black because it sounds the smoothest.
  • S-Curve. This fades quickly, then lingers. I don’t use this often, truthfully.
  • +3 dB. This is the default fade and is best used when cross-fading from one “steady-state” audio clip to another; for example, from one piece of music to another. (See Tip #104 for the reason why.)
  • -3 dB. This is best used when you want something to fade really quickly, then linger longer than an S-curve. I use this most often at the beginning of a clip when I want to minimize a breath, but be at full-volume for the start of a sound-bite.

Each of these sounds different and has a different use in an audio mix. I vary these from one clip to the next, depending upon the sound I need. The one you should use is the one that sounds the best to you.


Please rate the helpfulness of this tip.

Click on a star to rate it!

… for Apple Final Cut Pro X

Tip #069: Create a Default Effect

Larry Jordan – https://LarryJordan.com

Your favorite effect is only one (unassigned) keyboard shortcut away.

Tip Screen Shot

Topic $TipTopic

Let’s say that your favorite video effects is a Gaussian Blur. You use it so much that it would save you a lot of time if you could apply that effect with a single keyboard shortcut.

You can and it’s easy.

  • Right-click (or Control-click) the effect you want to make the default and select Make Default Video Effect.
  • Next, select the clip, or clips, to which you want to apply the effect and type Option + E.

Your favorite effect is now exactly one keyboard shortcut away!

EXTRA CREDIT

You can also do the same with any audio effect:

  • Right-click and select Make Default Audio Effect

Now, when you type Option + Cmd + E, the default audio effect is applied to all selected clips.

Cool.


Please rate the helpfulness of this tip.

Click on a star to rate it!