… for Codecs & Media

Tip #613: Blu-ray Disc File Formats

Larry Jordan – LarryJordan.com

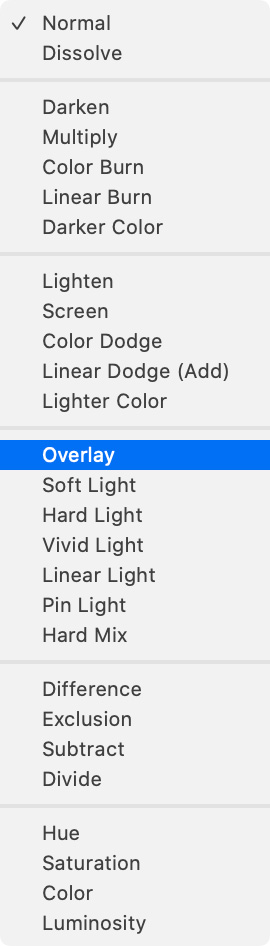
The most popular distribution format for Blu-ray Disc is H.264/AAC.

The Blu-ray Disc logo.

Topic $TipTopic

Continuing our look at Blu-ray Discs that we started in Tip #612, here’s a list of supported codecs for Blu-ray Discs.

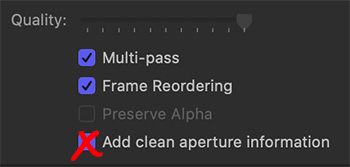
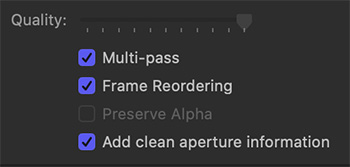
NOTE: You can use any media format for mastering, but files for distribution must use one of these formats.


According to this Sony website, the following audio and video codecs are supported on Blu-ray Disc® media.

Video Codecs

  • MPEG-2: Enhanced for HD, also used for playback of DVDs and HDTV recordings.
  • MPEG-4 AVC: Part of the MPEG-4 standard also known as H.264 (High Profile and Main Profile).
  • SMPTE VC-1: A standard based on Microsoft® Windows Media® Video (WMV) technology.

Audio Codecs

  • Linear PCM (LPCM): Offers up to 8 channels of uncompressed audio.
  • Dolby Digital® (DD): Format used for DVDs also known as AC3, offers 5.1-channel surround sound.
  • Dolby Digital® Plus (DD+): Extension of DD, offers increased bitrates and 7.1-channel surround sound.
  • Dolby® TrueHD: Extension of MLP Lossless, offers lossless encoding of up to 8 channels of audio.
  • DTS Digital Surround®: Format used for DVDs, offers 5.1-channel surround sound.
  • DTS-HD®: Extension of DTS, offers increased bitrates and up to 8 channels of audio.

Please rate the helpfulness of this tip.

Click on a star to rate it!

… for Codecs & Media

Tip #589: Pick the Right Version of ProRes

 Larry Jordan – LarryJordan.com

I recommend ProRes 422 for camera media and ProRes 4444 for computer media.

The Apple ProRes logo.

Topic $TipTopic

Apple provides this description of the six different versions of ProRes:

Apple ProRes 4444 XQ: The highest-quality version of ProRes for 4:4:4:4 image sources (including alpha channels), with a very high data rate to preserve the detail in high-dynamic-range imagery generated by today’s highest-quality digital image sensors.

Apple ProRes 4444: An extremely high-quality version of ProRes for 4:4:4:4 image sources (including alpha channels). This codec features full-resolution, mastering-quality 4:4:4:4 RGBA color and visual fidelity that is perceptually indistinguishable from the original material. Apple ProRes 4444 is a high-quality solution for storing and exchanging motion graphics and composites, with excellent multi-generation performance and a mathematically lossless alpha channel up to 16 bits.

NOTE: Apple ProRes 4444 XQ and Apple ProRes 4444 are ideal for the exchange of motion graphics media because they are virtually lossless, and are the only ProRes codecs that support alpha channels.

Apple ProRes 422 HQ: A higher-data-rate version of Apple ProRes 422 that preserves visual quality at the same high level as Apple ProRes 4444, but for 4:2:2 image sources.

Apple ProRes 422: A high-quality compressed codec offering nearly all the benefits of Apple ProRes 422 HQ, but at 66 percent of the data rate for even better multistream, real-time editing performance.

Apple ProRes 422 LT: A more highly compressed codec than Apple ProRes 422, with roughly 70 percent of the data rate and 30 percent smaller file sizes. This codec is perfect for environments where storage capacity and data rate are at a premium.

Apple ProRes 422 Proxy: An even more highly compressed codec than Apple ProRes 422 LT, intended for use in offline workflows that require low data rates but full-resolution video.

My general recommendation is to use ProRes 422 for all images shot on a camera (except RAW formats), and ProRes 4444 for all media converted from RAW or Log or media generated on a computer.

EXTRA CREDIT

Here’s an Apple White Paper that explains ProRes in more detail.


Please rate the helpfulness of this tip.

Click on a star to rate it!

… for Codecs & Media

Tip #590: What is a Proxy File?

 Larry Jordan – LarryJordan.com

Proxy files allow editing on slower systems, using less storage.

Topic $TipTopic

Proxy files are designed to be smaller, easy-to-edit media files when compared to camera native. But what does “easy-to-edit” and “smaller” actually mean?

EASY TO EDIT

There are two ways to compress video:

  • GOP (also called “inter-frame compression”) compresses images in groups. This creates very small file sizes, but requires more CPU performance to edit because the computer needs to deconstruct each group before it can edit a specific frame.
  • I-frame (also called “intra-frame compression”) compresses each frame individually. This creates larger files, but even slower systems can edit them smoothly because each frame is immediately available for editing.

All proxy files use I-frame compression, which decreases the load on the CPU and speeds editing.

SMALLER

Proxy files are 1/4 the resolution of the camera native media, which decreases the load on storage system capacity and bandwidth. For example, a proxy file for a 1920 x 1080 frame is only 960 x 540 pixels. This reduces storage bandwidth by 75%.

However, this reduced resolution also means that proxy files should not be used for final output because they don’t have the full resolution of the master file.

SUMMARY

Both Premiere and Final Cut support seamless proxy editing, which is recommended for larger frame sizes and multicam editing. Then, for final output, switch from the proxy to high-quality files to get the best images from your project.


Please rate the helpfulness of this tip.

Click on a star to rate it!

… for Codecs & Media

Tip #588: What is ProRes?

Larry Jordan – LarryJordan.com

ProRes is a good choice for capture, editing and master files.

The Apple ProRes logo.

Topic $TipTopic

Apple ProRes codecs provide a combination of multistream, real-time editing performance, impressive image quality, and reduced storage rates. ProRes codecs take full advantage of multicore processing and feature fast, reduced-resolution decoding modes. All ProRes codecs support any frame size (including SD, HD, 2K, 4K, 5K, and larger) at full resolution. The data rates vary based on codec type, image content, frame size, and frame rate.

As a variable bit rate (VBR) codec technology, ProRes uses fewer bits on simple frames that would not benefit from encoding at a higher data rate. All ProRes codecs are frame-independent (or “intra-frame”) codecs, meaning that each frame is encoded and decoded independently of any other frame. This technique provides the greatest editing performance and flexibility.

A variety of cameras can now capture and record a wider gamut of
color values when working in log or raw formats. You can preserve a wider color gamut by recording with the ProRes LOG setting on certain cameras such as the ARRI ALEXA or transcoding from the RED® camera’s REDCODE® RAW format. This results in deeper colors and more detail, with richer red and green areas of the image.

EXTRA CREDIT

Here’s an Apple White Paper that explains ProRes in more detail.

The table of file sizes, at the end, are invaluable in planning storage requirements.


Please rate the helpfulness of this tip.

Click on a star to rate it!

… for Random Weirdness

Tip #548: What Is ISO?

Larry Jordan – LarryJordan.com

ISO affects gain after the image is captured.

Topic $TipTopic

This tip, presenting by Chris Lee, first appeared in PetaPixel.com. This is a summary.

ISO is probably THE most misunderstood term as it relates to digital photography. Stemming in part from people equating ISO sensitivity directly with film speed, and in part from some useful-but-misleading simplifications that are shared quite frequently, people often share two bits of misinformation:

  • ISO is one way to increase your exposure without changing shutter speed or aperture
  • ISO “increases your sensor’s sensitivity to light.”

As Lee explains in the video above, neither of these things are technically true, though both ARE useful ways to think about ISO when you’re out shooting.

ISO is a gain knob. Electrical amplification that is done after your camera is done gathering light. It has no impact on how much light your camera sensor’s photosites can gather during a given exposure, and therefore has no direct connection to exposure itself, despite being part of “the exposure triangle.”

At the most basic level—and Lee plans to do a follow-up explaining more in-depth concepts like ISO invariance and how different cameras handle this setting—ISO is the level of electrical amplification done to the analog “signal” collected by your image sensor before it’s sent to the analog to digital converters (ADCs), eventually producing an image.

EXTRA CREDIT

Visit the link above and watch Chris Lee’s video. In 12 minutes you’ll understand what ISO is and how it affects exposure.


Please rate the helpfulness of this tip.

Click on a star to rate it!

… for Codecs & Media

Tip #577: VoIP Audio is Not High-Quality

Larry Jordan – LarryJordan.com

Codecs are also why our phones work.

Topic $TipTopic

We’ve all heard of codecs. These convert audio, or video, from analog into digital signals and back.

Just as codecs are the heart of digital visual media, they are also at the heart of VoIP, which stands for Voice over IP. This technology is what allows you to connect a telephone to the Internet and have it actually work.

An audio codec works its magic by sampling the audio signal several thousand times per second. For instance, a WAV codec samples the audio at 64,000 times a second. It converts each tiny sample into digitized data and compresses it for transmission. When the 64,000 samples are reassembled, the pieces of audio missing between each sample are so small that to the human ear, it sounds like one continuous second of audio signal.

What I learned recently is that the codecs used for VoIP don’t sample at 64,000 samples per second. Rather, they sample at 8,000 samples per second. According to the Nyquist theorem, if you divide the sample rate by 2, that yields the maximum frequency response for that sample rate. This means that the maximum high frequency carried by most VoIP systems is 4,000 Hz. This is well below the frequency range of many consonants, such as “S” and “T.”

EXTRA CREDIT

In case you were wondering, codecs use advanced algorithms to help sample, sort, compress and packetize audio data. The CS-ACELP algorithm (CS-ACELP = conjugate-structure algebraic-code-excited linear prediction) is one of the most prevalent algorithms in VoIP. CS-ACELP organizes and streamlines the available bandwidth. Annex B is an aspect of CS-ACELP that creates the transmission rule, which basically states “if no one is talking, don’t send any data.” The efficiency created by this rule is one of the greatest ways in which packet switching is superior to circuit switching. It’s Annex B in the CS-ACELP algorithm that’s responsible for that aspect of the VoIP call.

And, no, that won’t be on the quiz.


Please rate the helpfulness of this tip.

Click on a star to rate it!

… for Codecs & Media

Tip #565: Frame Rate Does Not Create Motion Blur

Motion blur is based on shutter speed, not frame rate.

Topic $TipTopic

A frequent email from filmmakers asks about how to change their project’s frame rate to make it more “cinematic.” Specifically, they are looking to convert to 24 fps. The problem is that changing the frame rate will only make a video look worse.

Motion blur, which is a slight blurring of the edges of a moving object, is caused by something moving while the shutter is open. If the shutter speed is slow, meaning the shutter is open for a longer time, the motion blur is exaggerated. If the shutter speed is fast, the motion blur is minimized.

Changing the frame rate after an image is recorded won’t affect motion blur. Motion blur is determined at the moment the original image is recorded.

Changing the frame rate after a clip is recorded can only be done by removing or adding frames. For example, changing the frame rate from 30 fps to 24 fps means that every fifth frame of the original media will be removed. There’s no other way to do this, you can’t “reallocate” frames to match a different frame rate; you can only drop or add them.

In the case of dropping frames, this means that the video will have a slight “stutter” every five frames, which will mess with any kind of smooth camera move.

The moral of this story is: shoot the frame rate you need to deliver and don’t change frame rates after the fact.

EXTRA CREDIT

The web supports any frame rate you can upload, unlike broadcast or cable. There’s no benefit to converting frame rates.


Please rate the helpfulness of this tip.

Click on a star to rate it!

… for Visual Effects

Tip #556: Blend Modes in Brief

Larry Jordan – LarryJordan.com

Blend modes create textures.

Blend mode options in Photoshop.
Blend modes combine textures between clips. They are found in all modern NLEs, like this list from Photoshop.

Topic $TipTopic

Iain Anderson, at MacProVideo, wrote this up in more detail. But I liked his summary of blend modes, which I have modified from his article.

Blend modes allow us to combine textures, and sometimes colors, between clips or elements that are stacked vertically on top of each other.

Whether you are in Photoshop or Premiere, Final Cut or Motion, blend modes work the same way. These are arithmetical expressions, with nothing to adjust. You either like the effect or you don’t.

NOTE: If you don’t like the effect, tweak either the gray-scale or color value of the top clip and the results will change.

All these settings should be applied to the top clip. It will be the only clip that changes. Here’s what the settings mean.

  • Normal. This leaves the top clip’s image unaltered
  • Subtract, Darken, Multiply, Color Burn, and Linear Burn. These combine clips based upon darker grayscale values. For example, the top clip will darken clips below it. Multiply usually works best for adding darker areas.

NOTE: If nothing changes when you apply this setting, your top clip is too light. Darken it.

  • Add, Lighten, Screen, Color Dodge, and Linear Dodge. These combine textures between clips based upon lighter grayscale values. Screen usually works best for adding bright elements like sparks and flame.

IMPORTANT: Avoid using Add. It creates highlights that exceed legal white values. Screen does not.

  • Overlay, Soft Light, Hard Light, Vivid Light, Linear Light, Pin Light, and Hard Mix. These combine textures based on mid-tone grayscale values, often in a way that increases contrast. Overlay usually works best, though more often these days, I find myself using Soft Light.

NOTE: For better results, reduce opacity and play with the grayscale settings.

  • Difference and Exclusion. These mess with color values to create very hallucinogenic effects. What’s happening is that color values in the top clip are mathematically removed from the clips below in slightly different ways. Also useful for spotting the difference between two clips.
  • Stencil Alpha and Stencil Luma. These insert the background image into the foreground image. Use Stencil Alpha, provided the foreground has an alpha channel. If it doesn’t, use Stencil Luma, but the results may not be as good.
  • Silhouette Alpha and Silhouette Luma. These cut a hole into the background image based upon the foreground image shape. Again, use Silhouette Alpha if the foreground image has an alpha channel.
  • Behind. This displays the clips below the current effect. It is used when you are also using Stencil Alpha to insert one image into another.

The bottom choices will vary by application, and are covered in the Help files.


Please rate the helpfulness of this tip.

Click on a star to rate it!

… for Codecs & Media

Tip #560: What is “Clean Aperture” in Apple Compressor?

Larry Jordan – LarryJordan.com

This option should be off for most media today.

Uncheck “Add clean aperture information” when working with digital media.

Topic $TipTopic

One of the checkboxes in Apple Compressor is “Add clean aperture information.” What is this and should it be checked or unchecked?

Apple’s Help Files state: Select this checkbox to define clean picture edges in the output file. This property adds information to the output file to define how many pixels to hide, ensuring that no artifacts appear along the edges. When you play the output file in QuickTime Player, the pixel aspect ratio will be slightly altered. This process doesn’t affect the actual number of pixels in the output file—it only controls whether information is added to the file that a player can use to hide the edges of the picture.

For example, this setting would clean up edges from a VHS tape transfer that waver.

YouTube, on the other hand, prefers this option be unchecked to prevent the video from being cropped during playback.

My suggestion: If you are dealing with digital media with clean edges, uncheck this before starting compression.


Please rate the helpfulness of this tip.

Click on a star to rate it!

… for Codecs & Media

Tip #559: What is “Frame Reordering” in Apple Compressor?

Larry Jordan – LarryJordan.com

This defaults to on. Leave it that way.

The Frame Reordering option in Apple Compressor.

Topic $TipTopic

Ever wonder what Frame Reordering does in Apple Compressor? Me, too. So, I did some research. Here’s what I learned.

Frame reordering is the concept of allowing frames to be decompressed in a different order than their display order. For almost all cases, leave this box checked for H.264 encoding. Some more advanced compressors use “frame reordering” to more efficiently represent movie data.

Important: If you select “Allow frame reordering,” your output file may be more efficiently compressed but may not be compatible with decoders on older hardware. For example, if someone asks you to create your content with “B-frames turned off.”

In looking at YouTube’s latest upload specs, they make no mention of this setting. My suggestion is to leave it on unless you are specifically required to turn it off.


Please rate the helpfulness of this tip.

Click on a star to rate it!