This video focuses more on digitizing and streaming.
Host, John Hess.
Filmmaker IQ created a 25 minute video describing “The Basics of Setting Up a Multi-camera Live Stream.” Hosted by John Hess.
It’s a rundown of all the elements you have to plan and pull together to create a successful multi-camera live stream, with a focus on the capture card and digitizing the image.
https://www.theinsidetips.com/wp-content/uploads/2019/09/Tips-Logo-700x150.jpg00Larry Jordanhttps://www.theinsidetips.com/wp-content/uploads/2019/09/Tips-Logo-700x150.jpgLarry Jordan2021-04-23 01:30:002021-04-23 01:30:00Tip #1583: The Basics of Live Multi-cam Streaming
ACES is designed to be the industry standard for color.
The ACES logo.
This article, written by Jourdan Aldredge, first appeared in NoFilmSchool.com. This is a summary.
The Academy Color Encoding System (ACES) is designed to be the industry standard for color. This series will help explain what it is and how to use it in DaVinci Resolve.
ACES is a color management framework for motion images. This means that it offers a standardized way to transform what our camera saw into what our display can reproduce.
Just like our eyes, cameras and displays encode color as a proportion of pure red, green, and blue. But “pure” means one thing to our vision system, and another to any particular camera or display. This is why we need color spaces.
And this is where ACES comes in—it offers a user-friendly system for performing these transformations, allowing us to objectively transform our image from its capture color space into the color space of the display we’re mastering. This process is known as color management, and it’s the foundation of all effective image mastering.
EXTRA CREDIT
As well, the NoFilmSchool article is the start of a multi-part series explaining ACES and includes a video explaining ACES and DaVinci Resolve.
The video is worth watching and run less than 12 minutes.
Please rate the helpfulness of this tip.
Click on a star to rate it!
https://www.theinsidetips.com/wp-content/uploads/2019/09/Tips-Logo-700x150.jpg00Larry Jordanhttps://www.theinsidetips.com/wp-content/uploads/2019/09/Tips-Logo-700x150.jpgLarry Jordan2021-04-21 01:30:002021-04-21 01:30:00Tip #1579: Understanding ACES for Color
If the creatures are going to be CGI, make everything else real.
Milla Jovovich and Tony Jaa had to perform with the signature oversized weapons from the video game.
This article, written by Trevor Hogg, first appeared in VFXVoice.com.
This in-depth article explores how the VFX team responsible for creating Monster Hunter, which is based on a video game. This is a summary.
Director Paul Anderson said: “My approach on this movie was if the creatures have to be CG, let’s shoot on real landscapes rather than in studio backlots against a greenscreen. Every time a creature’s foot goes down on the ground it displaces and showers our actors with real sand, and the lens flare from the sun will be real as well as the wind. It gives the animators an awful lot to match into as well as helps to tie the creatures into the reality of the existing location.”
The cinematic versions of the monsters are not exact replicas. “With the monsters you’re building them at a different level of detail than a video game engine could ever handle,” says Anderson. “Dennis Berardi [The Shape of Water], our Visual Effects Supervisor and co-producer, and his team sat down and analyzed the way that the creatures moved in the game and compared that to creatures of a similar bulk in our world [such as elephants and rhinoceroses] and how they would move with gravity operating on them. A footfall of a creature weighing a certain amount must displace a certain amount of sand or whatever material it’s running on. Something of a certain size normally moves at certain speed.”
Sixty-five minutes of screen time consist of 1,300 visual effects shots created by MR. X facilities in Toronto, Montreal and Bangalore, as well as at South African-based BlackGinger. “We had one situation where Kaname Fujioka [the director of the Monster Hunter games] and the team at Capcom were like, ‘Diablos looks amazing, but her toenails are too sharp,’” recalls MR. X Visual Effects Supervisor Trey Harrell. “Diablos is an herbivore, so the feature should be more like a rhino or elephant with rounded tusks with no pointy sharp bits. The most interesting thing to me that I found over the course of this whole journey was there is a certain amount of hubris involved when you start on a property and go, ‘Now we’re making a movie version of this.’ But a lot of times you do that before you understand the design in the first place. Everything was there for a purpose.”
EXTRA CREDIT
Trevor’s interview contains far more detail, almost two dozen production stills, and links to other in-depth interviews.
Please rate the helpfulness of this tip.
Click on a star to rate it!
https://www.theinsidetips.com/wp-content/uploads/2019/09/Tips-Logo-700x150.jpg00Larry Jordanhttps://www.theinsidetips.com/wp-content/uploads/2019/09/Tips-Logo-700x150.jpgLarry Jordan2021-04-21 01:30:002021-04-21 01:30:00Tip #1581: Bring the HEAVY Weapons to “Monster Hunter:
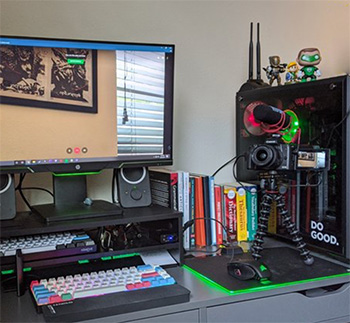
Alejandro Medellin’s webcam studio with Canon camera on the right.
This article, written by Alejandro Medellin, first appeared in PremiumBeat.com.
Webcams these days are in short supply. Fortunately, last year, Canon released the EOS Webcam Utility, Canon’s answer to the ongoing webcam shortage. It’s really, really easy to set up, and the picture quality is top notch.
The webcam utility turns several Canon cameras into legitimate webcams. (22 EOS cameras and 3 Powershots). The utility was good, the battery life of the cameras wasn’t.
So, Canon just released the new Webcam Accessories Starter Kit. This kit comes in three variations that each serve a line of Canon cameras. Each kit comes with an interface cable, a power adapter, and a dummy battery. The camera can stay on for hours with the dummy battery, which draws its power from an electrical outlet via the power adapter. The interface cable connects the camera to the computer via the USB port, which the webcam software then converts into a clean video input.
Though Canon’s accessory kit would have made a more significant impact last year at the height of the pandemic, it’s still a welcome product. The kit puts the hardware on par with the webcam software, and that’s all I needed. With demand still for webcams, the accessories kit is highly sought after.
EXTRA CREDIT
The article includes a list of all supported Canon cameras, details on configuring the software, and a review on how easy it is to use and how well it works.
The evolution from baseband to IP turned into a revolution in 2020 for the broadcast and streaming industries as the effects of the COVID-19 pandemic forced operations to double down on remote production workflows and technologies. Video technology companies and producers have turned to IP-based production like never before, embracing its efficiency, flexibility, and ability to meet rapidly changing requirements cost-effectively.
PrimeStream just released a new white-paper: “The IP Broadcast Revolution” that discusses this transition. The white paper takes a closer look at this massive paradigm shift. We trace the IP revolution from RF and baseband to IP, from satellite and microwave antennas to SIM cards, and from the broadcast operations center to the cloud. From there, we introduce the Primestream IP Broadcast Network Operation Center™ (NOC), which is enabling the future of video workflows through powerful solutions such as Media IO and Xchange™ Media Cloud.
The white paper is only 7 pages long, profusely illustrated and easy to read.
https://www.theinsidetips.com/wp-content/uploads/2019/09/Tips-Logo-700x150.jpg00Larry Jordanhttps://www.theinsidetips.com/wp-content/uploads/2019/09/Tips-Logo-700x150.jpgLarry Jordan2021-04-02 01:30:002021-04-02 01:30:00Tip #1524: The IP Video Revolution in Here
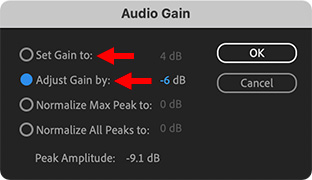
Generally, we adjust clip volumes relatively and monitor them absolutely.
The Gain wndow in Adobe Premiere Pro.
There are two ways to adjust the volume of any audio clip: Absolute and Relative. Here’s what these terms mean and how they work.
An absolute audio level adjustment sets audio levels regardless of the audio volume of that clip before the adjustment. For example, setting one or more clips to -6 dB. If one clip is at -4 dB and a second clip is at 0 dB before the change, they will both be at -6 dB after the change.
A relative audio level adjustment sets audio levels based upon the audio levels before the adjustment. For example, raising the level of one or more clips by 4 dB. If one clip is at -4 dB and a second clip is at 0 dB before the change, the first clip will be at 0 dB and the second clip will be a +4 dB after the change.
NOTE: Audio meters always show absolute levels, the precise volume of all active clips, regardless of the dB setting of their individual clip volume.
KEYBOARD SHORTCUTS
Select the clips you want to adjust in the timeline.
Type G, to open the Gain window.
Set Gain to performs an absolute audio adjustment.
Adjust Gain by performs a relative audio adjustment.
The waveforms in clips you adjust will change, but the volume line will not.
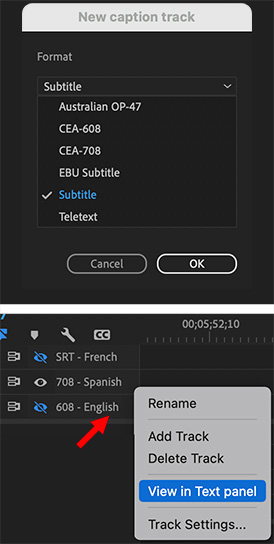
Captions are now much more flexible and easier to use in Premiere Pro.
Caption track window (top) and caption track menu (lower).
One of the exciting new features in Premiere’s new caption workflow is its flexibility. There is no limit to the number of caption tracks (the container for captions) you can create. There is also no limit to the number of captions you can put in each track.
NOTE: Well, there is, I guess. Captions need to display for at least a second, so you are limited by the length of your program. But, um, hold your captions on-screen longer than a second…
When you add a new caption track, you can determine the format for all the captions it contains. However, you can’t mix caption formats in the same track.
You can have tracks for different languages, and each track can be a different format (as illustrated in the lower half of the screen shot).
Control-click a caption track to reveal other options.
Here’s a tutorial from my website that describes captions in more detail.
The high-end Mac Pro vastly speeds creating animation & VFX assets.
Detail from Lunar Animation ad for Disney+
Lunar Animation wrote a detailed blog about how using high-end Mac Pros enabled their animation activities over the last year. Their blog “looks at the noticeable things that this machine really helps with once you start working as an artist.”
Today we’re going to give a 12 month 3D computer animation perspective on the Mac Pro and Pro Display XDR. We really push our computers hard on a daily basis and benchmarks don’t always reflect real world use on a project. So in this post we will focus on how the Mac Pro has affected our current workflows and how it’s opening up new and exciting workflows for the future.
We currently have two Mac Pros in the studio, we have a mid-tier model which has the 16-core CPU and dual graphics cards and then a higher tier 28 core model, which has four graphics cards. Now I know what you’re thinking, why on earth would you want four graphics cards? Well we’ll get to that later in the post.
Their software includes:
MAYA – 3D Modelling and Animation
V-RAY – Rendering Engine for Maya
HOUDINI – Simulation and Effects
NUKE – Compositing
DAVINCI RESOLVE – Editing
SUBSTANCE PAINTER – Shading and Texturing
ZBRUSH – 3D Sculpting
ADOBE PHOTOSHOP – Image Editing
DEADLINE – Render Management Software
[What using a high-end Mac Pro ] means is that rather than having to close the heavy scene, load up the 3D model we want to adjust and then close that and reopen the original scene to continue working, we are able to simply switch spaces in macOS, add a light to a 3D model and quickly switch back and check the update with the interactive IPR renderer.
Then while we’re waiting for that to create a preview render, we can switch over to another screen and adjust another model.
What we’re seeing here is the fluidity of the artist working and not having to be ground to a halt because the computer is having to think. It feels like having multiple computers at your fingertips. All without constant crashing, which means we avoid losing work and more importantly save artists’ time.
The entire blog is a tour de force and well worth reading. And the behind-the-scenes video is amazing.
Please rate the helpfulness of this tip.
Click on a star to rate it!
https://www.theinsidetips.com/wp-content/uploads/2019/09/Tips-Logo-700x150.jpg00Larry Jordanhttps://www.theinsidetips.com/wp-content/uploads/2019/09/Tips-Logo-700x150.jpgLarry Jordan2021-03-10 01:30:002021-03-10 01:30:00Tip #1473: Lunar Animation: Mac Pro Big Help in VFX
Interviews with the VFX team for “The Good Lord Bird.”
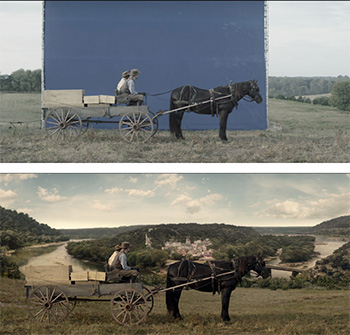
For the great reveal of the Harpers Ferry region, a horse and wagon and grassy field appear in the foreground. Right behind them, production rigged a bluescreen. Ingenuity Studios created everything beyond the foreground elements in order to simulate Harpers Ferry in 1859 in this panoramic shot. Images courtesy of Showtime.
This article, written by Chris McGowan, first appeared in VFXVoice.com. This is an excerpt.
For the Showtime series “The Good Lord Bird,” show-side Visual Effects Supervisor Brad Minnich and Ingenuity Studios Visual Effects Supervisor Andrew Woolley were tasked with recreating Harpers Ferry in 1859 and other settings from the last years of abolitionist John Brown.
Matthew Poliquin was Executive Producer and Adam Lambert the VFX Producer for Ingenuity Studios. Marz VFX, Barnstorm VFX, Trehmer Film and Technicolor VFX were other participating visual effects studios. Ingenuity Studios, the primary VFX house, completed 450 shots and worked on everything from period towns and landscapes to CGI fires, muzzle flashes, train smoke, extensive matte paintings and CG body doubles in battle.
“We had a lot of on-set photography and drone footage to reference to build that town,” Minnich comments. A lot of older photography from the area was also used for reference of what the structures and landscape looked like. “The cool thing about Harpers Ferry is that it is still intact and still has the [pre-Civil War] essence. I remember a session with Andrew where we picked off the modern buildings.” With those cleared out, “Andrew and his team at Ingenuity Studios had a good guide.”
Harpers Ferry is in a river valley, with mountains on either side. One of the memorable establishing scenes is a great reveal of the region. A horse and wagon and grassy field are in the foreground of the shot. Right behind them, production rigged a bluescreen. Ingenuity Studios created everything beyond the foreground elements. “We had to find or build all the elements – trees and grasses, mountains and so on, in the correct varietals and topography for the location,” Woolley notes. Another item was a bridge built in CG and added to the scene. “We had to match all the lighting to the practical elements in the scene,” he adds. “We stitched everything together and projected it onto some rough geo to give more 3D feel. It’s essentially 2.5D, though where the various depths move independently to achieve the correct parallax through the crane move. Finally, it was all integrated with atmosphere and the sky replacement to cap it off. It was the big reveal of Harpers Ferry. Once we locked that in, it established the lay of the land for our viewers.”
EXTRA CREDIT
The article continues with more interviews, along with before and after images of various effects shots.
There are only a few tools that create WebM files on a Mac.
The WebM logo.
Last week, Tip #1436 reported that support for WebM video playback was in current beta builds of Apple Safari. However, as several readers pointed out, that didn’t answer the question of how to create WebM files on a Mac. Here’s what I learned.
While there are LOTS of ways to convert WebM into MP4, there are only a very limited number of ways to convert anything into WebM.
NOTE: ffMPEG supports WebM creation. However, that’s accessed using the command line in Terminal; hardly easy for non-developers to use.
I’m a big fan, and regular user, of ffWorks, however, I haven’t used any of the rest of these. The good news is that, so far, no one has asked me for a WebM file. If you know of other conversion software, please let us know in the comments.
Please rate the helpfulness of this tip.
Click on a star to rate it!
https://www.theinsidetips.com/wp-content/uploads/2019/09/Tips-Logo-700x150.jpg00Larry Jordanhttps://www.theinsidetips.com/wp-content/uploads/2019/09/Tips-Logo-700x150.jpgLarry Jordan2021-03-09 01:30:002021-03-05 11:42:23Tip #1467: Create WebM Files on a Mac
We may request cookies to be set on your device. We use cookies to let us know when you visit our websites, how you interact with us, to enrich your user experience, and to customize your relationship with our website.
Click on the different category headings to find out more. You can also change some of your preferences. Note that blocking some types of cookies may impact your experience on our websites and the services we are able to offer.
Essential Website Cookies
These cookies are strictly necessary to provide you with services available through our website and to use some of its features.
Because these cookies are strictly necessary to deliver the website, refuseing them will have impact how our site functions. You always can block or delete cookies by changing your browser settings and force blocking all cookies on this website. But this will always prompt you to accept/refuse cookies when revisiting our site.
We fully respect if you want to refuse cookies but to avoid asking you again and again kindly allow us to store a cookie for that. You are free to opt out any time or opt in for other cookies to get a better experience. If you refuse cookies we will remove all set cookies in our domain.
We provide you with a list of stored cookies on your computer in our domain so you can check what we stored. Due to security reasons we are not able to show or modify cookies from other domains. You can check these in your browser security settings.
Google Analytics Cookies
These cookies collect information that is used either in aggregate form to help us understand how our website is being used or how effective our marketing campaigns are, or to help us customize our website and application for you in order to enhance your experience.
If you do not want that we track your visit to our site you can disable tracking in your browser here:
Other external services
We also use different external services like Google Webfonts, Google Maps, and external Video providers. Since these providers may collect personal data like your IP address we allow you to block them here. Please be aware that this might heavily reduce the functionality and appearance of our site. Changes will take effect once you reload the page.
Google Webfont Settings:
Google Map Settings:
Google reCaptcha Settings:
Vimeo and Youtube video embeds:
Other cookies
The following cookies are also needed - You can choose if you want to allow them:
Privacy Policy
You can read about our cookies and privacy settings in detail on our Privacy Policy Page.