… for Random Weirdness

Tip #1184: Music Videos, Point Clouds & LiDAR

Larry Jordan – LarryJordan.com

Sometimes, the greater the restrictions, the more inspired the creativity.

A detail from “Clove Cigarette,” courtesy of NoFilmSchool.com.

Topic $TipTopic

This article, written by Colin Medley, first appeared in PremiumBeat.com. This is a summary.

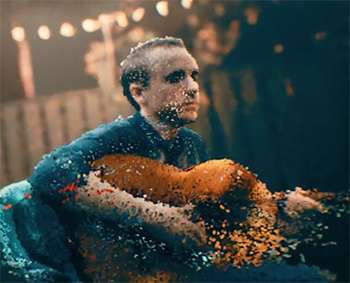
The video for Andy Shauf’s song “Clove Cigarette” has received a fair amount of attention for its unusual visuals and complex workflow. The creators of an amazing new music video share their complex, imaginative process with Unreal Engine and photogrammetry.

This is the time of COVID-19. Colin Medley (co-diretor) said, “I remember our first meeting, we were sitting in your backyard and I think the first idea came from just being there and thinking, ‘Okay, what can we do safely?'”

Jared Raab (co-director): Tristan Zerafa is a good friend of mine who works as a visual effects supervisor on much higher budget operations. I asked him about the LiDAR scanning part of it and whether or not he would be interested in being involved, and he said, “For sure.” And like I said, you, Luca, were the original reason why I even thought we had a chance at pulling this off because of the amount of Kinect scans that you were doing.

Luca Tarantini (technical director): I’d been experimenting with Kinect scans and animation for a couple of years at that point, so I guess that’s what made you think of point clouds.

Jared: Yeah, but you brought up something much more interesting, which was the ability to use photogrammetry, which is the process of taking overlapping photographs of something and turning them into a 3D model.

See the results in their video “Clove Cigarette” here. And their discussion of how they created it is equally fascinating.


Please rate the helpfulness of this tip.

Click on a star to rate it!

… for Random Weirdness

Tip #1151: Rescue Your Storage Using Recovery Mode

Larry Jordan – LarryJordan.com

The key is to be sure you are pressing the keys before you restart your system.

Select the drive you want to repair, then click First Aid in Disk Utility.

Topic $TipTopic

There’s a new way to keep your Mac running smoothly – it’s called “Recovery Mode.” Here’s how it works.

Shut down your Mac. (You can do this from a restart, but the timing of when to press the keys is trickier.)

Before you push the power button, press and hold Cmd + R. Then, turn your system on.

Continue pressing both keys until the startup thermometer gets about half-way across the screen.

What you’ve just done is tell your Mac to boot into a hidden start-up volume called the Recovery disk. You can’t run your normal applications with it, but you CAN:

  • Reinstall the latest version of macOS.
  • Repair your boot disks using Disk Utility
  • And two other options that I, ah, forget

Once boot up finishes, you’ll see a menu with four choices. Click the bottom one: Run Disk Utility.

When it opens, you’ll see two internal drives in the sidebar on the left:

  • Macintosh HD
  • Macintosh HD – Data

Select each one in turn and run First Aid. This fixes any problems with your boot disks; which are the ones most likely to show signs of disk corruption.

NOTE: In the distant past, we would sometimes zap the PRAM or reset the SMC. The vast majority of the time those old stand-bys won’t help today. Recovery Mode will.

When you are done, restart your Mac and get back to work.

NOTE: This is a good utility to run every month or so and is much superior to launching into Safe Boot, which we used to do in the past.


Please rate the helpfulness of this tip.

Click on a star to rate it!

… for Random Weirdness

Tip #1156: How to Organize Editing a Feature

Larry Jordan – LarryJordan.com

Larry’s Rule: Keep things as simple as possible for as long as possible.

Topic $TipTopic

At a recent webinar, Alan asked:

What’s the best organizational system for editing a scripted feature film?

I told him that every editor ultimately creates their own system, because file naming and media organization is intimately tied up in this, too. However, when thinking about the edit, my suggestion is to keep things as simple as possible for as long as possible.

Start with one scene per timeline. This allows you to focus just on the clips for that scene, without getting intimidated by the vastness of the entire project. One scene per timeline also allows you to edit your scenes out of order and easily shuffle clips or scenes around until they make the most sense for the story you want to tell.

Then, as all the scenes for an act are completed – at least, completed well enough that you want to see them integrated into a larger picture – copy / paste the clips from each scene in order into an Act.

NOTE: You can use nests or compound clips if you want. These keep projects neater. But, at this level, I still like the ability to move/trim individual clips without having to go in and out of the nest.

Finally, as you near the end, create a new project / library and copy each act into it. This means that only the clips you are actually using will be stored in this master file.

Once you have all your clips, scenes and acts built into the right order, do the final color correction and audio mixing in preparation for final output.

This system allows you to focus on what’s important for each phase of the edit: individual clips, scenes, acts to the final complete project.


Please rate the helpfulness of this tip.

Click on a star to rate it!

… for Random Weirdness

Tip #1168: 10 Inspirational Tips from Spike Lee

Larry Jordan – LarryJordan.com

Making even a terrible film is hard. Never give up. Never stop learning.

Spike Lee

Topic $TipTopic

I first saw these 10 inspirational filmmaking tips from Spike Lee posted to LinkedIn.com. I don’t know who compiled them, but I thought they were deeply insightful.

  1. Write about yourself and what you know.
  2. Making even a terrible film is hard.
  3. If you want to be a director, you have a much bigger chance to ger your (first) film made if you also write your own screenplays.
  4. For drama you got to have two people butting heads. And to elevate that drama both have to be right.
  5. Your filmmaking always has room for improvement. Try to grow with every project.
  6. Laziness can hinder a filmmaker the most.
  7. To make it, you got to be relentless, you got to persevere, you got to be focused, you have to work on your craft and never stop learning.
  8. Make films with your phone and make them seen online. Film agencies have people whose only job is to look for new talent on the Internet.
  9. If you go to film school, don’t go for the degree. Go to learn the game, to use their resources and to come out with a finished film or screenplay.
  10. Write by hand.

Please rate the helpfulness of this tip.

Click on a star to rate it!

… for Random Weirdness

Tip #1143: 5 Tips to Make Video More Cinematic

Larry Jordan – LarryJordan.com

Notice – nowhere in this list does it mention frame rate.

Ah… the movies.

Topic $TipTopic

This article first appeared in MotionArray.com. This is a summary.

One of the most asked questions that come from beginner filmmakers is, “how do I make my films look more cinematic?” Today, we’re going to go over five tips to help you make your next video look and feel more cinematic.

Part 1: What Does Cinematic Footage Mean?

There are a couple of interchangeable terms we can use. Cinematic, professional, high-quality, sharp, etc. Essentially, the highest overall goal is to make your video look like what you see when you watch a feature film in a theater.

Part 2: Tips to Make Cinematic Films & Videos

  1. Create Depth. You might have heard that shooting with a shallow depth of field is an easy way to make your footage look more cinematic fast. That’s because it does! It really helps, and it’s mostly because it’s a very effective shortcut to giving your shot depth.
  2. Get Your Light Right. Lighting is such a huge category that we can’t do it justice in just a quick overview. Instead, this article offers some quick solutions that can help you out in a pinch to get better quality shots out of whatever camera you’re using.
  3. Aspect Ratio. Basically, you can trick your audience into seeing your footage as more cinematic by changing its aspect ratio.
  4. Color Correction. You knew this one was coming. Color correction is a huge piece of this puzzle. This is where you take the image you captured and shape it into the final product in terms of light and color.
  5. It’s All an Illusion. Movie-making is all a magic trick. Because that’s what a movie is — it’s a trick. So the last goal in all of this is to make sure you don’t remind your audience that they’re watching a movie.

EXTRA CREDIT

This article goes into more depth, and multiple steps for each of these points. This is a nice refresher of things you once knew, but, maybe, forgot.


Please rate the helpfulness of this tip.

Click on a star to rate it!

… for Random Weirdness

Tip #1144: An Excellent Discussion of Plot & Story

Larry Jordan – LarryJordan.com

It all starts with a plot and story. Here’s how to get started right.

The basic plot diagram in three acts.

Topic $TipTopic

This article, written by Jourdan Aldredge, first appeared in PremiumBeat.com. This is a summary.

Let’s explore the fundamentals of story and plot structure and how filmmakers can use these basics to create their own narratives. In fact, a good script is only as good as the plot — or the story at the center of it all. But, what makes a good story? And, how do you structure the perfect plot for your films and screenplays?

What is a plot? Looking into purely literary terms, a plot is simply: “The plan, scheme, or main story of a literary or dramatic work, as a play, novel, or short story.” Although, for our film purposes, it’s probably best to go with the functional definition: “The sequence of events where each affects the next one.” Basically, this just means the plot is what happens and in what order.

A story, on the other hand, is “an account of imaginary or real people and events told for entertainment,” which is slightly different in that it accounts for the sensational elements of things that may or may not have actually happened and are presented for entertainment purposes.

The article presents a video of Kurt Vonenegut discussing the shape of a story, along with detailing the basics of plot diagrams and structure.

As well, another video discusses Joseph Campbell‘s Hero’s Journey. This plot and story structure is as old as humankind itself. It’s perhaps the most nuanced take on how stories are structured and the individual plot points you need to use (or at least understand) for your projects.

Finally, this article provides examples of plot structure with videos about:

  • Harry Potter
  • Empire Strikes Back
  • Dead Man’s Chest
  • Rick and Morty / Adult Swim

It really becomes up to you — as a screenwriter and/or filmmaker — to take these structures for what they are: building blocks to your story. You can choose which structure or format that’s best for you and your narrative, as well as decide at what point you might want to deviate from the structured norms to create unease or excite wonder in your audience and their formulaic expectations.


Please rate the helpfulness of this tip.

Click on a star to rate it!

… for Random Weirdness

Tip #1145: What Every Sound Utility Should Know

Larry Jordan – LarryJordan.com

The sound utility person is an essential piece of the audio puzzle on set.

(Image courtesy of pexels.com.)

Topic $TipTopic

This article, written by Daron James, first appeared in NoFilmSchool.com. This is a summary.

There are dozens of roles and responsibilities on a film set. Whether you’re a camera assistant, a prosthetic makeup artist, a set costumer, or a video assistant, everyone makes up the dynamic team that supports a director’s vision.

A sound utility is one of the puzzle’s most important pieces. Part of the production sound team that generally includes a production sound mixer, a boom operator, and a sound utility, they’re often referred to as 2nd boom, third, or cable person.

As a sound utility, you’re one of the first people on set. You power up the sound equipment, check batteries and wireless frequencies, and you make sure there are enough printed sides of the shooting script. You understand the shooting schedule and when it’s time to move. You double-check the bag rig in case the production sound cart can’t be used. You understand audio playback and the importance of soundproofing sets.

You need to have people skills, understand set politics, and know when to speak up.

One of your most methodical and critical jobs on set will be to wire talent. You’re working with actors, wardrobe and makeup/hair to make sure everyone is on the same page and understands what you’re looking to accomplish. Having to stop production to fix an incorrectly placed lav is something every sound department wants to avoid.

Here are some additional tips:

  • Assist the boom operator, wire the talent, and make sure all equipment is in range
  • Set up loop systems, dampen noise, and make sure everything is charged
  • Organize paperwork, know where your gear is, and make sure the equipment works
  • Remember to wear your IFB, be a cart master, and make sure everything is returned

The article goes into more detail on each of these points with detailed, practical advice.


Please rate the helpfulness of this tip.

Click on a star to rate it!

… for Random Weirdness

Tip #1119: Free Hand-Painted Animated Fonts

Larry Jordan – LarryJordan.com

Free for personal use, not to be resold.

A sample of these hand-drawn fonts.

Topic $TipTopic

This article, written by Todd Blankenship, first appeared in PremiumBeat.com. These free hand-painted animated fonts were painstakingly painted frame by frame to give your titles and design a fun, energetic feel.

The more real and textural you make your designs, the more tangible and authentic they feel. Making your title slate or other motion graphic feel as if it were hand-painted (when the style fits, of course) will always catch the viewer’s eye a bit more than a standard piece of clean, sharp text.

As a bit of behind-the-scenes, to create this freebie, we printed off large sheets of two different fonts, and painted 7-8 frames of each of them on similarly-sized sheets of poster board, then scanned each frame one by one. Then, inside of After Effects, we cleaned it all up and set them in a sequence, animating each scan in succession once every two frames.

Here’s the link to download these free, hand-painted, animated fonts.


Please rate the helpfulness of this tip.

Click on a star to rate it!

… for Random Weirdness

Tip #1121: 5 Hacks for Film & Video Lighting

Larry Jordan – LarryJordan.com

In an ideal world, we’d have time and money. In the real-world, we have these hacks.

(Image courtesy of MotionArray.com.)

Topic $TipTopic

This article first appeared in MotionArray.com. This is a summary.

Shooting a film or video without thinking about lighting is a recipe for disaster. Cameras don’t pick up light the same way our eyes do, so even if a scene looks to have plenty of light, the camera may not see it that way. Luckily, there are some hacks that can help you get a better shot on a budget or in a pinch. Here are 5 lighting hacks for film and video that you can try when you need a few tricks to get the job done.

  • Start With Bulbs. When shooting indoors, one of the very simplest things you can do to help your video lighting is to change the lightbulbs around you. Maybe you are shooting in a house with standard incandescent bulbs. A normal 60-watt incandescent puts out about 800 lumens of light. On the other hand, a compact fluorescent bulb in the 32-35 watt range will put out 2600 lumens, more than 3 times the amount of light. You can also get 2600 lumens out of a 25-28 watt LED light bulb. So, by simply grabbing some higher light-emitting bulbs, you can immediately make a positive impact on lighting for your film or video.
  • Bulking Up. For a very little extra cost, you can pick up a socket adaptor that will turn one regular light socket into 4. Remember that these bulb tips will not give you specific pointed light, but will enhance the overall ambient light on set. And that is the basis for a good lighting setup in most cases.
  • Reflectors. So, you have plenty of light now, but you don’t have it going in the direction you want. In a typical studio setting, you might break out a set of reflectors. Essentially any large solid surface in black or white will give you some level of reflection or shadow, but foam core board is a great solution. It’s fairly sturdy with a large surface area. It generally comes in black and white, with the white having a somewhat shiny white surface, and it’s cheap and easy to find.
  • Cheap Lamps. Getting ambient light from brighter bulbs is great, but sometimes you really need more strong directed light. After all, this is what a light kit is for. Setting up things like key, fill, and backlights won’t work with an overhead socket and bulb. But if you don’t have access or money for a lighting kit, there are lots of helpful options at the hardware store. For starters, these little clamp lamps can be very handy.
  • Diffusers. Of course, your fancy light kit will have various types of diffusers and maybe gels to work with. But we don’t have time for that. We are light-hackers. Guess what else makes a great diffuser? A bed sheet. A bed sheet will produce a similar effect to a softbox diffuser, and you probably have plenty of them laying around.

In a perfect world. we’d always have the extra lighting setup that we wanted, and all of the time and budget to make everything look perfect. But in the real world, with tight budgets, lack of access, and limited time, we have to make do with what we can get. And the reality is, there are a lot of good and cheap substitutes that will bring your lighting to a much higher level.

EXTRA CREDIT

The article, linked above, has more tips and video illustrating these concepts.


Please rate the helpfulness of this tip.

Click on a star to rate it!

… for Random Weirdness

Tip #1123: Basic Camera Technique Tips

Larry Jordan – LarryJordan.com

The best camera operators know not just technique but understand performance.

Image courtesy of NoFilmSchool.com.

Topic $TipTopic

This article first appeared in NoFilmSchool.com. This is a summary.

If you’ve just started learning how to operate a camera, this is the video for you. Camera operator Oliver Cary, whose work includes Orange Is the New Black, John Wick: Chapter 3 – Parabellum, and Dark Waters breaks down different shooting methods and how they impact the story.

The best camera operators know not just technique but understand performance. They understand the emotional arc and subtleties of the story in each scene. And that’s key. In time, anyone can frame a shot on a tripod, but knowing why you are framing that particular shot and how it connects to the next shot and to the subtext of the story is what separates good operators from great ones.

As you progress from basic techniques and beyond, you’ll learn how to find those moments within a scene where you push the camera in or glide it through the room, because you’re connecting to the performance. That’s what’s going to make you stand out as an operator—reacting to those moments that were not rehearsed on set. Those instincts are hard to teach, so start discovering them now.

EXTRA CREDIT

The article, linked above, has a ten minute video illustrating these concepts.


Please rate the helpfulness of this tip.

Click on a star to rate it!