… for Random Weirdness

Tip #1231: How to Break Down a Script

Larry Jordan – LarryJordan.com

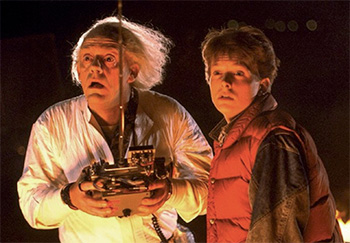
Script breakdowns start the process of turning words into images.

(Image courtesy of PremiumBeat.com.)

Topic $TipTopic

This article, written by Jason Boone, first appeared in PremiumBeat.com. This is a summary.

A script breakdown helps a film crew prepare for production. With a proper breakdown, a production team can isolate all the necessary elements, put together a shooting schedule, create a shot list, and generate script sides.

In the video tutorial that accompanies this article, the author uses StudioBinder to break down a script.

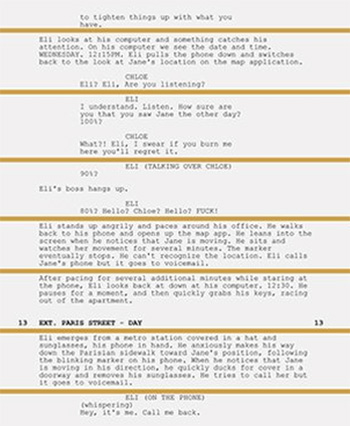
Line the Script. The first step in breaking down a script is to separate it into filmable scenes. This is called “lining the script,” and it’s quite easy when things are properly formatted. Since one page of a screenplay is generally translated as one minute of screen time, using eighths just provides extra precision.

Isolate the Production Elements. With the script properly broken into scenes and divided by eighths, tag them. Elements include anything that’s going to be on-screen, including cast members, props, VFX, makeup, set dressing, etc.

Create the Breakdown Summary Sheet. This could include shot lists and production schedule.

Once I have all of the elements isolated, I can now put together a breakdown sheet. With this step, I’m essentially categorizing and listing out all of the elements from the breakdown for each particular scene.

With my script breakdown in hand, I’m now ready to move on to the next stages of pre-production.

EXTRA CREDIT

The article includes a five minute video tutorial along with more details and screen shots.

The StudioBinder website is here.


Please rate the helpfulness of this tip.

Click on a star to rate it!

… for Random Weirdness

Tip #1232: What Should Be in Every Scene You Write?

Larry Jordan – LarryJordan.com

Drama occurs from conflict. Spike Lee says the best drama is when both sides are right.

(Image courtesy of Pexels.com.)

Topic $TipTopic

This article, written by Jason Hellerman, first appeared in NoFilmSchool.com. This is a summary.

Scenes: they’re the backbone of every story, whether it be TV, film, or even on the stage. Scenes build on one another and create a world, a vision, and take people on a journey. But, what should be in every scene?

At the end of the day, every scene needs to have one thing: drama. Does your character have a goal in the scene? What’s standing in their way? That’s it. That’s the center of every scene.

Drama is the perils that your characters face in order to achieve their goal. Those perils can make us laugh, they can be thrilling, they can be emotional. But without drama, you’re not building a story. You’re just boring us.

The biggest pratfall I see from younger writers are scenes that have no conflict. People come in and out of doors and espouse facts, then go on their way. We need to see what stands in their way both tangibly and intangibly if we want to really be a part of the story.

This article includes a video on how to write a scene, along with more details.


Please rate the helpfulness of this tip.

Click on a star to rate it!

… for Random Weirdness

Tip #1207: I Need Your Help

Larry Jordan – LarryJordan.com

The Inside Tips encourages reader-contributed tips. Please share yours with us.

We don’t know what we don’t know until we learn it from someone else.

Topic $TipTopic

I want to encourage you to submit a tip or two for “The Inside Tips.” We all benefit when we take the time to share what we know.

Random Weirdness about Media is a Tip Letter focused on media production. Production is a vast topic, far more than any single person can master.

Each of us, during our career, has benefited by learning from others – sometimes in a formal setting, more often in the course of daily work.

For this reason, it would be great if you could contribute a tip or two from your own experience. The Inside Tips are read in every state in the US, as well as 50 countries around the world.

Even the “simple things” only seem simple after we learn them.

Click this link to submit a tip…. And thanks!


Please rate the helpfulness of this tip.

Click on a star to rate it!

… for Random Weirdness

Tip #1216: A Split-Screen Movie – that Works.

Larry Jordan – LarryJordan.com

80 minutes – two separate locations – both shot in real-time at the same time.

Screen shot from the film “Last Call.”

Topic $TipTopic

When does film become theater… and when does theater become film?

This article first appeared in NoFilmSchool.com. This is a summary.

The film, “Last Call” is about a suicidal alcoholic (played by the film’s co-writer Daved Wilkins) on the anniversary of his son’s death. When he attempts to call a crisis hotline, a mis-dial connects him with Beth, a single mother working as the night janitor (Sarah Booth) at a local community college. The split screen feature showcases both characters in real-time as they navigate a life-changing conversation.

80 minutes – two separate locations – both shot in real-time at the same time. 10 days of rehearsal, 4 days to shoot, 5 good takes.

“We were either going to get it or not,” director/co-writer Gavin Michael Booth says. “We filmed every rehearsal and watched it back to see if a particular section was getting boring and therefore to try something visually to spice it up. I was like an NFL coach being able to watch the game plays back to perfect the technical aspects of the performance.”

Not content with shooting both takes simultaneously in realtime, they shot in locations several blocks away from each other. The crew for each was a camera operator and a sound operator. Cinematographer Seth Wessel-Estes was in charge of Daved’s storyline, while Booth took charge of the other storyline featuring his wife. They shot with a part of RED Helium cameras in 8K.

Shot almost exactly two years ago, the film picked up 25 awards on the festival circuit including the Founders Award at Napa Valley and Best Feature at Hamilton, eventually landing a theatrical release with Mutiny Pictures and a streaming distribution deal with Apple TV+ with more to follow.

The article provides lots more details, plus a trailer and production shots.


Please rate the helpfulness of this tip.

Click on a star to rate it!

… for Random Weirdness

Tip #1217: Create Loglines that Sell Movies

Larry Jordan – LarryJordan.com

Taglines intrigue audiences. Loglines sell films to investers.

Screen shot of “Back to the Future” (Image courtesy of Universal Pictures.)

Topic $TipTopic

This article, written by Darin Bradley, first appeared in PremiumBeat.com. This is a summary.

Every creative medium uses some version of the elevator pitch to condense a project into a simple, memorable description — in the movie business, it’s the logline. Agents and producers of all stripes across the entertainment industry use these one-liners when jockeying scripts, books, or games between the creators they represent and the buyers they’re trying to convince.

A logline is a simple descriptive sentence that identifies the inciting incident (motivation and/or risks), the protagonist, the primary action, and the antagonist. This straightforward sentence reduces all the complexity and nuance of your script into a digestible takeaway that makes it simpler for the various brokers who bring movies to life to move big, beautiful, ungainly scripts around.

Here are the “Rules:”

  1. Create Strong Protagonists
  2. Specific About Character Actions
  3. The Unexpected Is Your Friend

The article then provides almost a dozen examples of both successful and unsuccessful loglines, with an analysis of each.


Please rate the helpfulness of this tip.

Click on a star to rate it!

… for Random Weirdness

Tip #1198: 6 Tips to Improve Audio Quality

Larry Jordan – LarryJordan.com

Please, for the love of humanity, stop using the camera mic for dialog!

Not a camera mic. (Image courtesy of Pexels.com)

Topic $TipTopic

This article first appeared in MotionArray.com. This is a summary.

Not much is more distracting than bad audio in an otherwise good film or video.

Great sound typically goes unnoticed by the viewer. It stays in the subconscious, but as soon as you bring it to the conscious, that’s when you start hearing words like amateur, low budget, B-movie, and student film.

In this article, the author looks at how to improve audio recordings:

  1. Use a Dedicated Microphone
  2. Get Your Microphone Close to Your Subject
  3. Don’t Clip Your Audio
  4. Location
  5. Get a Dead Cat
  6. Capture Room Tone

It includes a details on each subject, along with a seven-minute tutorial video.


Please rate the helpfulness of this tip.

Click on a star to rate it!

… for Random Weirdness

Tip #1199: Video Creativity: Casey Neistat

Larry Jordan – LarryJordan.com

“It doesn’t have to be perfect to be good.”

Casey Neistat (Image courtesy of PremiumBeat.com)

Topic $TipTopic

This article, written by Jourdan Aldredge, first appeared in PremiumBeat.com. This is a summary.

In this in-depth review and interview with YouTube vlogger Casey Neistat, Jourdan takes a look at the philosophy, gear and perspective of this highly-successful digital creator who, at his heart, is just another filmmaker and content creator trying to turn his creativity into art.

Jourdan: What sparks your creativity in today’s world of video content?

I find so much inspiration in how diversified YouTube is becoming. … Overall, it’s seeing creators really lean into what they’re passionate about rather than trying to conform to what some might feel is necessary to succeed.

What have you recently been shooting your videos on?

I’ve recently switched over entirely to Sony. It was a hard process because I think Canon makes fantastic cameras. For years, including my entire vlog series, I shot on Canon—I love the image straight from their cameras, love their color science—but when Sony launched the ZV-1, I really felt like it was the perfect camera for a YouTuber. Then, when the a7S III dropped with the articulating screen, it closed the deal for me.

Take us through your editing workflow and process for your videos?

I only edit my YouTube videos on a computer using Adobe Premiere Pro. …I only edit chronologically—start with the first frame of the video and don’t stop or review until I’ve made it to the end. Then, I backtrack and can rearrange and all that. I find editing scenes first to be confusing. I love discovering the story by forcing it to reveal itself this way. …Rather than cover up any scars or evidence that this video was made by one person, I embrace those flaws—often embellish them. Leaning into the imperfections is a way for me to say to my audience that I am not a pro, I am just a regular guy trying to tell a story.

What’s the single best way to create engaging videos?

I don’t know the answer to this but going back to the first question about what excites me; I think that being true to your passion, abiding by an unspoken understanding that if YOU find it interesting that someone else will also find it interesting, that then you will ultimately find your audience.

EXTRA CREDIT

The article has links to several of Casey’s videos, analysis of his answers and much more. It is quite in-depth and well-worth reading.


Please rate the helpfulness of this tip.

Click on a star to rate it!

… for Random Weirdness

Tip #1200: Filmic Pro Adds 10-bit Dolby Vision HDR

Larry Jordan – LarryJordan.com

Filmic Pro has become an iPhone movie-making standard.

Image courtesy of NoFilmSchool.com.

Topic $TipTopic

This article first appeared in NoFilmSchool.com. This is a summary.

Filmic Pro is a versatile tool that is a must-download for any mobile filmmaker who wants more manual control over the native cameras found on smartphones. With v6.12.7 of the iOS app, it now supports 10-bit Dolby Vision HDR on the iPhone 12 series.

Whether you’re just starting out creating content or looking for a low-budget way to shoot your next short, FiLMiC Pro has the essential tools to help dial in your image. The intuitive app has options to adjust white balance, focus, exposure, resolution, frame rate, and even aspect ratio. Want to shoot 2.76:1 or 2.39:1? No problem, the app can do both.

If you’re looking for more advanced features, it has options for focus peaking, a histogram, zebra lines while supporting flat/Log gamma curves, anamorphic lenses (like the Blue Flare lens from Moment), gimbals from DJI, Movi, and Zhiyn, and Bluetooth microphones. You can even record using a clean HDMI output for livestreaming or to an external recorder. So, yeah, it’s versatile.

Dolby Vision is supported by Netflix, Amazon, and Apple iTunes, so it didn’t come as a big surprise when it was announced the iPhone 12 series supports it. The drawback to creating Dolby Vision HDR content is that you need a compatible display to watch it, so at the moment, not everyone is going to see your punchy blacks and sweet highlights. But at least as a creator you can start learning the benefits of HDR as an image pipeline.

The update is free to existing users. For new users, the app has a $15 price tag.

EXTRA CREDIT

This article includes several videos showcasing Filmic Pro, along with a variety of supporting links.


Please rate the helpfulness of this tip.

Click on a star to rate it!

… for Random Weirdness

Tip #1160: The Secret History of Clapperboards

Larry Jordan – LarryJordan.com

Every shot starts with one, but what do you really know about the clapperboard?

(Image courtesy of Pexels.com.)

Topic $TipTopic

Most of the time, the tips for this Tip Letter focus on production. Mostly. Recently, I came across a fascinating article on the history of clapperboards that fits right in.

This article, written by Jourdan Aldredge, first appeared in PremiumBeat.com. This is a summary.

Every shot starts with one, but what do you really know about the iconic film clapperboard? Let’s take a look.

The clapperboard was not always called a clapperboard, and, in fact, has had many different names over the years:

  • Sound marker
  • Slate
  • Sync slate
  • Dumb slate
  • Time slate
  • Clapboard
  • Clapperboard
  • Cue board
  • Film sticks
  • Sound sticks
  • And many, many more…

The clapperboard was very much an invention of necessity, and variations of the board date back to the earliest days of even silent cinema. A “slate board” could be found on silent film sets as a way to record and identify the type of film stock that was being used for the shoot.

The hinged, clappy part of the clapperboard was the innovation of Australian studio head F. W. Thring. When pioneering sound engineer Leon M. Leon thought to combine Thring’s hinged sticks with the slate board, the clapperboard we now know was born.

As we’ve moved into modern filmmaking, the standard chalkboard and dry-erase style clapperboards have of course transitioned as well. Modern digi-slates can be used to change and display all the relevant information digitally, as well as display SMPTE time code to further help with the pulling of metadata. There are also some other cool breakthroughs with digital slates and apps that are worth checking out.

Ultimately, it comes down to your filmmaking style and the specific needs of your production. A clapperboard will always be a useful tool, a helpful reminder, and a dependable source of information (should any of the digital alternatives fail you at some point).

EXTRA CREDIT

Jourdan’s article also has three interesting videos:

  • The history of clapperboards
  • How to Slate the Camera
  • And a montage of slates from Quentin Torentino’s Inglorious Basterds

Please rate the helpfulness of this tip.

Click on a star to rate it!

… for Random Weirdness

Tip #1183: Make a Film Using Zoom

Larry Jordan – LarryJordan.com

Remember, Zoom is both a technology and a character in your film.

Image courtesy of Paula Goldberg & PremiumBeat.

Topic $TipTopic

This article, written by Paula Goldberg, first appeared in PremiumBeat.com. This is a summary.

Let’s explore the important elements you’ll need to know to make a successful short film using Zoom technology.

  • Storytelling. The platform might be unusual, but the content demands remain the same. You can’t fix an idea in post. Everything starts with the material. With any short film, you’re looking for a simple plot and complex characters, a compelling conflict, and a surprising, but truthful, resolution. The extra consideration with Zoom is that action will be limited, and your screenplay will be dialogue driven.
  • Casting. Don’t cast your roommate. Good actors want to work on good material. If your script is gripping and your artistic vision clear, chances are you’ll find actors willing to do your project. So much can be forgiven technically, but a bad performance can kill any script.
  • Minimize the Tech. Built-in computer webcams are compact and so are their lenses. This sets a limit on the amount of light that they can capture—a problem especially for low-light conditions. External webcams provide better performance. Some even feature wide-angle lenses. They’ll also give your actor the ability to adjust resolution, frame rate, color, and brightness.
  • Preparation. Time is on your side and a spectacular return on your investment is to spend that time in pre-production. I’d approach it three ways: set/costume, filmmaking, storytelling. The most important part of the preparation is artistic. This is a very unnatural way for actors to work. You may want to suggest that they put a piece of paper over their own image on the screen. This will help them be less self-conscious—in no other medium is the actor able to view themselves while shooting. Once Sasha suggested that, both actors felt much more comfortable playing off each other.
  • Production. A perk about Zoom is that the director can record and watch each take live by muting their audio, disabling their video, and selecting “hide non-video participants.” When the video is processed, there will be no indication that anyone was present except the performers. You can pause between takes and discuss, then hide yourself again and resume another take.
  • Editing. If recording on Zoom, a [close-up] can be quite compelling, especially if the storytelling has numerous reveals and twists. It encourages multiple views to catch moments you didn’t get on the first view. However, don’t be afraid to edit. Most people are used to jump cuts and you have three angles you can use—a split screen two shot and the two singles. What will help the flow is if you cut on action, which can be as simple as a shift in seating position, interaction with a prop, or hand movements.

The article has a variety of technical tips and lots of screen shots, as the author follows her production from first idea through to editing. It is well worth reading.


Please rate the helpfulness of this tip.

Click on a star to rate it!