… for Apple Motion

Tip #752: 3 Highly-Intriguing Simulation Behaviors

Larry Jordan – LarryJordan.com

These behaviors have lots of uses – and are fun to play with.

Orbit Around and Align to Motion behaviors applied to the arrow.

Topic $TipTopic

Here are three behaviors that are fun to play with – and useful at the same time. (This text is from the Apple Motion Help files.)

  • Align to Motion. This changes the rotation of an object to match changes made to its direction along an animation path. This behavior is meant to be combined with Simulation behaviors that animate the position of an object or with a keyframed animation path you create yourself. Unlike the Snap Alignment to Motion behavior, which produces absolute changes in rotation that precisely match changes in direction, Align to Motion has a springy reaction and creates a more lively effect.

NOTE: The Align to Motion behavior does not work on objects animated using the Motion Path behavior. Instead, use the Snap Alignment to Motion behavior (in the Basic Motion subcategory).

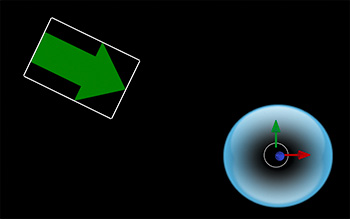
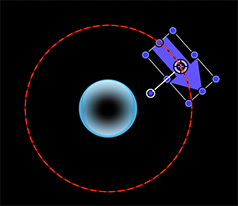
  • Orbit Around. This causes the affected object to circle around a designated target. Similar to the Attracted To behavior, the Orbit Around behavior’s default parameter settings give the object sufficient initial velocity to orbit around another object in a perfect circle.
  • Repel. This pushes objects away from the affected object. If you apply the Repel behavior to an object, that object pushes away all other objects within the area of influence in the canvas. The strength with which objects are pushed away can be increased or decreased, as can the distance repelled objects travel. I find this simulation works really well flying an object through a field of particles, pushing the particles away from the object.

Please rate the helpfulness of this tip.

Click on a star to rate it!

… for Random Weirdness

Tip #742: The Best Advice to Keep Your Cool

Larry Jordan – LarryJordan.com

Don’t argue – just address the note.

Topic $TipTopic

This article, written by Todd Blankenship, first appeared in PremiumBeat.com. This is an excerpt.

NOTE: This is an OUTSTANDING article on dealing with clients. Click the link above to read all of it.

It’s funny how a simple conversation can change everything. A colleague or a friend says something that just sticks. You probably don’t realize the power of the moment while you’re in the moment, but then, even years later, their words pop into your head when you’re driving or working or in the shower.

I was working on a project with a producer from L.A. who had produced a ton of actual television shows. He had definitely earned the right to tell me what to do. Alas, the young and obnoxious creative that I was at the time, I argued with him. I didn’t want to make his changes. I thought my ideas were the only possible way things should go. I thought his input would absolutely ruin the project. It was the wrong call.

I pleaded my case. I explained to him why his ideas wouldn’t work and how my way was the better way. Instead of firing me on the spot, he said three simple words: “Address the note.”

I stared at him, wondering what he meant. He continued:

Just address the note — that’s all you need to do. You don’t have to do it exactly as I said it, just make me happy. I’m not a cinematographer, I’m a producer — you’ll know better what to do, specifically. My specific way may not be the best, but now you know something that’s bothering me as a producer and all you gotta do is find a way to address it and make me happy. Just address the note.

Wow.


Please rate the helpfulness of this tip.

Click on a star to rate it!

… for Apple Motion

Tip #722: Apple Motion: The Move Behavior

Larry Jordan – LarryJordan.com

The Move behavior moves an element to or from a target.

The green arrow is moving toward the target, which was placed inside the blue ball.

Topic $TipTopic

The Move behavior (Basic Motion > Move) moves a selected element to or from a target. This is a really easy way to create directed movement. Here’s how it works.

The Move behavior provides more control than a Throw, but less than a Motion Path.

  • Select a layer in the Layers panel.
  • Choose Behavior > Basic Motion > Move
  • Position the playhead at the start of the effect
  • Drag the element to its starting position
  • Drag the target (white circle) where you want the element to move

When you play the project, the selected object (green arrow, in my example) moves in a straight line to or from the target.

NOTE: You can’t add curves to the Move behavior.

EXTRA CREDIT

Select the Move behavior. In the Inspector, you can change the direction of the movement (To or From), as well as the acceleration.


Please rate the helpfulness of this tip.

Click on a star to rate it!

… for Visual Effects

Tip #728: Improve Landscapes with Gradients

Larry Jordan – LarryJordan.com

Apply the Overlay blend mode to a B&W gradient to add magic to exteriors.

Clockwise from top left: Source, blend mode, gradient, finished image.

Topic $TipTopic

This trick was invented by Ansel Adams almost 100 years ago; when used with a lens, it’s called a “grad filter.” You can use it yourself to improve exterior shots. Here’s how.

  • Using Photoshop, or the NLE of your choice, create a smooth gradient the same frame size as your project, shading from black, at the top, to white, at the bottom.
  • Stack it on top of an image.
  • Apply the Overlay blend mode to the gradient.

Done.

NOTE: Vary the results by adjusting the width of the transition between the two colors, as well as rotating the angle of the transition.

Note how the darker portions of the gradient emphasize the texture and color of the clouds. While the lighter portions of the gradient highlight the foreground.

The overlay blend mode alters highlights and shadows, but not midtones, which is why the middle of the image looks the same in both shots.

This is a powerful effect that I use frequently.


Please rate the helpfulness of this tip.

Click on a star to rate it!

… for Adobe Premiere Pro CC

Tip #736: Auto Save Secrets

Larry Jordan – LarryJordan.com

Auto Save Preferences in Adobe Premiere Pro 2020.

Topic $TipTopic

Auto Save makes backups of your projects. But, what do all the Auto Save preference settings do?

  • Automatically Save Projects. By default, Premiere Pro automatically saves your project every 15 minutes and retains the last five versions of the project file on the hard disk.

    You can revert to a previously saved version at any time. Archiving many iterations of a project consumes relatively little disk space because project files are much smaller than source video files. It’s best to save project files to the same drive as your application. Archived files are saved in the Premiere Pro Auto-Save folder.

  • Maximum Project Versions. Enter the number of versions of a project file you want to save. For example, if you type 10, Premiere Pro saves the ten most recent versions.

NOTE: When you specify auto-save to occur at regular intervals, Premiere Pro auto-saves a project on detecting changes to the project file. The auto-save occurs irrespective of whether you manually save the changes to the project or not. Earlier, Premiere Pro would not execute auto-save if you manually saved within the interval setting. If the system goes idle for a period beyond the interval setting, Premiere Pro forces an auto-save.

  • Save Backup Project To Creative Cloud. To let Premiere Pro auto-save your projects directly to your Creative Cloud-based storage, select this preference.

    When Premiere Pro auto-saves a project, a directory named “auto-save” is created in your Creative Cloud online storage. All the backed-up projects are stored in the “auto-save” directory.

    You can access your backed-up projects from the Files tab of your Creative Cloud desktop application.

  • Auto Save also saves the current project(s). When this setting is enabled, Auto Save creates an archived copy of your current projects, but also saves the current working project. This setting is off by default.

    Auto saved versions have a suffix with the date and time it was saved (yy-mm-dd-hh-mm-ss) appended to the project name (for example, ProjectName-2018-08-31_09-53-41.prproj).

    When an auto save occurs, Premiere Pro creates a new backup project file and adds it to the auto-save folder as an emergency project backup. This file is always the latest saved version of that project. Here are some of the characteristics of the emergency back project file:

    • The backup file has the same name as the project, it does not have any suffix.
    • Premiere Pro produces only one emergency backup file per project, and it is overwritten at each Auto Save interval and when you save the current project.

Please rate the helpfulness of this tip.

Click on a star to rate it!

… for Random Weirdness

Tip #730: Tips to Control Depth of Field

Larry Jordan – LarryJordan.com

Big aperture = small f/number = small depth of field

Shallow depth-of-field. (Image courtesy of Pexels.com.)

Topic $TipTopic

This article, written by Brian Auer, first appeared in PictureCorrect.com. This is an excerpt.

Depth of field (DOF) is one of the most important factors in determining the look and feel of an image. You should know how to utilize this effect.

Depth of field refers to the distance (depth) from the focus point that a photo will be sharp, while the rest becomes blurry. A large, or wide, depth of field results in much of the photo in focus. A small, or narrow, depth of field results in much more of the photo out of focus.

There are four main factors that control depth of field: lens aperture, lens focal length, subject distance, and sensor size. Your sensor is pretty well set, so you won’t have much luck changing that. Your focal length and distance to the subject are usually determined by your choice of composition. So the lens aperture is your primary control over depth of field.

Before I get to the tips, let’s get a few things straight:

  • BIG APERTURE = SMALL F-NUMBER = SMALL DEPTH OF FIELD
  • SMALL APERTURE = BIG F-NUMBER = BIG DEPTH OF FIELD

Large apertures (small f-numbers) cause a narrow DOF, while small apertures (large f-numbers) cause a wide DOF.

If you want to bring an entire scene into focus and keep it sharp, use a small aperture. But be careful not to go too small. Lens sharpness starts to deteriorate at the smallest apertures.

The DOF extends behind and in front of the point of focus. It usually extends further behind than in front, though. So keep this in mind when choosing your focus point; you’ll want to focus about a third of the way into the scene rather than halfway.

Your focal length is usually determined by your choice of composition, but you should know how it affects your depth of field. Longer focal lengths (200mm) have less depth of field than shorter focal lengths (35mm).

EXTRA CREDIT

The link at the top has videos illustrating these concepts, as well as more information.


Please rate the helpfulness of this tip.

Click on a star to rate it!

… for Apple Motion

Tip #719: Secrets of the Sequence Text Behavior

Larry Jordan – LarryJordan.com

Sequence Text animates font position, size, rotation, color, opacity and more.

Animated text.

Topic $TipTopic

This tip originally appeared as an Apple KnowledgeBase article. This is an excerpt.

You can build custom text sequence animations using the Sequence Text behavior (in the Text Animation category of behaviors in the Library). The Sequence Text behavior (not to be confused with the Text Sequence category of preset behaviors in the Library) lets you animate text attributes—scale, position, color, opacity, glow, and so on—in sequence, character by character. For example, you can create a sequence in which text characters fall vertically into place as they scale down, fade in, and rotate.

Because the Sequence Text behavior is not a preset, applying and activating it is a two-step process:

  • Step 1: Apply the Sequence Text behavior to a text layer in your project.
  • Step 2: In the Behaviors Inspector, assign the parameters you want to animate, then adjust controls to set the animation’s direction, speed, number of loops, and other qualities. (Optionally, you can assign the Position, Rotation, and Scale parameters by dragging onscreen controls in the canvas.)

EXTRA CREDIT

Using the Transform Glyph tool, you can modify individual text characters independently of the influence of the applied Sequence Text behavior.

Here’s a link to learn more: Modify Text glyphs.


Please rate the helpfulness of this tip.

Click on a star to rate it!

… for Visual Effects

Tip #723: 5 Highly Creative Edits

Larry Jordan – LarryJordan.com

Watch the video to see specific examples.

Topic $TipTopic

This article, written by Rubidium Wu, first appeared in PremiumBeat.com. This is an excerpt.

This video highlights some unusual and creative edits that can add value to your next video project.

Specifically:

  • The Punch Cut. By shooting a punch toward the camera, and then a reaction from the camera, you get a blow that appears to travel through the lens and into the audience.
  • Whip Pan Blur. As you pan, the image blurs. If you use this blur as a cut point between two shots, the effect is hidden in the pan. This can be great to hide a cut in a long take — or to make a stunt safer.
  • Shimmer Cut. By having ten or so interspaced single frames between your cuts, you can create a shimmer effect that has a lot of impact on the viewer. It’s best used for music videos when the beat kicks in.
  • Droop Cut. To enhance a regular “dip to black” fade between the cuts, I added a feathered vignette at the top and bottom of the frame. This looks more like the POV character is closing his eyes.
  • Dolly Behind Cut. If you ever have a scene where someone is interviewing multiple candidates, like a speed-dating environment or a police interrogation, it can be a nice transition to dolly behind the interviewer’s head, then cut at the moment the screen is black. This way you have an artful way of changing between characters in one shot.

The link at the top has videos that illustrate all these cuts.


Please rate the helpfulness of this tip.

Click on a star to rate it!

… for Visual Effects

Tip #727: Enhance images – Gradients & Blend Modes

Larry Jordan – LarryJordan.com

Gradients plus blend modes make images much more interesting.

The same shot with different gradients applied using the Overlay blend mode.

Topic $TipTopic

We can use gradients applied using blend modes to enhance our shots; especially exteriors.

An easy way to enhance almost any exterior is to apply a gradient shading from black at the top to white at the bottom. This enhances the sky while lightening the foreground.

But, you don’t need to stop with a simple black-and-white gradient. The screen shot illustrates that colors can also enhance your shots.

  • The top image is the source.
  • The middle image has a blue-to-green gradient applied using Overlay.
  • The bottom image has a blue-to-orange gradient also applied using Overlay.

These gradients can be created in Photoshop, or the NLE of your choice. Experiment with your own colors and watch what happens. I’ve had the best results using Overlay.


Please rate the helpfulness of this tip.

Click on a star to rate it!

… for Adobe Premiere Pro CC

Tip #725: Change Your Look – Use Lighting Effects

Larry Jordan – LarryJordan.com

Lighting Effects provide a range of ways to modify the look of a clip with light.

Lighting effects: Source (left), Spotlight (center), Omnilight (right)

Topic $TipTopic

This tip originally appeared as an Adobe Help page article. This is an excerpt.

You can use up to five lights to introduce creative effects. You can control such lighting properties as lighting type, direction, intensity, color, lighting center, and lighting spread. There is also a Bump Layer control for using textures or patterns from other footage to produce special effects such as a 3D-like surface effect.

NOTE: All Lighting Effects properties except Bump Layer can be animated using keyframes.

You can directly manipulate the Lighting Effects properties in the Program Monitor. Click the Transform icon next to Lighting Effects in the Effect Controls panel to display the adjustment handles and Center circle.

NOTE: If a clip is already selected in a Timeline panel, you can drag the Lighting Effects directly to the Video Effects section of the Effect Controls panel.

  1. In the Effects panel, expand the Video Effects bin, expand the Adjust bin, and then drag the Lighting Effects onto a clip in a Timeline panel.
  2. In the Effect Controls panel, click the triangle to expand the Lighting Effects.
  3. Click the triangle to expand Light 1.
  4. Choose a light type from the menu to specify the light source.
  5. Specify a color for the light.
  6. (Optional) Click the Transform icon to display the light’s handles and Center circle in the Program Monitor. You can directly manipulate the position, scale, and rotation of a light by dragging its handles and Center circle.
  7. In Effect Controls, set each light’s properties.

EXTRA CREDIT

The link above has more details, as well as defining what each setting controls.


Please rate the helpfulness of this tip.

Click on a star to rate it!