… for Visual Effects

Tip #832: Free Software for VFX Artists

Larry Jordan – LarryJordan.com

These are by far the best tools you can start with today without waiting.

Sculptris Artist: Barry Croucher

Topic $TipTopic

Here’s a list, published by TheRookies.co, a community for digital artists, of free VFX software. “These days there are plenty of free software licenses out there for you to play with. Most software companies offer educational licenses for their professional suite of tools, but nothing beats free. These are by far the best tools you can start with today without waiting.”

Blender. Blender is the free and open source 3D creation suite. It supports the entirety of the 3D pipeline—modeling, rigging, animation, simulation, rendering, compositing and motion tracking, video editing and 2D animation pipeline.

Link.

Fusion 16. Now it’s possible to bring feature film quality visual effects and motion graphics to any production! Whether you’re working on a Hollywood blockbuster, episodic television show, national commercial or independent film, Fusion gives you the power to create photorealistic visual effects, stunning motion graphics and incredible title sequences that completely immerse your audience. Best of all, it’s now part of DaVinci Resolve so you can switch from editing, color or audio to visual effects and motion graphics with a single click!

Link.

Houdini Apprentice. Houdini Apprentice is a free version of Houdini FX which can be used by students, artists and hobbyists to create personal non-commercial projects. With Houdini Apprentice, you have access to virtually all of the features of the award-winning Houdini FX to develop your skills and work on personal projects. Apprentice lets you save to disk and render out with a word mark.

Link.

Foundry Nuke (Non-Commercial). With Nuke Non-commercial, you get access to free, non-watermarked versions of Nuke, NukeX and even top-of-the-line Nuke Studio for as long as you like, so you can learn, explore and have fun on your own schedule. If you want to learn to composite, edit and finish with industry-leading tools used on blockbuster movies, Nuke Non-commercial is what you’ve been waiting for. You can work on personal projects, update your skills, experiment, research or just play around.

Link.

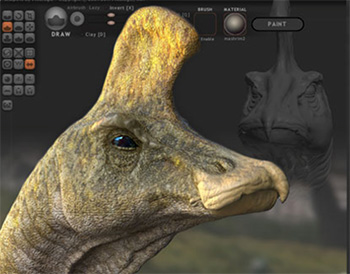
Sculptris. A fun and engaging way to start off your digital sculpting journey! If you’re new to the world of digital sculpting, Sculptris is the ideal ground on which to get started. If on the other hand you’re experienced in CG, we offer you ZBrush. With our award-winning software, ZBrush, released more than a decade ago, Pixologic, makers of ZBrush and Sculptris, has become recognized for bringing ground-breaking innovations into the world of digital art.

Link.


Please rate the helpfulness of this tip.

Click on a star to rate it!

… for Visual Effects

Tip #833: More About TheRookies.co

Larry Jordan – LarryJordan.com

TheRookies.co – a community for non-professional digital artists.

The Rookies website logo.

Topic $TipTopic

Founded in 2010, TheRookies.co is a community for non-professional digital artists. A place for artists with a passion for film, games, animation, immersive media, archviz, motion graphics, product design and other creative industries.

It doesn’t matter whether you are a hobbyist, student, self-taught or even wanting to change careers. All that matters is you want to become a better artist, learn new skills and be surrounded by people on the same journey as you.

I enjoyed browsing the site, there are hundreds of examples of art across a wide range of skill sets – each showing finished results and how they got there.

They also offer a variety of projects and contests to reward skilled work.


Please rate the helpfulness of this tip.

Click on a star to rate it!

… for Adobe Premiere Pro CC

Tip #824: A Fast Way to Change Clip Speed

Larry Jordan – LarryJordan.com

All changes adjust the speed of the entire clip by the same amount.

The Clip Speed / Duration dialog in Adobe Premiere Pro.

Topic $TipTopic

A lot of key features in Premiere are hidden – unless you know where to look. Here’s another one: the Clip Speed/ Duration dialog. Here’s what it does.

To open the dialog shown in the screen shot, select one or more clips and type Cmd + R. (You can also choose Clip > Speed/Duration, but menus are boring.) This dialog allows changing the speed of a clip by typing in a percentage change or the duration you need it to match.

NOTE: Not all speed changes yield good results. I’ve found the best success using speed percentages that divide equally into 200.

The Reverse Speed checkbox plays a clip backwards.

By default, changing the speed of a clip also changes its duration. This means that an upstream clip, that is slowed down, will crash into the clip next to it. Checking the Ripple Edit box moves downstream clips out of the way.

Time Interpolation is only relevant when the speed of a slow-motion clip goes below 15%. Most of the time, you’ll get the best results leaving this set to Frame Sampling.


Please rate the helpfulness of this tip.

Click on a star to rate it!

… for Apple Final Cut Pro X

Tip #818: Change Media Storage Locations

Larry Jordan – LarryJordan.com

Storage locations can be customized for each library.

The Library Storage Locations window.

Topic $TipTopic

It used to be that Final Cut only gave us two choices when importing media: Leave it where it is, or move it into the library. However, now, we have new options.

  • Select the Library name in the library sidebar next to the browser.
  • Open the Inspector.
  • Click Modify Settings next to Storage Locations.
  • In the dialog illustrated in the screen shot, you can set a custom location for media, Motion templates, cache files and project backups.

These settings can vary by library.

In general:

  • Leave cache files on the internal drive for speed.
  • Store media to a separate, external location.
  • If you plan to share the project between editors, store all custom Motion templates in the library.
  • Finally, store backups in a separate location from the project file itself… just in case.

Please rate the helpfulness of this tip.

Click on a star to rate it!

… for Random Weirdness

Tip #807: Create Looped Video for Live Streams

Larry Jordan – LarryJordan.com

Loops fill time or background when you don’t have anything else to show.

Simple animated loops can solve several knotty post-production problems.

Topic $TipTopic

This article, written by Charles Yeager, first appeared in PremiumBeat.com. This is a summary.

You’ve probably seen video loops on so many live streams that you don’t even give them a second thought. Here are some common loop examples:

  • Pre-Roll Loops: These video loops play before a live stream begins to give viewers a chance to settle in.
  • Live Radio/Podcast: These loops provide viewers with something of visual interest when people/subjects aren’t on screen.
  • Animation Scene Loops: These are looping animation scenes, frequently used on lo-fi music channels and other music broadcast channels.

The link (above) has a step-by-step tutorial on how to create a looped video, including the software you’ll need, and look at some common video loop examples.


Please rate the helpfulness of this tip.

Click on a star to rate it!

… for Visual Effects

Tip #808: How to Change Adobe App Icons

Larry Jordan – LarryJordan.com

Application icons are easy to change – once you know where they are stored.

The old icons (top) and revised icons (bottom).

Topic $TipTopic

If you are one of the many, many people offended by Adobe’s bland – and darn-near-impossible-to-distinguish – application icons, Jack Roberts has written a step-by-step tutorial on how to change the application icons back to something more useful.

NOTE: This technique allows you to change these icons to ANYTHING you want – so feel free to let your creativity run amok.

I’d copy the steps here, but his tutorial is clear, well-written and clearly illustrated.

Read it here.


Please rate the helpfulness of this tip.

Click on a star to rate it!

… for Random Weirdness

Tip #791: Tips for Better Battle Scenes

Larry Jordan – LarryJordan.com

Creating visceral battles only requires emphasizing basic tenets of filmmaking

(Image courtesy of Pexels.com)

Topic $TipTopic

This article, written by Jourdan Aldredge, first appeared in PremiumBeat.com. These are the highlights.

If you think about it, every battle scene comes down to one thing: one side wants something that the other side doesn’t want to give up — the high ground. A beach. A prisoner, information, or maybe a way home.

Fortunately, creating visceral battles in smaller film projects only requires some of the most basic tenets of filmmaking — world-creating, empathetic storytelling, safely performed stunts, and lots of simulated explosions.

Here are some tips:

  • Create an Accurate World. When it comes to classic battle scenes, you can’t do much better than the harrowing, large-scale sequences found in the Francis Ford Coppola horrors-of-war epic Apocalypse Now. And, while it’s a bit dated (released in 1979), its world building is by far the standard for great battles and impressive set pieces.
  • Long Takes Add Realism. Shoot long sequences that keep your viewers on the edge of their seats, trying not to blink. The long take sequence is a hallmark of many notable action, adventure, and war movies like Saving Private Ryan and The Raid: Redemption.
  • Compositing Stunts. Compositing action sequences in post is a great way to create highly technical stunts in a safe and controlled manner. This approach is perfect for anyone with limited production resources who needs battle, fight, and action sequences on a budget.
  • Explosion Sounds and Visual Effects. War and battle scenes have only grown more over the top over the years. However, an alternative for DIY filmmakers is working with explosive elements in the edit.
  • The Importance of Your Soundtrack. Background music highlights cinematic elements and heightens the narrative stakes. The right background music elevates individual scenes and adds an undeniable high-production-value sheen to your entire project. Don’t sleep on your soundtrack.

EXTRA CREDIT

The full article, linked above, has videos and links that illustrate this in much more detail.


Please rate the helpfulness of this tip.

Click on a star to rate it!

… for Apple Motion

Tip #793: What Is a “Light Setup”?

Larry Jordan – LarryJordan.com

Light Setups provide a variety of placed and pre-aimed lights to shape 3D text.

A “Drama Top Right” light setup, with blue and purple colors added to the lights.

Topic $TipTopic

An element in the Object menu is “Light Setup.” What are these and how do we use them? A Light Setup is like having your own lighting grid and instruments that you can hang around any 3D object in Motion. Most of the time, this means 3D text.

In the screen shot, I created a 3D text clip, then applied grayish textures to the letters. In this case, I used Concrete > Sidewalk for the front and Plaster > Eggshell Plaster for the sides. (Using gray textures allows the greatest freedom in applying color using light.)

Next, in Inspector > Text > Lighting, I changed Lighting Style between different setups to see which one I liked the best.

For my example, given the shape and angle of the text, Drama Top Right worked great.

Finally, I selected each individual light in the Layers panel and changed color and intensity using Inspector > Light > Light Controls.

EXTRA CREDIT

Switching the light from Directional to Spot provides even greater control over fall-off and shading.

This is an effect you can play with forever, just like real lights, to get exactly the look you need.


Please rate the helpfulness of this tip.

Click on a star to rate it!

… for Apple Motion

Tip #795: Rotate Text in 3D

Larry Jordan – LarryJordan.com

3D Text can rotate and cast shadows on the text next to it.

3D Text with custom lighting, where each character is rotated invidually and casting shadows.

Topic $TipTopic

A hidden feature in Motion is the ability to rotate individual letters of 3D text. Here’s how.

We use Inspector > Properties to rotate the entire text element.

However, if you select the 3D text in the Layers panel, then go to Inspector > Text > Advanced and adjust Rotation, yo


Please rate the helpfulness of this tip.

Click on a star to rate it!

… for Apple Motion

Tip #795: Rotate Text in 3D

Larry Jordan – LarryJordan.com

3D Text can rotate and cast shadows on the text next to it.

3D Text with custom lighting, where each character is rotated invidually and casting shadows.

Topic $TipTopic

A hidden feature in Motion is the ability to rotate individual letters of 3D text. Here’s how.

We use Inspector > Properties to rotate the entire text element.

However, if you select the 3D text in the Layers panel, then go to Inspector > Text > Advanced and adjust Rotation, you can rotate each individual text character.

Not only does this give your text a different look, it also changes how it responds to different lighting based on direction. Plus, each letter can cast a shadow on the text next to it, adding depth and interest.

EXTRA CREDIT

To turn shadows off, select the text layer, then go to Inspector > Properties > Shadows and turn off Cast Shadows.


Please rate the helpfulness of this tip.

Click on a star to rate it!