… for Apple Final Cut Pro X

Tip #682: My Rocking Horse Move

Don Smith – www.donsmith.me

Connection Override allows moving Primary Storyline clips without modifying connected clips.
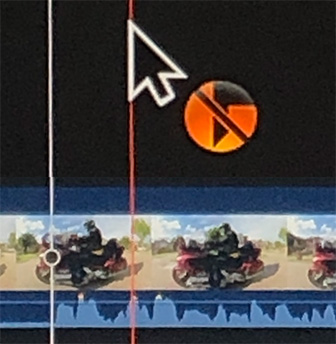
The Connection Override icon.

Topic $TipTopic

Connection Override allows you to move a Primary Storyline clip without moving any connected clips attached to it. Pressing the tilde key (~) while dragging a Primary Storyline clip enables Connection Override.

NOTE: The tilde key is located just below the ESC key, to the left of the number 1.

Pressing Command then tilde turns on Connection Override until you press tilde to turn it off.

With that as background, Don Smith writes:

I wanted to find a way to ‘lock on’ the Connection Override to have both hands free to make adjustments. By default, you have to press and hold the tilde key.

So, I started experimenting. At first, I found that if you press and hold the tilde key, press and hold the Command key, release the tilde key first, then release the Command key last, the Connection Override would stay enabled hands-free.

Then, the OS was updated and my method broke. But, with a modification, it still works.

Use the Option key in place of the Command key. So, for newer Mac OSs, do what I call my ‘Rocking Horse’ move (because your fingers are rocking back and forth on the keys) and hold the tilde key, press and hold the Option key, release the tilde key, then release the Option key.

In both versions, you only have to tap the tilde key when finished to release the Connection Override lock.

Larry adds: I was just testing this and, in Catalina with FCP X 10.4.8, tapping Tilde then Command locks this setting on, then tapping Tilde turns it off.

Thanks, Don, for writing this up. I had forgotten this feature was there.


Please rate the helpfulness of this tip.

Click on a star to rate it!

… for Apple Final Cut Pro X

Tip #664: What is a Smart Collection?

Larry Jordan – LarryJordan.com

A “Smart Collection” is a saved search.

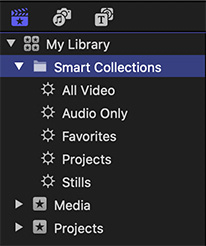
The default Smart Collection list associated with every FCP X library.

Topic $TipTopic

You see them listed at the top of every library: Smart Collections. But, what are they and how can they help us?

At its core, a Smart Collection is a saved search. If you double-click the name of any Smart Collection, it opens the Search Filter window, showing the criteria for that search and allowing you to change it.

You can easily create your own Smart Collections, but the interface is hard to find:

  • Click the magnifying glass at the top of the Browser.
  • Click the “slate” icon to the right of the search box.
  • This opens the Search Filter window.
  • Make whatever changes you want.
  • If you simply close the window, the current search is updated with your changes.
  • If you click the Save Smart Collection button at the bottom right, a new Smart Collection is created.

EXTRA CREDIT

Tip #84
explains how to create a Smart Collection.


Please rate the helpfulness of this tip.

Click on a star to rate it!

… for Random Weirdness

Tip #678: A Guide to On-Set Film Terms – Part 2

Larry Jordan – LarryJordan.com

Topic $TipTopic

The intrepid team at MotionArray.com has compiled a glossary of film terms. This list relates to the key people on set. There’s the producer, who’s the money, and the director, the creative force, but who are all the rest of these people? 

  • 1st AD. The first assistant director is basically the second in charge on any set. They serve as the all-important link between the head honcho director and the entire cast and crew and are responsible for ensuring that the production runs like a well-oiled machine. Did someone say presssshhha?
  • 2nd AD. Working directly under the 1st AD, the second assistant director is responsible for drafting up all the logistical documents (call sheets and the like) and making sure that the 3rd AD has the cast and crew in check.
  • 3rd AD. The third assistant director is basically one big people wrangler. It’s their job to ensure that all members of the cast and crew are in the right place and the right time.
  • Gaffer. Head electrician responsible for setting up all of the lighting equipment used in a given production. You might also hear them being referred to as a Spark or Juicer.
  • Key Grip. Head technician responsible for setting up all the non-electrical lighting equipment. (Think lighting modifiers, flags, cookies, etc).
  • Best Boy. Assistant to either the Gaffer or Key Grip, distinguished by the titles Best Boy Electric or Best Boy Grip.
  • Second Unit. A completely separate crew charged with filming any takes that don’t involve face-to-face interaction, such as inserts and action sequences. Second units usually work simultaneously alongside the main unit to help speed up the production process.

Please rate the helpfulness of this tip.

Click on a star to rate it!

… for Random Weirdness

Tip #677: A Guide to On-Set Film Terms – Part 1

Larry Jordan – LarryJordan.com

These eleven terms are heard daily on virtually every production set.

Topic $TipTopic

The intrepid team at MotionArray.com has compiled a glossary of film terms. Here’s a sample that relates to the gear on set.

  • Blonde. A type of light but much brighter than a redhead. (1,000-2,000 watts).
  • Boom Mic. A directional mic mounted to the end of a long pole that is then wielded by sound technician folk to capture close-range audio.
  • Clapper. So it turns out that black-and-white striped board that someone snaps in front of the camera before every take does have a name. And that name is clapper. Or clapboard. Or a clacker. This does two very important things: It displays all the scene and take info that the crew needs to sort through the footage at a later date, and the snappy sound it makes is essential for syncing video with the audio during post.
  • Dead Cat. A fuzzy black cover that goes over the end of a boom mic.
  • Dolly. A wheeled cart onto which you mount a camera in order to capture smooth horizontal shots. Ever since steadicams came onto the scene, the use of dollies has been reduced in production.
  • Hot Brick. A walkie-talkie with a fully charged battery.
  • Legs or Sticks. Simple slang for a tripod.
  • Redhead. A type of light with a power rating in the vicinity of 800 watts.
  • Squib. A tiny explosive device used to simulate a bullet hitting an actor. You’ve probably seen squillions of these throughout your movie-watching career.
  • Steadicam. This stabilizing contraption enables you to strap a camera to your big ol’ belly (or rather a vest that you’re wearing around your big ol’ belly) to get those super smooth shots.
  • Stinger. An extension cord

Please rate the helpfulness of this tip.

Click on a star to rate it!

… for Random Weirdness

Tip #676: 7 Best Digital Film Festivals & Challenges

Larry Jordan – LarryJordan.com

Seven Festivals to keep you from going stir-crazy.

A typical example: The 48-Hour Film Project.

Topic $TipTopic

This article, written by Jourdan Aldredge, first appeared in PremiumBeat.com. This is an excerpt.

Here are seven online film festivals and challenges where filmmakers can compete from home.

1. Roger Corman’s Film Festival. Rules: You have to stay home and stay safe and film the video inside your house or in the backyard. The short must be filmed on a cell phone. It must be under two minutes. Upload to Instagram and tag Roger Corman’s account.

2. Quarantine Film Festival. Hosted by the Plaza Theatre in Atlanta, Georgia, the Quarantine Film Festival is an ongoing online film festival that accepts entries every Monday through Wednesday, then streams the winners on Fridays

3. COVIDaVINCI Film Festival. Put on by what is usually called the DaVinci Film Festival in Los Angeles, California, the COVIDaVINCI Film Festival is a five-minute quarantine film challenge that empowers filmmakers to submit for the “Shelter-In-Place Vitruvian Award.” Learn more here.

4. Couch Film Festival. Fittingly titled, the Couch Film Festival is an IMDb-eligible quarterly film festival based in Toronto, Ontario, that’s put together a new “quarantine” category for its upcoming Summer 2020 showcase.

5. Long Distance Film Festival. The Long Distance Film Festival is truly an online-based festival that intends to live entirely online via a global live-streaming marathon of selected projects. Learn more here.

6. Online Isolation Short Videos Festival. The Online Isolation Short Videos Festival is an online event film festival hosted out of Russia. It’s actually an offshoot of the Russian International Horror Film Festival. Learn more here.

7. 48-Hour Film Project. The 48 Hour Film Project takes the traditional on-the-run film challenge to a new level, with an open online weekend challenge set for every other weekend during quarantine. Learn more here.


Please rate the helpfulness of this tip.

Click on a star to rate it!

… for Apple Motion

Tip #665: B-spline Masks

Larry Jordan – LarryJordan.com

The key to the B-spline is feathering and mask blend modes.

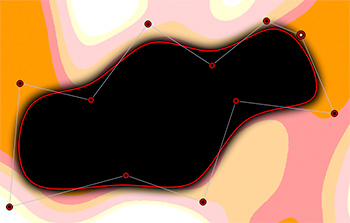
A B-spline mask, using a subtraction blend mode with feathering.

Topic $TipTopic

There are five different masks in Apple Motion. The B-spline mask is probably the most misunderstood.

B-spline masks always create curves. (A Bezier mask, on the other hand, can create corners or curves.)

Where B-splines get interesting, however, is when you start changing the Mask Blend Mode. You modify these by selecting the mask, then going to Inspector > Mask. There are four choices:

  • Add: Adds the mask to the alpha channel (the default setting). This is useful for adding back regions of an image that other masks are cutting out.
  • Subtract: Subtracts a mask from the alpha channel. This is useful for creating holes in the middle of layers, or for masking out additional regions of an image that are untouched by other masks.
  • Replace: Replaces the layer’s original alpha channel, as well as any other masks applied to the same layer that appear underneath the current mask in the Layers list, with the current mask. You can add masks above, set to whatever blending mode you like.
  • Intersect: Masks out all regions of the layer that do not overlap the mask itself (but does not replace a layer’s original alpha channel). This includes other masks applied to the same layer that appear nested underneath the intersecting mask in the Layers list.

The final mask is the combined result of all image masks applied to the layer.

EXTRA CREDIT

Remember, you can combine different masks to the same layer to allow you to select very specific, non-geometric shapes.


Please rate the helpfulness of this tip.

Click on a star to rate it!

… for Apple Motion

Tip #663: Motion Cinema Workspace

Evan Fitzer

Control + Option + U displays the Cinema Layout. Control + U displays Classic.

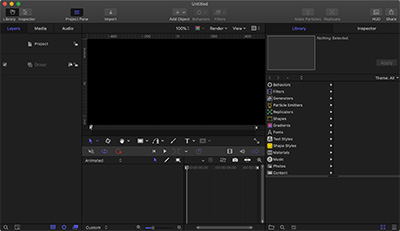
Cinema view displays a larger Layers on the left and larger Inspector on the right.

Topic $TipTopic

Evan Fitzer writes:

First a quick note to let you know how much I enjoy these Inside Tips. So nice to have them in my inbox each morning. My tip isn’t really a tip, per se. Just pointing out that Motion has two different UI layouts available. The Classic Layout, and Cinema Layout.

  • Select: Window > Window Layout > Classic/Cinema (shortcut: Control + Option + U).

I now use the Cinema layout almost exclusively. I find it more balanced and pleasing to the eye. As well, I think it’s more intuitive and easier to navigate. In the end though, it really comes down to personal preference.

Larry adds: OOH! I like this a lot! This puts Layers on the left and the Inspector on the right. I had forgotten this!


Please rate the helpfulness of this tip.

Click on a star to rate it!

… for Apple Motion

Tip #661: Lock Text Height, But Not Width, in Apple Motion

Don Smith – www.donsmith.me

The secret is an almost-invisible dummy layer.

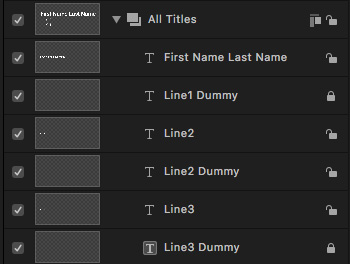
Note each line has a locked dummy field, containing the letter “g”.

Topic $TipTopic

Don Smith writes:

I create templates in Motion for use in Final Cut Pro X. I needed a way to lock the height of a text box vertically to accommodate a descender character, but not horizontally.

I duplicated the line, left its position unchanged, and, in the lower layer, I put a ‘g’ in it and turned its opacity to zero. However, at zero opacity, the character disappeared and the vertical size of the text box collapsed.

Instead, I found, an opacity setting of .01 made the character stay, but it remained invisible which allowed me to lock the height of the dummy text box.

I then locked the dummy layer.

Because the user could only use the visible duplicate, now it doesn’t matter if the visible text box in the same position as the dummy gets a character with a descender or not. The visible line, being in the same position as the dummy that’s locked vertically, keeps the height of the enclosing folder locked and objects linked to that text, or its enclosing folder, can depend on the height of the text box to remain stable no matter what the user types into it.


Please rate the helpfulness of this tip.

Click on a star to rate it!

… for Visual Effects

Tip #679: 9 Free After Effects Templates

Larry Jordan – LarryJordan.com

Cool Stuff to Improve Your Projects

The After Effects logo.

Topic $TipTopic

This article, written by Annie St. Cyr, first appeared in PremiumBeat.com. This is an excerpt.

  1. 9 Digital Distortions. The digital distortions template allows you to simply drag and drop your footage into the composition and play with the motion parameters to get Noise, Color Boxes, Flicker, Tuning, Turbulence, Pixel Blending, Rolling Bars, Chromatic Aberration, and Color TV Pixels.
  2. The Anamorphic Look. The wider visuals of the anamorphic lens can add drama to your travel video or help draw focus to a character or element of a video you’d like to feature more prominently. This juxtaposition of usefulness has made the anamorphic highly sought after.
  3. Free Action Effects. Fire is one of the most difficult elements to pull off digitally. This free Action Elements Pack can be used in any NLE or motion graphics software. Adjusting the scale, motion parameters and alpha channels will provide you with some solid fire and explosion effects. It’s better than any fire template I have seen. These elements look much more realistic and require much less render time.
  4. Animated Fonts. With over 43 unique compositions, this animated font After Effects template can make any information much more invigorating. This skill is essential for your motion graphics tool kit. You never know when you might need a few animated letters or numbers to spice up your next edit.
  5. VHS Distortion. Just like the digital distortions pack, this free After Effects template allows you to recreate the look of an old VHS tape. Once again, all you have to do is drag and drop your footage. You can even customize the text. This template does require you to download a free font as well.
  6. Free HUD Elements. If you are looking for that futuristic HUD aesthetic this free After Effects template is for you. Below is a tutorial for how to create a Spider-Man: Homecoming-inspired look, but these HUD elements have a multitude of uses.
  7. Dynamic Car Gauges. Now that so many car commercials have gone digital, every video editor needs digital assets for commercial work and promos. With these 16 free After Effects car gauges, you can easily create a custom gauge for your car work. The download also includes 9 free sound effects.
  8. 20 Free Color Grading Presets. If you aren’t a color grading expert but want to add a great custom look to your footage, these 20 free AE color grading presets are fantastic. Each color grade adds a unique style and tone to your films and commercials. Check out all twenty presets in this video.
  9. Split Layers.If you aren’t the best with motion graphics, this free After Effects template instantly creates split layers to splice up your images or video. You just drop your footage into the project and select which of the nine types of layers you want.

Please rate the helpfulness of this tip.

Click on a star to rate it!

… for Visual Effects

Tip #674: 51 Free Accent Animation Graphics

Larry Jordan – LarryJordan.com

51 Free Motion Graphics from PremiumBeat.com

Free Stuff!

Topic $TipTopic

This article, written by Todd Blankenship, first appeared in PremiumBeat.com. With these FREE motion graphics, you can easily add elegant motion and animation accents to your titles and designs in any project.

Most of the time, those little extra touches are things like really small details and additional motion in small portions of the scene. These are things that the viewers might not even fully notice but, when added as part of a whole, these accents and animations can really bring your work to a whole new level.

We’ve made a pack of FREE motion graphics that you can use to add little accents of motion to your titles and animations.

Here’s the link.


Please rate the helpfulness of this tip.

Click on a star to rate it!