… for Apple Motion

Tip #649: Convert a Motion Project for Final Cut

Larry Jordan – LarryJordan.com

You can convert a Motion project for Final Cut at any time.

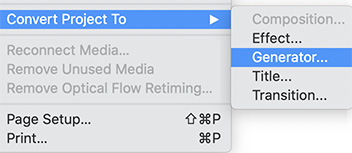
The File > Convert Project menu in Apple Motion.

Topic $TipTopic

Normally, you need to decide when you first create a Motion project whether you want to save it as a template for Final Cut Pro X. However, there’s a hidden menu that gives you other options.

The File > Convert Project To menu converts any Motion project into an FCP X effect, generator, title or transition – even after you’ve already created the project. The next time you save the project, even if you’ve already saved it, Motion displays a dialog where you can name the template and determine which effect category to store it in.

This means that if you find yourself with a project you really like, creating a template from it is easy.


Please rate the helpfulness of this tip.

Click on a star to rate it!

… for Visual Effects

Tip #694: What is Parallax?

Larry Jordan – LarryJordan.com

Reducing parallax is important in panoramic stills, VFX and Stereo 3D video.

Topic $TipTopic

Parallax is the difference in the apparent position of an object viewed along two different lines of sight; say from the left eye to the right eye, or each lens of a stereo 3D video camera.

As the eyes of humans and other animals are in different positions on the head, they present different views simultaneously. This is the basis of stereopsis, the process by which the brain exploits the parallax due to the different views from the eye to gain depth perception and estimate distances to objects.

In addition to its use in making stereo3D believable, parallax is also used in panoramic images, visual effects and web design.

EXTRA CREDIT

Even if your camera setup is perfectly level, you won’t be happy with the results for panoramic images until you eliminate image parallax. Image parallax occurs when near and far objects don’t align in overlapping images. For example, if you’re shooting a scene that contains a fence line, each fencepost in Image 1 should line up with its twin in Image 2. You can eliminate the effects of parallax by placing the optical center of the lens (not the camera) directly over the point of rotation.

Learn more here


Please rate the helpfulness of this tip.

Click on a star to rate it!

… for Visual Effects

Tip #693: 3 Quick Motion Tracking Tips

Larry Jordan – LarryJordan.com

Camera moves – Shutter speed – Depth-of-Field

Topic $TipTopic

Ever have trouble getting good motion tracks for your visuals? The problem usually lies in the camera settings!

Here are three simple steps to follow to improve the quality of the source footage for a motion track:

  1. Make sure camera moves are not too complex and pay attention to parallax.
  2. Shutter speed heavily affects motion blur. Higher shutter speeds minimize motion blur and improve the image quality of visual effects. The recommendation is 1/200th or faster.
  3. Decrease aperture to increase the depth of field. This helps the computer track contrast points.

Please rate the helpfulness of this tip.

Click on a star to rate it!

… for Visual Effects

Tip #692: 10 Tips for Shooting Media for VFX

Larry Jordan – LarryJordan.com

Ten Ideas to Improve VFX Source Footage

Topic $TipTopic

This tip, written by Tihomir Lazrov, first appeared in fstoppers.com. This is a summary.

Visual effects are not software magic that works with any footage. With video you have lots of still images per second and the process of making a composite needs to be automated as much as possible. Working on a frame by frame basis is avoided as much as possible. Here are 10 quick tips on the importance of shooting appropriate video content to help create realistic visual effects more easily.

  1. Include Camera Motion
  2. Shoot to Avoid Motion Blur
  3. Know the Camera Settings for the Footage
  4. Put Tracking Markers in the Shot
  5. Shoot on a Tripod If There’s Nothing to Track
  6. Avoid Fast Camera Moves
  7. Shoot a Blank Background Plate
  8. Shoot a 360° Environmental Map
  9. Use the Sky as a Blue-Screen
  10. Use Foreground and Background Objects for Tracking

EXTRA CREDIT

The article, linked above, has lots of details on these ten tips.


Please rate the helpfulness of this tip.

Click on a star to rate it!

… for Codecs & Media

Tip #691: Compare Post-Production Codecs

Larry Jordan – LarryJordan.com

Compare Cineform, DNx, ProRes, DPX and Uncompressed; all in one table.

Topic $TipTopic

This tip, written by David Kong, first appeared in Frame.io Insider. This is a summary.

The team at Frame.io pulled together a list of more than 50 of the most common intermediate codecs used in video post-production, so that you can compare codecs against each other.

This covers intermediate codecs, not camera codecs. Each company publishes their own specifications in different formats, but they scoured the Internet and brought them all into a single page. If you want to compare ProRes vs DNxHD, ProRes vs Cineform, DNxHD vs. DPX, or any other combination, this table can help you choose the right codec for your next project.

Click the link above to view the comparison table.


Please rate the helpfulness of this tip.

Click on a star to rate it!

… for Codecs & Media

Tip #690: H.264 vs. HEVC – What’s the Difference?

Larry Jordan – LarryJordan.com

Smaller file size, greater image quality; but requiring more CPU power to encode or decode.

Topic $TipTopic

This tip, written by Ana Rodrigues, first appeared in Medium.com. This is a summary.

Conceived to boost video streaming, High Efficiency Video Coding (HEVC), or H.265, is a video compression standard designed to substantially improve coding efficiency when compared to Advanced Video Coding (AVC), or H.264.

With this new format, image resolutions around 8192×4320 become possible to display and stream. HEVC reduces file sizes 40-60%, depending upon frame size. As well, when compared to H.264, HEVC/H.265 delivers a significantly better visual quality, when compressed to the same file size or bitrate.

However, apart from the fact that the codec is patented by various parties and it is associated with high licensing fees, HEVC/H.265 comes with the trade-off requiring almost 10x more computing power.

Both codecs work by comparing different parts of a video frame in order to find the ones that are redundant within the subsequent frames. These areas are replaced with a short information, describing the original pixels. What differs HEVC/H.265 from H.264 is the ability to expand the size of these areas into bigger or smaller blocks, called coding tree units (CTU) in the HEVC/H.265. The pattern CTU sizes can be from 4×4 to 64×64, whilst H.264 only allows a maximum block-size of 16×16 (CTU is particular feature of HEVC). An improved CTU segmentation, as well as a better motion compensation and spatial prediction require much more signal processing capability for video compression, but has a significantly less impact on the amount of computation needed for decompression. Motion compensated prediction, another great progress in HEVC/H.265, references blocks of pixels to another area in the same frame (intra prediction) or in another frame (inter prediction).

Please rate the helpfulness of this tip.

Click on a star to rate it!

… for Codecs & Media

Tip #689: What Does Video Bit-Depth Determine?

Larry Jordan – LarryJordan.com

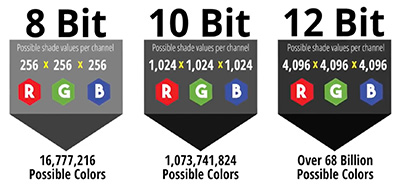
Bit-depth determines the maximum number of colors in a video frame.

Image courtesy of VideoMaker.com

Topic $TipTopic

So, what is bit depth? Well, essentially it determines the range of possible colors your camera is capable of capturing. The higher the bit depth, the higher the number of possible colors your camera is able to capture, which means smoother gradations and less (or no) color banding. However, the higher the bit depth, the larger the files, which means a higher need for storage space and possibly a more powerful computer to handle all of the data.

Keep in mind, though, that even if you go with a camera whose file formats support higher bit depths, that doesn’t necessarily automatically translate to amazing image quality. There are many other factors that play a role in both gamut and color depth, including color sampling and data rate.

If you’re still confused about whether or not you need a camera that offers high bit depth, keep these things in mind.

  • Color banding is ugly.
  • Can you handle all that extra data?
  • Higher bit depth affords you more latitude during color grading.

EXTRA CREDIT

Here’s a link to a VideoMaker presentation, on NoFilmSchool.com, that explains bit depth in three minutes.


Please rate the helpfulness of this tip.

Click on a star to rate it!

… for Adobe Premiere Pro CC

Tip #686: Optimize Your Premiere Pro System

Larry Jordan – LarryJordan.com

The four keys are: memory, storage, graphics and CPU.

Topic $TipTopic

This tip originally appeared as an Adobe Support article. This is an excerpt.

The four key variables for a great video production system are memory, storage, graphics, and your processor. Here are tips from Adobe on how to optimize your system.

  • Memory. Professional video workflows rely on system memory. A good video editing workstation should have at least 32GB of memory— and as much as 128GB.
  • Storage/hard drives. Fast storage is critical for video production. Use solid-state NVMe or SSD storage. Unless you have a fast RAID array, spinning disks generally do not offer sufficient speed for HD and 4K video production.
  • Graphics. The GPU is used for onscreen rendering and export, priority areas for video production. Premiere Pro is engineered to take advantage of the GPU. After Effects is also GPU-optimized. Graphics card with at least 4GB of memory (VRAM). (Optional) Multiple GPUs, including eGPUs, can be used to speed up rendering and export.
  • Processor/GPU. For CPUs, clock speed matters more for After Effects. Multiple cores have more impact for Premiere Pro. The sweet spot for running both applications is a fast CPU with 8 cores. Core i7 or Core i9 Intel processors or AMD equivalents are strongly recommended. Fast clock speed at least 3.2 GHz, or higher.

EXTRA CREDIT

Thinking of upgrades? Here’s where Adobe suggests you spend your money, in priority, for Premiere Pro:

  1. More RAM — up to 128GB if your motherboard supports it.
  2. A faster GPU (or additional GPUs) for faster rendering and export
  3. Faster (or more) NVMe or SSD drives
  4. Faster CPU

Please rate the helpfulness of this tip.

Click on a star to rate it!

… for Adobe Premiere Pro CC

Tip #685: Troubleshoot Premiere Pro Issues

Larry Jordan – LarryJordan.com

Here are ideas you can try to keep your system running smoothly.

Topic $TipTopic

This tip originally appeared as an Adobe Support article. This is an excerpt.

Having problems with Premiere Pro? The trouble-shooting guide linked above has tips on the following issues:

  • Why is my rendering slow?
  • Why doesn’t my timeline show any video preview?
  • Why am I getting choppy playback and poor performance?
  • What can I do to optimize the playback performance?
  • Checking for issues with applied effects
  • Checking for issues with plug-ins
  • What can I do if I think my hardware setup is not optimal?
  • Why does my audio playback keep getting stuck?
  • How do I get better performance with h.264/h.265 media?

EXTRA CREDIT

Here are more tips on how to optimize your system for video editing with Premiere Pro and After Effects.


Please rate the helpfulness of this tip.

Click on a star to rate it!

… for Adobe Premiere Pro CC

Tip #684: System Compatibility Report

Larry Jordan – LarryJordan.com

Having performance problems? Check the System Compatibility Report.

The System Compatibility Report in Premiere Pro.

Topic $TipTopic

Have you ever wondered if your hardware is fighting Premier Pro? The System Compatibility Report holds the answers.

To display the report, choose Help > System Compatibility Report. This displays any hardware compatibility issues between your system and Adobe’s software.


Please rate the helpfulness of this tip.

Click on a star to rate it!