… for Visual Effects

Tip #673: Create VFX in Photoshop

Larry Jordan – LarryJordan.com

Photoshop is great for adding shapes and textures, but not for rotoscoping video.

Image courtesy of Pexels. com.
Photoshop is great at adding textures to video.

Topic $TipTopic

This article, written by Audrey Ember, first appeared in PremiumBeat.com. This is an excerpt.

Here are a few Photoshop tricks you can pull off to quickly and easily add a little life to your video projects. Use these for specific shots, don’t try editing video in Photoshop.

To start, switch to Window > Workspace > Motion. This displays a timeline at the bottom of the interface.

Things You Can Do

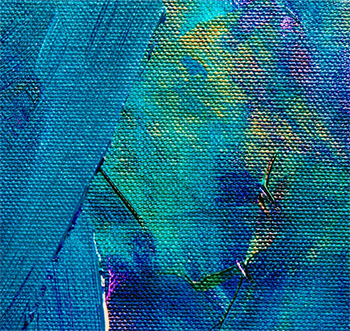
  • Add Color and Texture. Use different brushes to create shading and highlights.
  • Create Interesting Titles or Text Overlays. In Photoshop, the possibilities are endless, whether it’s creating unique shapes or adding textures to text or backgrounds.
  • Use Animations to Add Emphasis and Interest. Add different designs to emphasize movement and create a more stylized looks to the background.

EXTRA CREDIT

The original article has videos that show the results of these tips.


Please rate the helpfulness of this tip.

Click on a star to rate it!

… for Codecs & Media

Tip #681: When Does Using High Sample Rates Make Sense?

Larry Jordan – LarryJordan.com

Most of the time, 48K sampling is the best choice.

Image courtesy of Electro-Voice.
An Electro-Voice RE-20 microphone.

Topic $TipTopic

This is an excerpt from an informative article in Sound-on-Sound, written by Hugh Robojohns.

Higher sample rates only provide a greater recorded bandwidth — there is no intrinsic quality improvement across the 20Hz‑20kHz region from faster sampling rates — and, in fact, jitter becomes a much more significant problem. So I would suggest that you forget 192kHz altogether unless you need to do specialist sound‑design work where you want to slow recorded high‑frequency sounds down dramatically.

The question of whether to use a 96kHz sample rate is less clear-cut, because it can prove useful in some specific situations. Yes, it creates larger files and higher processing loads, but it also removes the possibility of filtering artifacts in the audio band and reduces the system latency compared with lower rates. Many plug‑in effects automatically up‑sample internally to 96kHz when performing complex non‑linear processes such as the manipulation of dynamics.

EXTRA CREDIT

Note, though, that not all software is particularly good at sample‑rate conversion, with even some expensive and well regarded DAW software resulting in noticeable aliasing. You do, of course, need to judge results subjectively, but if you’re curious how well your software performs in this respect — or whether any free software performs this function any better — then check out Infinite Wave’s database at (src.infinitewave.ca) which compares results from a huge number of applications, and includes test files so you can perform your own tests too.

Larry adds: Most of the time for video recording a sample rate of 48K is the best choice.


Please rate the helpfulness of this tip.

Click on a star to rate it!

… for Codecs & Media

Tip #680: What is the Alpha Channel

Larry Jordan – LarryJordan.com

Alpha Channel defines the transparency in a digital image or video.

Topic $TipTopic

The Ask Tim Grey website had a nice answer to this question.

An alpha channel is essentially any channel other than the channels that define color values for pixels in an image. Generally an alpha channel is used to define areas of a photo, such as to define transparency.

In the context of a digital image, the term “channel” generally refers to the information about individual color values that comprise the overall pixel information. For example, with a typical RGB image there are three channels that individually define the red, green, and blue values for pixels.

So, an alpha channel is essentially a “map” that defines specific areas of the image. It is similar in many ways to a channel that defines color, but since it is used to define transparency or selection rather than defining color for an image, it needed a “special” name. The term “alpha channel” is the name that was given to this feature.

EXTRA CREDIT

Here’s a link to learn more from Tim.


Please rate the helpfulness of this tip.

Click on a star to rate it!

… for Codecs & Media

Tip #675: Which Codecs Support Alpha Channels

Larry Jordan – LarryJordan.com

Not all codecs support transparency. When you need it, use one of these.

Topic $TipTopic

To include transparency in video, you need to create it in software which supports alpha (transparency) channels. These include Final Cut, Motion, Premiere, After Effects, Avid and many other professional editing packages.

Then, you need to choose a codec which also supports alpha channels. Not all of them do.

Rocketstock has compiled a list, though not all of these are video codecs:

  • Apple Animation
  • Apple ProRes 4444
  • Avid DNxHD
  • Avid DNxHR
  • Avid Meridien
  • Cineon
  • DPX
  • GoPro Cineform
  • Maya IFF
  • OpenEXR Sequence With Alpha
  • PNG Sequence With Alpha
  • Targa
  • TIFF

Please rate the helpfulness of this tip.

Click on a star to rate it!

… for Adobe Premiere Pro CC

Tip #668: Productions: Toggle Read-Write

Larry Jordan – LarryJordan.com

Switching between read-only and read-write is a single mouse click.

Green indicates you have read-write permission. Red indicates read-only.

Topic $TipTopic

Switching a project between read-write and read-only (and back) is a single mouse click. Here’s what you need to know.

First, if someone else has the file open read-write, you can’t take over the file, you can only have read-only access until the other editor releases it to the group.

Open the file from the Production panel. If someone else has the file open or if you are the only person who has the file open but were not the creator, it will open as read only.

To switch a file between read-write (green pencil) and read-only (red lock) simply click the pencil or lock icon in the extreme lower-left corner of the Premiere interface.

EXTRA CREDIT

A good reason to switch a file to read-only is to allow another editor to add graphics or titles to an ongoing project.


Please rate the helpfulness of this tip.

Click on a star to rate it!

… for Adobe Premiere Pro CC

Tip #667: Productions: What the Icons Mean

Larry Jordan – LarryJordan.com

The icons tell the story of file status and ownership in the Productions folder.

A typical Productions folder, showing file status and current owner.

Topic $TipTopic

Productions are a new way for editors to organize and collaborate on projects. This is a summary of what the icons and colors mean in the Productions panel in Adobe Premiere.

  • Hollow rectangle. The project file is not open on any system.
  • Solid rectangle. The project file is open on at least one editor’s system.
  • Name. The owner of the file, or, if the file is open, the name of the editor with read-write access.
  • Red lock. The file is currently locked as read-only. However, if no one is using the file, it takes only a single mouse click, after opening the file, for an editor to switch the project to read-write.
  • Green pencil. The file is open on your system and you have read-write access.

Productions allows multiple projects to be opened on multiple systems at the same time, though only one editor has read-write access to a project at a time.


Please rate the helpfulness of this tip.

Click on a star to rate it!

… for Adobe Premiere Pro CC

Tip #666: Productions Overview

Larry Jordan – LarryJordan.com

Productions can help both single editors and teams.

The Productions folder, showing all available projects.

Topic $TipTopic

Productions are a new way for editors to organize and collaborate on projects. Here’s a quick overview of this new feature:

  • You can edit in Premiere as always without ever using Productions.
  • Productions can be used by a single editor using local or shared storage, or a team, using shared storage.
  • Productions don’t require Internet access.
  • Productions are available to any Premiere editor who has updated to the latest version (April, 2020).
  • Productions easily support breaking large projects into manageable chunks.
  • Only project files can be stored in a production folder.
  • There is no limit to the number of projects stored in a production folder.
  • Only one production folder can be open in Premiere at a time, however, there is no limit to the number of production folders that can be created.
  • Different editors can work in different productions at the same time.
  • Any project can be opened Read-only, however only one editor can have read-write access to a project at a time.

EXTRA CREDIT

I created a recent webinar that shows how to use Productions in detail. You can find it here: here.


Please rate the helpfulness of this tip.

Click on a star to rate it!

… for Apple Final Cut Pro X

Tip #662: Sustaining a Musical Chord

Brian Thomas

The Retiming bar showing an audio clip slowed 75%.

Topic $TipTopic

Brian Thomas writes:

At the end of a recent video I wanted the music to fade out slowly but the piece I had chosen came to a fairly abrupt end. I tried cutting out various short lengths of that final chord and repeating it a number of times with ever decreasing volume while applying various audio effects but there was always some sort of reverberating echo effect in there – not cool.

Suddenly I had a brain wave: Use the Retime facility on the last chord and stretch it out to the desired length!

Usually we think of retiming (speeding up or slowing down of footage) as applying to the image part of the video but it can be very useful to manipulate independent soundtracks since whatever you do FCP X will do its best to retain the original pitch.

In my case I cut the soundtrack a few frames after the last chord had started, clicked on the remaining part of the chord, pressed Cmd + R to invoke Retiming and then clicked on the small vertical line at the right of the green area of the clip dragging it out to the new desired length of time.

NOTE: Clicking on the downward arrow in the middle of the clip, followed by “Slow” offers some convenient values of 50% or 25% straight off.

Dragging the chord out to 20% still gave me great results.

EXTRA CREDIT

  • Bonus 1: If you notice a slight absence of the upper frequencies then you may need to apply the audio EQ effect and boost appropriately.
  • Bonus 2: Apply this technique to make a whole piece of music exactly fit your footage – it will still sound right as the pitch doesn’t get altered. Neat, huh!

Please rate the helpfulness of this tip.

Click on a star to rate it!

… for Apple Final Cut Pro X

Tip #645: Update a Smart Collection

Larry Jordan – LarryJordan.com

To update any Smart Search simply double-click its name in the Library List.

To modify any custom Smart Search, simply double-click its name in the Library List.

Topic $TipTopic Smart Collections are saved searches; though “Smart Collection” is a much cooler name.

Did you know you can quickly update them? Here’s how.

Smile… this is a very quick tip:

To modify any custom Smart Search, simply double-click its name in the Library List.

Make your changes, then simply close the search box.

NOTE: If you click New Library Smart Search (or New Smart Search), you’ll create a new search, as well as changing the old one.


Please rate the helpfulness of this tip.

Click on a star to rate it!

… for Apple Final Cut Pro X

Tip #642: Add a Cast Shadow to Text

Larry Jordan – LarryJordan.com

All it takes is changing one setting.

Text, filled with a gradient, with a cast shadow effect applied.

Topic $TipTopic

You can add a cast shadow to any clip, however it is most effective with text. Here’s how to create it.

In my example, I created a text clip and filled it with a gradient. (The color settings are in the Text Inspector > Face.)

  • Select the text clip.
  • Go to the Effects browser > Stylize and apply the Drop Shadow effect.
  • In the Video Inspector, change the drop shadow settings from Classic Drop Shadow to Perspective Back.
  • Finally, using the onscreen controls, tweak the shadow position and settings so it best matches your scene.

Done.


Please rate the helpfulness of this tip.

Click on a star to rate it!