… for Adobe Premiere Pro CC

Tip #736: Auto Save Secrets

Larry Jordan – LarryJordan.com
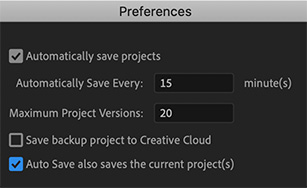
Auto Save Preferences in Adobe Premiere Pro 2020.

Topic $TipTopic

Auto Save makes backups of your projects. But, what do all the Auto Save preference settings do?

  • Automatically Save Projects. By default, Premiere Pro automatically saves your project every 15 minutes and retains the last five versions of the project file on the hard disk.

    You can revert to a previously saved version at any time. Archiving many iterations of a project consumes relatively little disk space because project files are much smaller than source video files. It’s best to save project files to the same drive as your application. Archived files are saved in the Premiere Pro Auto-Save folder.

  • Maximum Project Versions. Enter the number of versions of a project file you want to save. For example, if you type 10, Premiere Pro saves the ten most recent versions.

NOTE: When you specify auto-save to occur at regular intervals, Premiere Pro auto-saves a project on detecting changes to the project file. The auto-save occurs irrespective of whether you manually save the changes to the project or not. Earlier, Premiere Pro would not execute auto-save if you manually saved within the interval setting. If the system goes idle for a period beyond the interval setting, Premiere Pro forces an auto-save.

  • Save Backup Project To Creative Cloud. To let Premiere Pro auto-save your projects directly to your Creative Cloud-based storage, select this preference.

    When Premiere Pro auto-saves a project, a directory named “auto-save” is created in your Creative Cloud online storage. All the backed-up projects are stored in the “auto-save” directory.

    You can access your backed-up projects from the Files tab of your Creative Cloud desktop application.

  • Auto Save also saves the current project(s). When this setting is enabled, Auto Save creates an archived copy of your current projects, but also saves the current working project. This setting is off by default.

    Auto saved versions have a suffix with the date and time it was saved (yy-mm-dd-hh-mm-ss) appended to the project name (for example, ProjectName-2018-08-31_09-53-41.prproj).

    When an auto save occurs, Premiere Pro creates a new backup project file and adds it to the auto-save folder as an emergency project backup. This file is always the latest saved version of that project. Here are some of the characteristics of the emergency back project file:

    • The backup file has the same name as the project, it does not have any suffix.
    • Premiere Pro produces only one emergency backup file per project, and it is overwritten at each Auto Save interval and when you save the current project.

Please rate the helpfulness of this tip.

Click on a star to rate it!

… for Apple Final Cut Pro X

Tip #735: Select Your Fastest GPU

Larry Jordan – LarryJordan.com

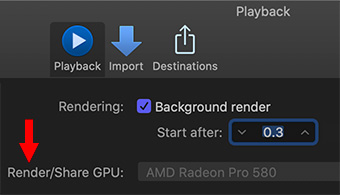
Use Preferences to select your fastest GPU.

The Preferences > Playback GPU option.

Topic $TipTopic

Starting with the FCP X 10.4.7 release, Final Cut now supports multiple GPUs and up to 28 CPU cores.

As part of the 10.4.7 release, FCP X received a new Metal engine for faster performance, along with internal/external GPU selection. Using preferences, you can now pick which GPU it uses for render and export.

To select a specific GPU, go to Preferences > Playback > Render/Share GPU.

NOTE: If you are running a MacBook Pro with an eGPU, be sure to select the eGPU in this menu to maximize the performance your system gets from that external device.


Please rate the helpfulness of this tip.

Click on a star to rate it!

… for Apple Final Cut Pro X

Tip #734: What is Tone-Mapping

Larry Jordan – LarryJordan.com

Tone-mapping preserves highlights when displaying HDR media on SDR displays.

HDR media not tone-mapped (bottom) and tone-mapped (top). Tone-mapping preserves highlights.

Topic $TipTopic

HDR (High Dynamic Range) media has grayscale values that far exceed what our computer monitors can display. (The Apple Pro XDR is a video monitor, not a computer monitor.)

As well, if we try using HDR media in a Rec. 709 HD project, the white levels are way past out of control.

NOTE: To convert HDR video to SDR video as part of a project, use the HDR Tools effect.

Tone-mapping solves this problem. This process automatically converts the vast grayscale range of HDR into the much more limited range of SDR (Standard Dynamic Range).

Final Cut Pro X does this using either a preference setting (Preferences > Playback) or a setting in the View menu at the top right corner of the Viewer.

This screen shot illustrates the difference. When tone-mapping is turned off (bottom of image) the highlights are blown out, with the detail lost; even though the image will look fine on an HDR monitor.

The top of the image is tone mapped to convert the highlights to fit within SDR specs. This means the image will look good on your computer monitor AND on an HDR monitor.


Please rate the helpfulness of this tip.

Click on a star to rate it!

… for Apple Final Cut Pro X

Tip #715: How to Reset FCP X to Fix Problems

Larry Jordan – LarryJordan.com

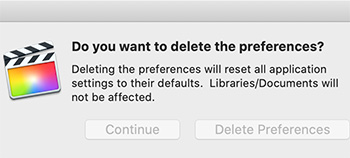
Deleting FCP X Preferences does a lot to fix problems.

The Delete Preferences window in Apple Final Cut Pro X.

Topic $TipTopic

Most of the time, Final Cut Pro X is a solid, reliable program. Until it isn’t. Fortunately, there’s one keyboard shortcut that fixes most problems by resetting Final Cut perferences to their factory default settings. Here’s how:

  • Quit the application.
  • Then, press and hold Shift + Cmd while restarting the application from the Dock.

When this window (screen shot) appears, click the blue Delete Preferences button.

WHAT THIS DOES

  • All preferences reset back to default settings.
  • The list of recently opened libraries is emptied. (HOWEVER, your libraries are NOT erased. You’ll find them stored at the location you specified when you first created them.

Final Cut preferences do a lot, much more than simply determine what the interface looks like. They are deeply embedded into the operation of the program, even if we can’t directly modify most of them.

SUMMARY

In the old days, with FCP 7, we needed to do this every couple of weeks. Now, you may only need to do this a few times a year. Still, when FCP X is acting up, restart your computer. If that doesn’t fix it, this keyboard shortcut probably will.


Please rate the helpfulness of this tip.

Click on a star to rate it!