… for Random Weirdness

Tip #740: 5 Affordable Fisheye Lenses

Larry Jordan – LarryJordan.com

Here are five affordable options for fisheye lenses.
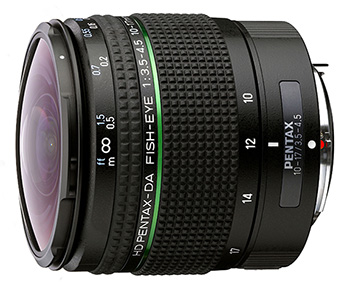
The Pentax 10-17mm F/3.5-4.5 (Image courtesy of Pentax.)

Topic $TipTopic

This article, written by Jourdan Aldredge, first appeared in PremiumBeat.com. This is an excerpt.

The fisheye look has been a go-to staple of cinema for ages. And while fisheye lenses can stylistically express both openness and containment, as well as distort perceptions of height, size, and importance, wide-angle lenses also have a very practical purpose. They’re great for filming in small, tight places.

Here are five affordable options.

  • Altura Photo 8mm F/3.0. The first option on our list is the Altura Photo 8mm F/3.0, which is one of the least-expensive fisheye lenses on the market. While wide-angle lenses are perhaps more popular in the photography world than in videography, lenses like the Altura Photo 8mm work great for both.
  • PENTAX 10-17mm F/3.5-4.5. A surprisingly affordable wide-angle zoom (and a great option for DSLR or mirrorless cameras), the PENTAX DA 10-17mm is actually an offshoot of the first fisheye zoom ever created. As a zoom, this PENTAX gives you solid coverage when navigating in tight spaces where you might need to tweak your framing and composition a bit.
  • Rokinon 8mm T3.8. Unlike the fisheye lenses above, the Rokinon RK8MV-C 8mm T3.8 Cine Fisheye Lens is tailor-made for film and video. This means better design quality for a videographer’s needs, with a focus on ease of use for aspects like focus pulling and smooth motion.
  • Samyang 12mm F/2.8. One of the best options for full-frame videographers, the Samyang Optics 12mm F/2.8 ED AS NCS Fisheye is a great manual focus lens, with flexibility for filming from both short and long distances. The Samyang 12mm is also one of the best low-light options for those really looking to cut the edge with some beautiful shallow-depth-of-field shots.
  • Tokina 10-17mm F/3.5-4.5. Another solid hybrid offering that’s on the higher end of our affordability chart, the Tokina AT-X 107 F/3.5-4.5 DX Fisheye (10-17mm) is a strong APS-C format wide-zoom for those looking to utilize the fisheye look with more options and control.

EXTRA CREDIT

The link at the top provides more tech specs and links for each of these lenses.


Please rate the helpfulness of this tip.

Click on a star to rate it!

… for Apple Motion

Tip #722: Apple Motion: The Move Behavior

Larry Jordan – LarryJordan.com

The Move behavior moves an element to or from a target.

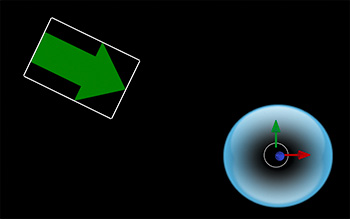
The green arrow is moving toward the target, which was placed inside the blue ball.

Topic $TipTopic

The Move behavior (Basic Motion > Move) moves a selected element to or from a target. This is a really easy way to create directed movement. Here’s how it works.

The Move behavior provides more control than a Throw, but less than a Motion Path.

  • Select a layer in the Layers panel.
  • Choose Behavior > Basic Motion > Move
  • Position the playhead at the start of the effect
  • Drag the element to its starting position
  • Drag the target (white circle) where you want the element to move

When you play the project, the selected object (green arrow, in my example) moves in a straight line to or from the target.

NOTE: You can’t add curves to the Move behavior.

EXTRA CREDIT

Select the Move behavior. In the Inspector, you can change the direction of the movement (To or From), as well as the acceleration.


Please rate the helpfulness of this tip.

Click on a star to rate it!

… for Apple Motion

Tip #721: Secrets of the Spin Behavior

Larry Jordan – LarryJordan.com

The Spin behavior can spin on any axis; you just need to know where to click.

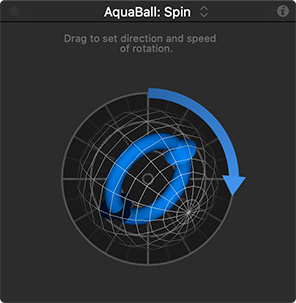
The Spin behavior rotating clock-wise around both the X and Y axes.

Topic $TipTopic

There’s a hidden feature in the Spin behavior that can add visual interest to your movement: Pseudo-3D. Here’s how it works.

When you apply the Spin behavior (Basic Motion > Spin) to an element, we are used to dragging the arrow at the top to get an object spinning.

The secret is the blue arrow at the center. This determines the axis around which the rotation (spin) takes place.

NOTE: This 3D movement works whether a group is set for 2D or 3D.

One of my favorite tricks is to spin an element on the Y-axis, which creates the illusion of spinning it back into 3D space.

EXTRA CREDIT

  • Press and hold the Shift key while dragging the top edge to constrain movement to the Y-axis.
  • Press and hold the Shift key while dragging the left edge to constrain movement to the X-axis.
  • To reset this effect, select it, then go to Inspector > Behaviors and click the Reset Parameter setting.

Please rate the helpfulness of this tip.

Click on a star to rate it!

… for Apple Motion

Tip #720: Motion Path vs. Throw

Larry Jordan – LarryJordan.com

Throw is straight-line movement. Motion Path offers more complexity.

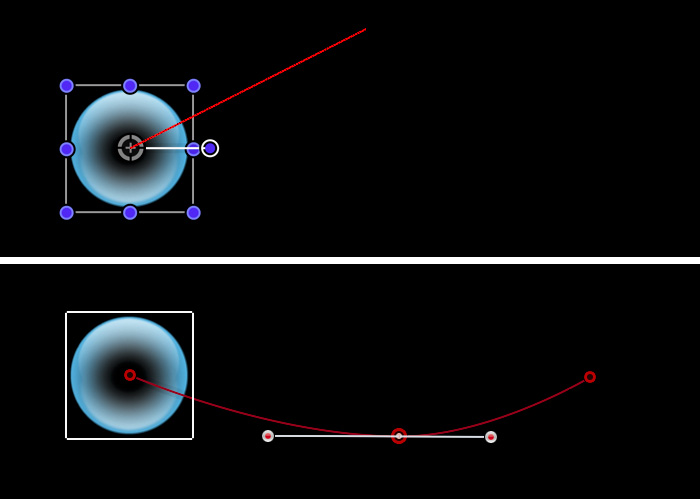
The Throw behavior, top, versus Motion Path, bottom.

Topic $TipTopic

Apple Motion has two behaviors that seem to do the same thing: Throw and Motion Path. What’s the difference?

The Throw behavior (Basic Motion > Throw) moves the selected object in a straight line, based upon settings in the HUD.

The Motion Path behavior (Basic Motion > Motion Path) provides a fixed starting point, a fixed ending point and the ability to add curves along the path.

NOTE: To add a curve to a Motion Path, double-click the red line, then adjust the two white curve controls.

As with all Motion effects, the speed of the effect is based upon its duration in the timeline (or mini-timeline).


Please rate the helpfulness of this tip.

Click on a star to rate it!

… for Visual Effects

Tip #728: Improve Landscapes with Gradients

Larry Jordan – LarryJordan.com

Apply the Overlay blend mode to a B&W gradient to add magic to exteriors.

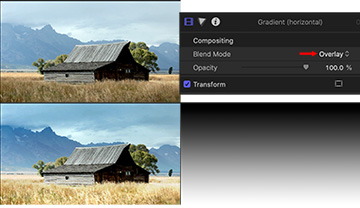
Clockwise from top left: Source, blend mode, gradient, finished image.

Topic $TipTopic

This trick was invented by Ansel Adams almost 100 years ago; when used with a lens, it’s called a “grad filter.” You can use it yourself to improve exterior shots. Here’s how.

  • Using Photoshop, or the NLE of your choice, create a smooth gradient the same frame size as your project, shading from black, at the top, to white, at the bottom.
  • Stack it on top of an image.
  • Apply the Overlay blend mode to the gradient.

Done.

NOTE: Vary the results by adjusting the width of the transition between the two colors, as well as rotating the angle of the transition.

Note how the darker portions of the gradient emphasize the texture and color of the clouds. While the lighter portions of the gradient highlight the foreground.

The overlay blend mode alters highlights and shadows, but not midtones, which is why the middle of the image looks the same in both shots.

This is a powerful effect that I use frequently.


Please rate the helpfulness of this tip.

Click on a star to rate it!

… for Codecs & Media

Tip #746: What is HDR Rec. 2020 PQ?

Larry Jordan – LarryJordan.com

PQ provides for the brightest images, even though technology today can’t fully support it.

The PQ inverse EOTF (electro-optical transfer function). I thought you’d like to see the math.

Topic $TipTopic

High-dynamic-range video (HDR video) describes video having a dynamic range greater than that of standard-dynamic-range video (SDR video). HDR capture and displays are capable of brighter whites and deeper blacks. To accommodate this, HDR encoding standards allow for a higher maximum luminance and use at least a 10-bit dynamic range in order to maintain precision across this extended range.

While technically “HDR” refers strictly to the ratio between the maximum and minimum luminance, the term “HDR video” is commonly understood to imply wide color gamut as well.

There are two ways we can display HDR material: HLG and PQ. (Tip #745 discusses HLG).

Perceptual Quantizer (PQ), published by SMPTE as SMPTE ST 2084, is a transfer function that allows for the display of high dynamic range (HDR) video with a luminance level of up to 10,000 cd/m2 and can be used with the Rec. 2020 color space.

NOTE: cd/m2 refers to “candela per meter squared.” One cd/m2 equals one IRE.

PQ is a non-linear electro-optical transfer function (EOTF). On April 18, 2016, the Ultra HD Forum announced industry guidelines for UHD Phase A, which uses Hybrid Log-Gamma (HLG) and PQ transfer functions with a bit depth of 10-bits and the Rec. 2020 color space. On July 6, 2016, the ITU announced Rec. 2100, which uses HLG or PQ as transfer functions with a Rec. 2020 color space.

The key takeaway here is that PQ supports extremely bright images, but in a format that is not compatible with anything else.


Please rate the helpfulness of this tip.

Click on a star to rate it!

… for Codecs & Media

Tip #745: What is HDR Rec. 2020 HLG

Larry Jordan – LarryJordan.com

HLG is compatible with both HDR and SDR broadcast and television sets.

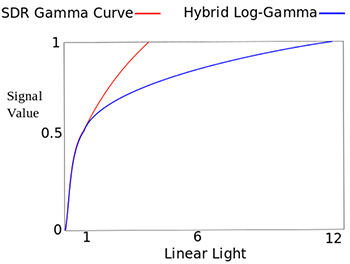
Chart showing a conventional SDR gamma curve and Hybrid Log-Gamma (HLG). HLG uses a logarithmic curve for the upper half of the signal values which allows for a larger dynamic range.

Topic $TipTopic

High-dynamic-range video (HDR video) describes video having a dynamic range greater than that of standard-dynamic-range video (SDR video). HDR capture and displays are capable of brighter whites and deeper blacks. To accommodate this, HDR encoding standards allow for a higher maximum luminance and use at least a 10-bit dynamic range in order to maintain precision across this extended range.

While technically “HDR” refers strictly to the ratio between the maximum and minimum luminance, the term “HDR video” is commonly understood to imply wide color gamut as well.

There are two ways we can display HDR material: HLG and PQ. (Tip #746 discusses PQ).

HLG (Hybrid Log Gamma) is a royalty-free HDR standard jointly developed by the BBC and NHK. HLG is designed to be better-suited for television broadcasting, where the metadata required for other HDR formats is not backward compatible with non-HDR displays, consumes additional bandwidth, and may also become out-of-sync or damaged in transmission.

HLG defines a non-linear optical-electro transfer function, in which the lower half of the signal values use a gamma curve and the upper half of the signal values use a logarithmic curve. In practice, the signal is interpreted as normal by standard-dynamic-range displays (albeit capable of displaying more detail in highlights), but HLG-compatible displays can correctly interpret the logarithmic portion of the signal curve to provide a wider dynamic range.

HLG is defined in ATSC 3.0, among others, and is supported by video services such as the BBC iPlayer, DirecTV, Freeview Play, and YouTube. HLG is supported by HDMI 2.0b, HEVC, VP9, and H.264/MPEG-4 AVC.


Please rate the helpfulness of this tip.

Click on a star to rate it!

… for Codecs & Media

Tip #744: What is Interlacing?

Larry Jordan – LarryJordan.com

Interlacing was needed due to limited bandwidth.

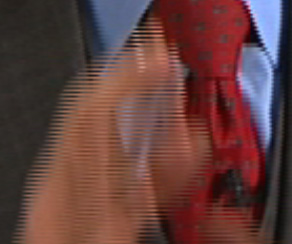
Interlace artifact – thin, dark, horizontal lines radiating off moving objects.

Topic $TipTopic

Even in today’s world of 4K and HDR, many HD productions still need to distribute interlaced footage. So, what is interlacing?

Interlacing is the process of time-shifting every other line of video so that the total bandwidth requirements for a video stream are, effectively, cut in half.

For example, in HD, first all the even numbered lines are displayed, then 1/2 the frame rate later, all the odd numbered lines are displayed. Each of these is called a “field.” The field rate is double the frame rate.

NOTE: HD is upper field first, DV (PAL or NTSC) is lower field first.

In the old days of NTSC and PAL this was done because the broadcast infrastructure couldn’t handle complete frames.

As broadcasters converted to HD at the end of the last century, they needed to make a choice; again due to limited bandwidth: They could either choose to broadcast a single 720 progressive frame, or an interlaced 1080 frame.

Some networks chose 720p because they were heavily into sports, which looks best in a progressive frame. Others chose interlaced, because their shows principally originated on film, which minimized interlaced artifact, which is illustrated in the screen shot.

As we move past HD into 4K, the bandwidth limitations fade away, which means that all frames are progressive.

EXTRA CREDIT

It is easy to shoot progressive and convert it to interlaced, with no significant loss in image quality. It is far harder to convert interlaced footage to progressive; and quality always suffers. Also, the web requires progressive media because interlacing looks terrible.

For this reason, it is best to shoot progressive, then convert to interlacing as needed for distribution.


Please rate the helpfulness of this tip.

Click on a star to rate it!

… for Adobe Premiere Pro CC

Tip #739: Premiere: No Support for FireWire DV Capture

Larry Jordan – LarryJordan.com

FireWire capture of DV media is no longer supported on Macs.

Topic $TipTopic

This tip first appeared on Adobe’s support page. While this won’t affect a lot of folks, it is still worth knowing.

Starting with macOS 10.15 Catalina, Premiere Pro, Audition, and Adobe Media Encoder no longer support the capture of DV and HDV over FireWire.

This change does not impact other forms of tape capture.
You can still edit DV/HDV files that have previously been captured.
DV/HDV capture is still available with Premiere Pro on Windows.

WORKAROUND

If you need access to DV/HDV ingest you can:

  • On macOS: Use Premiere Pro 12.x and 13.x on macOS 10.13.6 (High Sierra) or 10.14 (Mojave)
  • On Windows: Continue to use the latest versions of Premiere Pro with no impact.

Please rate the helpfulness of this tip.

Click on a star to rate it!

… for Adobe Premiere Pro CC

Tip #737: 5 Interesting Audio Preferences

Larry Jordan – LarryJordan.com

Not all of these are enabled. Check your preferences to be sure.

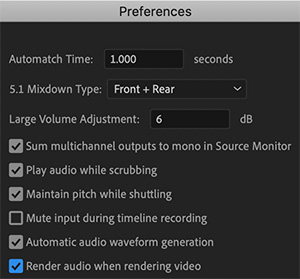
A detail of Preferences > Audio in Adobe Premiere Pro 2020.

Topic $TipTopic

The last time you looked at all the audio preference settings, you probably just wondered what these did and moved on. Well, let me explain five of the most interesting.

  1. Large Volume Adjustment. This preference lets you set the number of decibels to increase when using the Increase Clip Volume Many command.
  2. Play Audio While Scrubbing. Enables audio scrubbing. You can create a keyboard shortcut called “Toggle Audio During Scrubbing” to toggle audio scrubbing on or off while scrubbing. Using a keyboard shortcut is preferable to returning to the Preferences dialog box each time you want to turn audio scrubbing on or off.
  3. Maintain Pitch While Shuttling. Lets you maintain the audio pitch during scrubbing and playback while using the J,K,L keys. Selecting this preference helps improve the clarity of speech when playback is at a higher or slower than normal speed.
  4. Mute Input During Timeline Recording. To prevent monitoring of the audio inputs while recording the timeline, check this box.
  5. Render Audio When Rendering Video. To let Premiere Pro automatically renders audio previews whenever it renders video previews, select this preference.

Please rate the helpfulness of this tip.

Click on a star to rate it!