… for Random Weirdness

Tip #1099: The Challenge of Perfect vs. Good

Larry Jordan – LarryJordan.com

It doesn’t have to be perfect, it just needs to get the job done efficiently.

(Image courtesy of Pexels.com.)

Topic $TipTopic

My wife has a saying: “The perfect is the enemy of the good.” Nowhere is that more true than in technology; and it is driving us all nuts.

What this saying means is that we spend too much time looking for the perfect system, when a system that may be less than perfect is still more than adequate.

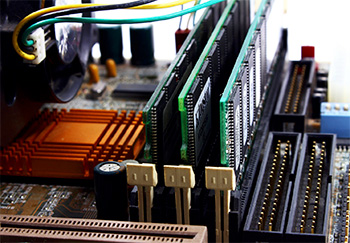
As an example, I’m in the process of upgrading my server for faster performance and greater capacity. However, last night, as I was exporting my weekly webinar, I measured how fast Final Cut creates a ProRes 4444 file: 85 MB/second. Even if I had storage that clocked in at NVMe speeds – 2500 MB/sec – my exports would not be any faster because FCP X can only calculate these files so fast.

1080p media needs less than 40 MB/second to edit, while 4K media needs less than 70 MB/sec. Storage that goes 300 MB/second will edit at the same speed as storage that goes 2500 MB/second.

I’m not saying faster storage is a bad idea, clearly, multicam editing, HDR or larger frame rates require more horsepower than simple HD. However, what I am saying is that we need to ask ourselves a bigger question: Where will extra speed actually help? For example, if I only edit one project a week, spending a lot of money improving export speed  is not meaningful compared to the time it takes to edit the project in the first place. Sadly, faster storage does not help me think any faster. I wish it did.

Another example was provided by Gloria. She owns a high-end 2019 Mac Pro. She’s worried that Thunderbolt 4, which hasn’t shipped yet, will make her system obsolete.

Well, first, ALL computers become obsolete at some point, but when it comes to performance, Thunderbolt 4 is the same as Thunderbolt 3, unless you are driving several very large external monitors. And, even when new gear is released, as it always is, all our current gear will still work exactly the same as it does now.

I get dozens of emails each week from editors happily editing on Mac Pro systems that are 10-12 years old. Clearly not state of the art, but fully capable of doing the work they need to get done – on time and on budget. I get even more emails from editors stressing over whether they need a 3.2 GHz CPU or 3.3 GHz.

My advice is stop trying for perfection – unless the search itself is something you enjoy. Instead find a system that meets your needs. Most of the time, good enough is also fast enough. And “future-proofing” is a fool’s errand.

Jan Frederickson, of WLS-TV, had a sign on her wall that I think about daily: “It’s better than perfect, it’s done.”

That is a reassuringly true statement.


Please rate the helpfulness of this tip.

Click on a star to rate it!

… for Apple Motion

Tip #1095: Playful, More Effective, Colors

Larry Jordan – LarryJordan.com

Texture and color variations improve almost every element. Gradients can help.

The gradient color options, with the results of this setting displayed below.

Topic $TipTopic

Coloring an element is something we do all the time. But, it is often much more interesting to color using gradients. Here’s how.

  • Select an element in the Layers panel. (White elements work best, but almot any color element can be used.
  • Apply Filters > Color > Gradient Colorize.
  • In Inspector > Filters > Gradient Colorize, select your own colors, or choose an existing style (menu at the top red arrow in screen shot).
  • Play with the lower controls and watch how they change the look of the gradient (lower red arrow in screen shot).

NOTE: If the colors in the original element interfere with the gradient, apply Filters > Color > Hue/Saturation, then remove all the saturation to convert the element to grayscale before applying the gradient.

EXTRA CREDIT

The only control missing from this effect is the ability to rotate the gradient so that it could flow from a different direction than simply the top.


Please rate the helpfulness of this tip.

Click on a star to rate it!

… for Apple Motion

Tip #1094: Secret Spinning

Larry Jordan – LarryJordan.com

Pressing the Shift key, while dragging, constrains the axis to 45° increments.

The Spin behavior with the inner circle constrained to a 45° angle.

Topic $TipTopic

Spin is a very popular Behavior that gets elements in a Motion project to spin! (I know, I know, who would have guessed…?)

What you may not know is that there is a hidden keyboard shortcut that helps you make the most of this move.

Dragging the outer circle determines the direction and speed of the spin. (For example, dragging a 90° arc means that the selected element will rotate 90° over the duration of the effect.)

Dragging the inner blue circle changes the axis of the spin.

Here’s the secret: Press the Shift key while dragging that inner circle to constrain the axis to 45° increments. This makes it very easy to rotate an element exclusively on, say, the Y axis.

I use this technique frequently, for example, when I want to apply perspective to text by rotating just on the Y axis.


Please rate the helpfulness of this tip.

Click on a star to rate it!

… for Apple Motion

Tip #1093: Audio is Motion’s Achilles Heel

Larry Jordan – LarryJordan.com

Always trim an audio clip to end one frame earlier than the end of a fade.

The HUD displaying the arrow to select effects applied to an element.

Topic $TipTopic

Audio is Motion’s Achilles heel. The audio controls in Motion are terrible. However, here’s a trick that can bail you out when you are in a hurry and need to add an audio clip that’s longer than your project.

Motion works best when you add a complete soundtrack, then edit to that, rather than trying to combine multiple audio elements. However, sometimes you need to add an audio fade to the end of a project. Except, every time you do, the audio either doesn’t fade or it fades then pops at the end. What’s going on?

The problem is that effects and audio are separate clips and, most often, their timing doesn’t match. Here’s what you need to do.

  1. Add an audio clip to your project
  2. Go to the Audio tab at the top of the Layers panel and select the audio clip. This displays it in the mini-timeline.
  3. Position the playhead where you want the audio to end and set an Out (type “O“).
  4. With the audio clip still selected, apply Behaviors > Audio > Audio Fade In / Fade Out.
  5. Display the HUD. If the fade controls are not displayed, click the small up/down arrow to the right of the HUD title (see screen shot) and select the effect.
  6. Adjust the duration of the fade out as needed.
  7. Finally, and this is the important step, make SURE the Out of the fade is one frame LONGER than the Out of the audio clip.

Modifying the timing of both the effect and the clip assures the fade will be heard, the audio will disappear and there will not be a pop at the end.


Please rate the helpfulness of this tip.

Click on a star to rate it!

… for Visual Effects

Tip #1108: Beginner’s Guide to DaVinci Resolve

Larry Jordan – LarryJordan.com

This is a thorough guide to learning Resolve.

(Image courtesy of Blackmagic Design.)

Topic $TipTopic

Earlier this year, Paul Saccone and Dion Scoppettolo co-authored the “Beginner’s Guide to DaVinci Resolve.” This PDF is geared for people who prefer to learn by reading, rather than watching.

Published just a few months ago, this covers all the key features of the software, including audio and effects, that you need to know to use Resolve effectively.

Paul was the Senior Director of Marketing at BMD until he left a couple of months ago to join Frame.io. Dion is a Senior Product Marketing consultant and still working with Blackmagic. Prior to Blackmagic, both Paul and Dion were part of Apple’s Final Cut Pro team.

Here’s the link to get your free copy.

EXTRA CREDIT

Even better, because this is a PDF, you can download it to study at your own pace without needing to be online.


Please rate the helpfulness of this tip.

Click on a star to rate it!

… for Visual Effects

Tip #1107: Boris FX Tutorials

Larry Jordan – LarryJordan.com

Dozens of tutorials covering all the Boris FX products.

Four of the tutorials on the Boris FX website.

Topic $TipTopic

I was exploring the Boris FX website and discovered a gold mine of video tutorials for 22 different host applications and spanning 23 categories, including:

  • Boris Continuum
  • Mocha Pro
  • Sapphire
  • Primatte
  • Particle Illusion
  • and more

Videos are organized by:

  • Category
  • Product
  • Feature
  • Host
  • Difficulty level

Here’s the link so you can explore on your own.


Please rate the helpfulness of this tip.

Click on a star to rate it!

… for Visual Effects

Tip #1106: Share Your Favorite Tutorials

Larry Jordan – LarryJordan.com

Share your favorite tutorial websites in the comments.

(Image courtesy of Pexels.com.)

Topic $TipTopic

With so many effects packages out there, and so many web sites providing tutorials, I’m curious about which tutorials or web sites you find the most helpful.

Share your favorites in the comment section below and I’ll highlight them in future Tip Letters.


Please rate the helpfulness of this tip.

Click on a star to rate it!

… for Codecs & Media

Tip #1105: What is Sharpening?

Larry Jordan – LarryJordan.com

Sharpening means enhancing the contrast of edges in an image.

Original file (left), blurred image, the subtracted image, the final result (right).

Topic $TipTopic

This article, written by Henry Guiness, first appeared in Photography.Tutsplus.com. This is a summary.

We have all heard the term “sharpening.” But what is it and how do we apply it? There are three main reasons to sharpen your image: to overcome blurring introduced by camera equipment, to draw attention to certain areas and to increase legibility.

Before I explain how to sharpen, we need to understand that sharpness is subjective.

Sharpness is a combination of two factors: resolution and acutance. Resolution is straightforward and not subjective. It’s just the size, in pixels, of the image file. All other factors equal, the higher the resolution of the image—the more pixels it has—the sharper it can be. Acutance is a little more complicated. It’s a subjective measure of the contrast at an edge. There’s no unit for acutance—you either think an edge has contrast or think it doesn’t. Edges that have more contrast appear to have a more defined edge to the human visual system.

Sharpening then, is a technique for increasing the apparent sharpness of an image. Once an image is captured, Photoshop can’t magically add more details: the actual resolution remains fixed. Yes, you can increase the file’s size but the algorithms any image editor uses to do so will decrease the sharpness of the details.

In the image in the screen shot, the author mimicked the Unsharp Mask effect in Photoshop. The first image is the original file, the second is a blurred copy, the third is the one subtracted from the other so as to detect the edges, and the fourth is the original image sharpened using the edge layer. Unsharp masking is the oldest sharpening technique. It subtracts a blurred (unsharp) copy from the original image to detect any edges. A mask is made with this edge detail. Contrast is then increased at the edges and the effect is applied to the original image. While unsharp masking was originally a film technique, it’s now the basis of digital sharpening.

The article continues with sharpening settings and illustrations of both good and bad sharpening, along with links to learn more.


Please rate the helpfulness of this tip.

Click on a star to rate it!

… for Codecs & Media

Tip #1104: Generate More Viewers on YouTube

Larry Jordan – LarryJordan.com

Simply uploading a video isn’t enough.

The Details section for each video in YouTube Studio for entering metadata.

Topic $TipTopic

I was reading a blog recently by Richard Tiland about posting videos to YouTube. In it, he wrote: “Uploading your video to YouTube isn’t enough. You need to include metadata so that the site understands what your video is all about.”

His points included:

  • Optimize the title with keywords. Keep it short, but searchable.
  • Add a detailed and accurate description. Length is less important here.
  • Include a transcript to help viewers take in your content without turning up the sound.
  • Organize content using playlists. This helps both viewers and YouTube’s search algorithms.
  • Create a cohesive look to improve branding. Make your videos look like they are coming from the same creative source.
  • Finally, don’t forget the Call to Action. This is the explicit behavior you want the audience to take after watching your video.

Metadata always seems intimidating somehow. But, really, all we are doing is enabling viewers to find our media faster and easier. And that is always a good thing.


Please rate the helpfulness of this tip.

Click on a star to rate it!

… for Codecs & Media

Tip #1102: What is a Render File?

Larry Jordan – LarryJordan.com

A render file is a media file calculated based on the effects applied to a source clip.

(Image courtesy of Pexels.com.)

Topic $TipTopic

Since all NLEs are non-destructive editors (leaving original media intact), render files are created when you alter an original clip, create a clip via a generator or use a still image in the Timeline. Those alterations need to be turned into media. That process is called “rendering.”

Essentially render files are new media files that match your project/sequence settings that your NLE uses instead of the original clips. They effectively ‘replace’ the original media and the NLE will refer to them instead of the original media once they’ve been rendered.

If you make additional changes to a rendered clip, the NLE will delete the old render file and it will be replaced by a new render file.

Generally, render files are retained by the NLE if you delete a clip from the timeline, which saves time in case you put it back in.

To pick up storage space, you can delete render files. If that file is needed again, the NLE will re-render it.

Once a project is complete, render files can be deleted. If they are needed in the future, the NLE will re-render them, as well.


Please rate the helpfulness of this tip.

Click on a star to rate it!